Conversion Linker — What It Is and How and When to Set It Up via GTM
Conversion Linker is a utility tag in Google Tag Manager that stores traffic advertising parameters (like gclid from Google Ads) in the browser’s first-party cookies. This allows Google Ads, GA4, and Floodlight to see conversions even when a user consents to the cookie banner after the initial hit or navigates between pages.
In this guide, we’ll cover what Conversion Linker is, when you don’t need to install it, in which cases it’s mandatory, and how to set up Conversion Linker via GTM step-by-step — with verification using Tag Assistant and DevTools.
What is Conversion Linker in Simple Terms
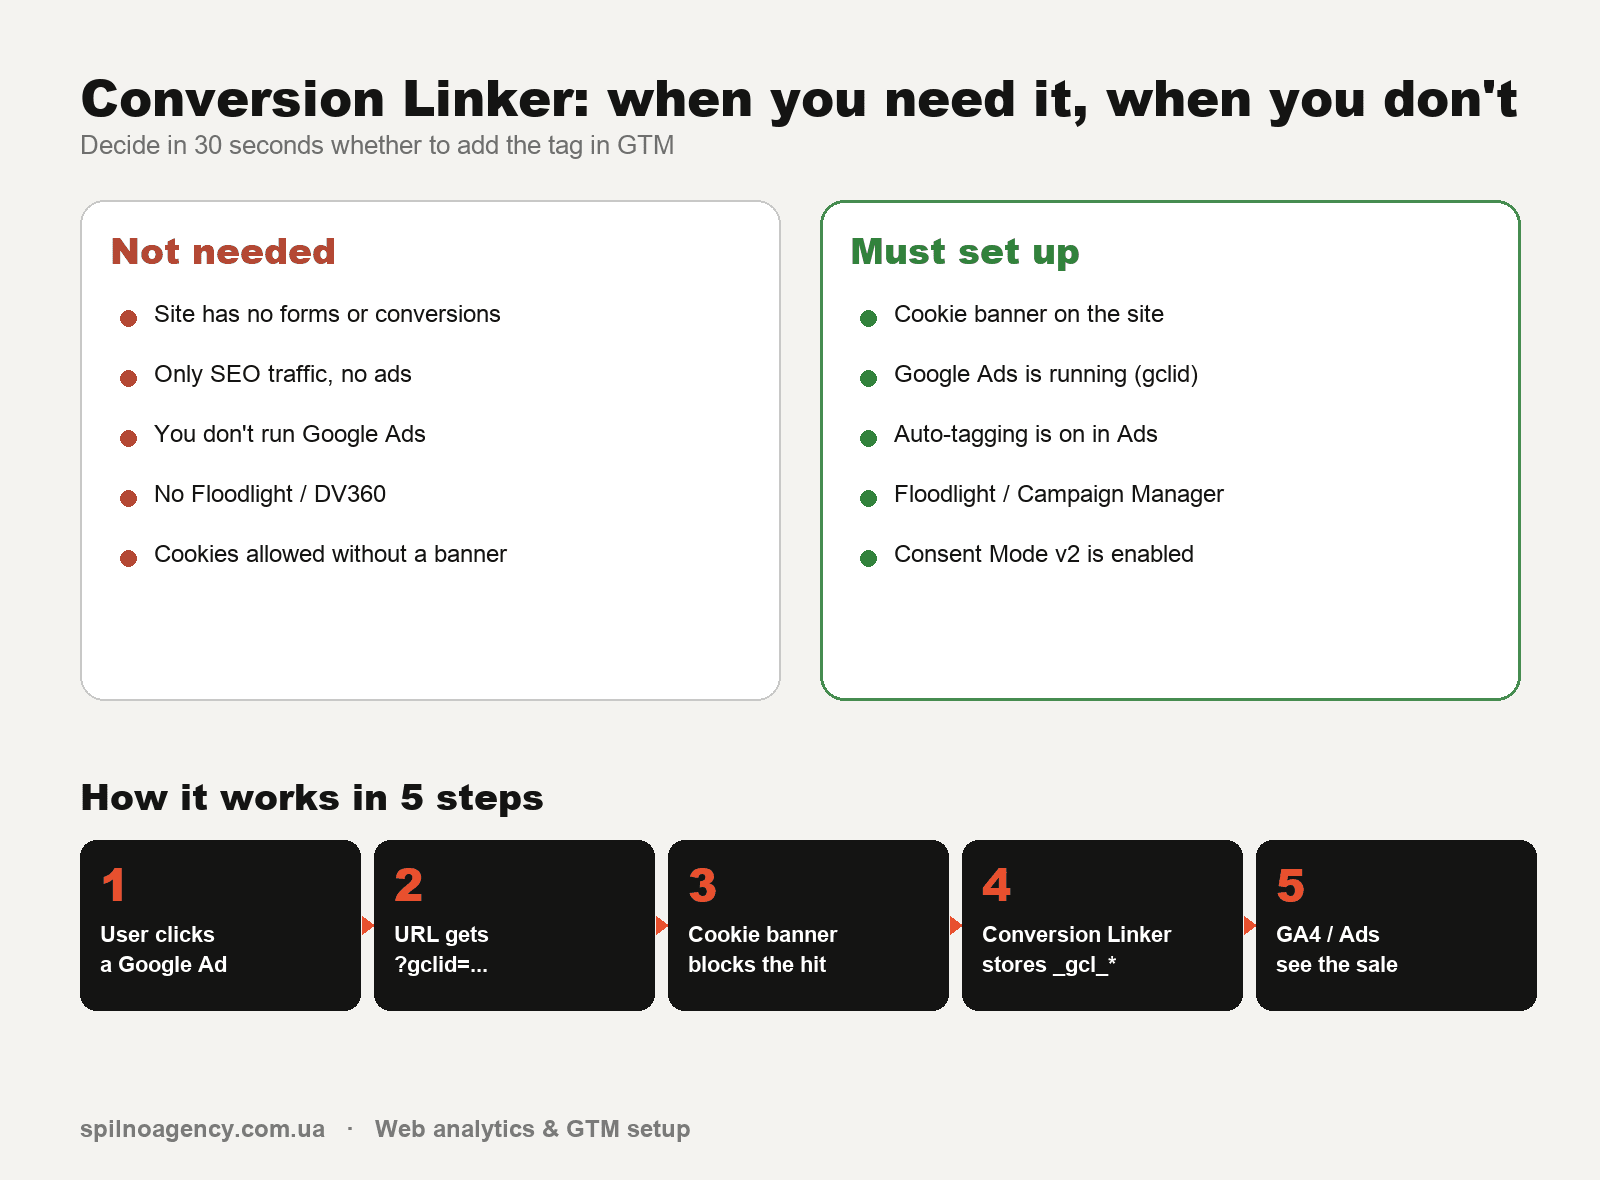
When a user clicks on a Google Ads ad, a parameter like ?gclid=... (or ?gbraid or ?wbraid in YouTube/DV360) is appended to the URL. This identifier is needed by Google Ads to link the ad click to a website conversion; otherwise, the system won’t know which campaign generated the sale.
The problem is that gclid only lives in the address bar. If a user:
- navigates to another page (the parameter disappears from the URL),
- doesn’t consent to cookies immediately (Consent Mode v2 blocks Ads requests until consent is given),
- lands on a page via an intermediate domain (payment form, chatbot, AMP),
— Google Ads will lose the connection between the click and the conversion, and attribution will break. Conversion Linker captures gclid in first-party cookies (_gcl_au, _gcl_aw, _gac_*, FPGCLAW) immediately upon page load, so when the user finally converts, the identifier is already saved.
Why Conversion Linker is Sometimes Not Needed
This tag isn’t useful for all websites. Here are cases where you can skip it without breaking anything:
- The website has no conversions at all. It’s purely an informational blog or a business card site without forms, calls, a shopping cart, or purchases. You’re not using Google Ads — there’s nothing to link.
- You are not running Google Ads / Floodlight / Campaign Manager 360. Conversion Linker works exclusively with Google’s advertising platforms. It’s not needed for Meta Ads, TikTok Ads, or Pinterest — they have their own first-party cookie logic (
_fbp,_ttp). - Auto-tagging is disabled in Google Ads. If you’ve consciously turned off auto-tagging and are only using manual UTMs, the
gclidparameter simply won’t be in the URL, and there’s nothing to capture. - The website has no cookie banner, and all cookies are allowed by default. In this scenario, GA4 and Google Ads tags already have access to cookies on the first hit — Conversion Linker doesn’t change anything.
- You’ve disabled GA4/Ads tags via Consent Mode without Conversion Linker. This is an anti-pattern — but if done intentionally, adding the tag won’t fix anything until Consent Mode is configured.
The simpler rule is: if Tag Assistant shows that gclid is present in the URL, but GA4/Ads aren’t saving it — Conversion Linker is needed. If gclid doesn’t appear at all, check auto-tagging first.
When Conversion Linker is Mandatory
This is a mandatory setup checklist. If even one point applies to you, you need to install the tag:
- Running Google Ads campaigns with auto-tagging enabled (enabled by default).
- The website has a cookie banner (Cookiebot, OneTrust, CookieYes, Iubenda, Complianz, etc.) that blocks tags until the user gives consent.
- You are using Consent Mode v2 — without Conversion Linker, it cannot correctly attribute conversions after consent is given.
- Floodlight / Campaign Manager 360 / Display & Video 360 — these tags rely on cookies set specifically by Conversion Linker.
- Multi-domain user journey: landing page + checkout on a different domain, an online chat widget, a separate domain for payments. Conversion Linker saves
gclidin the domain’s first-party cookie and helps prevent attribution loss (especially when combined with cross-domain tracking). - YouTube / DV360 ads — these use
gbraidandwbraidinstead of gclid. Conversion Linker saves these as well. - A “thank you” page that the user lands on after being redirected from a payment system —
gclidwon’t reach it if the tag hasn’t captured it earlier.
In all these scenarios, the absence of Conversion Linker means under-attributed conversions in Google Ads: some conversions will be mistakenly attributed to direct/organic traffic, and you’ll think your ads aren’t working.
How to Set Up Conversion Linker via Google Tag Manager: Step-by-Step Guide
Setup takes 3–5 minutes. We’ll do everything within the Google Tag Manager interface — no code on the website.
Step 1. Open Your GTM Container
Go to tagmanager.google.com, select the correct account and container for your website. Navigate to Workspace → Tags.
Step 2. Create a New Tag
- Click New in the top right corner.
- In the name field, enter a clear name:
Conversion LinkerorCL — All Pages. - Click in the Tag Configuration area.
- From the template gallery, select Conversion Linker (under the Google category, with a chain icon).
Step 3. Configure Tag Settings
In most cases, you don’t need to change anything — the default settings are sufficient. If your website uses subdomains or a separate domain for checkout (e.g., shop.example.com + pay.example.com), enable:
- Enable linking across domains — for cross-domain tracking.
- Cookie domain:
auto(default) — to ensure cookies are set at the top-level domain. - URL position:
Query parameter(default).
Only enable the advanced options Accept incoming linker and Decorate forms if you have a clear cross-domain scenario involving forms on another domain.
Step 4. Add the All Pages Trigger
- Click in the Triggering area.
- Select the default trigger All Pages (type: Page View).
- Save the tag — click the Save button in the top right corner.
Conversion Linker should fire on every page of the website because a user might arrive with a gclid not just on the homepage.
Step 5. Set Firing Priority (Important for Consent Mode)
If you’re using Consent Mode v2 or have a cookie banner, set a priority for the tag so it fires before GA4 and Ads tags:
- Expand Advanced Settings → Tag firing priority.
- Enter a value of
10(or higher than the priority of your Ads/GA4 tags).
Step 6. Test with Preview Mode
- Click Preview in GTM — Tag Assistant will open.
- Enter your website’s URL with a test parameter:
https://example.com/?gclid=TEST123. - On the Tags Fired tab, you should see Conversion Linker.
- In your browser’s DevTools → Application → Cookies, verify that
_gcl_awand_gcl_auhave appeared.
Step 7. Publish the Container
Go back to your GTM Workspace, click Submit → Publish. Add a version description: “Added Conversion Linker — All Pages”. That’s it, the tag is live.
How to Verify Conversion Linker is Working Correctly
A quick 2-minute audit:
- Open your site in Incognito mode with the URL
?gclid=TEST_VALUE. - In DevTools → Application → Cookies, check that under your domain, you see
_gcl_awwith a value similar to1.1234567.TEST_VALUE. - Navigate to another page on the site — the cookie should remain.
- Click “Accept” on the cookie banner (if present). Conversion Linker has already saved
gclidbefore consent was given. - In Google Tag Assistant (Chrome extension), check that the Conversion Linker tag is in the Fired status.
Common Mistakes When Setting Up Conversion Linker
- Trigger is not All Pages. If the tag is only attached to the homepage, conversions on internal pages with direct traffic are lost.
- Conversion Linker is blocked by the cookie banner. The tag should not depend on consent — it only writes first-party cookies for your domain. Move it to the strictly necessary category.
- Cross-domain is not enabled, but the user navigates to a checkout domain. Cookies are not passed between domains — attribution breaks. Enable Enable linking across domains.
- Priority is lower than GA4/Ads tags. Conversion Linker must fire first*; otherwise, with Consent Mode v2, GA4 won’t receive the saved gclid.
Conversion Linker and Consent Mode v2: How They Are Related
Consent Mode v2 is Google’s system for managing advertising tags under user consent conditions. Without Conversion Linker, Consent Mode cannot reconstruct conversions: when a user denies cookies, then changes their mind and gives consent, Google loses the session context.
Conversion Linker saves the raw gclid in a cookie before consent is given (this is allowed because it’s a necessary functional cookie without PII). After consent, Ads/GA4 tags read it and correctly attribute the conversion.
If you are setting up Google Analytics 4 with ad import or Google Ads with a cookie banner, Conversion Linker is an essential part of the basic configuration.
FAQ
Does Conversion Linker replace GA4 or Google Ads tags?
No. Conversion Linker is a utility tag. It doesn’t send hits or measure conversions; it only stores advertising parameters in cookies so that other tags (GA4, Google Ads Conversion Tracking, Floodlight) can correctly attribute conversions.
Is Conversion Linker needed for Meta Ads or TikTok Ads?
No. Meta Ads has its own pixel and first-party cookies _fbp + _fbc. TikTok uses _ttp. Conversion Linker works only with the Google ecosystem (Ads, Floodlight, DV360, CM360).
Is it safe to install Conversion Linker before cookie consent?
Yes. It only records advertising parameters from the URL into your domain’s first-party cookie — without PII. In most CMPs (Cookiebot, OneTrust), Conversion Linker is categorized as strictly necessary by default.
What to do if Conversion Linker isn’t writing cookies?
Check: 1) the GTM container is published (not just saved); 2) the trigger is All Pages; 3) the URL actually contains gclid; 4) the GTM snippet is installed on the site, not just gtag.js; 5) the browser isn’t blocking third-party cookies (this shouldn’t affect first-party ones, but some ad-blockers interfere with them too).
Conversion Linker or gtag.js — Which to Choose?
If you’re using GTM — use Conversion Linker as a tag in GTM. If you’re implementing Google Ads/GA4 directly via gtag.js — the Conversion Linker functionality is already built into gtag.js by default and doesn’t need separate activation.
Conclusion
Conversion Linker is an invisible but critical part of the GTM stack for any website using Google Ads and a cookie banner. It takes 3 minutes to set up and saves 10–30% of conversions from attribution loss — especially when used with Consent Mode v2.
If your website has at least one form + Google Ads + a cookie banner — set it up today. If you don’t have Google Ads or conversions, skip it without regret.
Need help with a GTM or GA4 audit, or setting up end-to-end analytics? The Spilno Agency team provides turnkey web analytics setup — contact us, and we’ll review your conversion attribution within 1 business day.
Read also
Telegram Advertising: What It Is and Which Ad Formats Exist in 2026
Telegram advertising in 2026 splits into six independent formats: the official Telegram Ads Platform, direct channel post buys,…
Google Ads Audit for E-commerce: What It Should Look Like in 2026
A Google Ads audit for an online store is not a check of CTR and campaign settings. It…
Looking for Partners: We Share Leads, Pay Commission, Exchange Links
Spilno Agency is looking for partners — web developers, independent marketers, and complementary agencies. We share leads, pay…