Meta Conversions API (CAPI): What It Is and How to Set It Up


What Is Meta Conversions API
Meta Conversions API (also known as CAPI or Facebook Conversions API) is a server-to-server data channel between your website and the Meta Ads platform. Unlike Meta Pixel, which runs in the user’s browser, CAPI sends conversion events directly from your web server to Meta’s servers via a secure HTTPS request.
The official name is Meta Conversions API. Before Meta’s 2021 rebranding, it was called Facebook Conversions API or Facebook CAPI. Both names are still widely used in the industry and refer to exactly the same tool.
How it works: instead of the visitor’s browser sending data to Facebook (as the Pixel does), your server independently sends a structured JSON request with event data — a purchase, registration, or lead form submission — directly to Meta’s Graph API. The browser is not involved in this process.
Why Meta CAPI Exists: The Data Loss Problem
Since 2021, advertisers have faced a significant attribution challenge. There are several reasons:
- iOS 14.5+ and ATT framework. Apple required all iOS apps to request user permission for tracking. The majority of users decline — and Meta Pixel stops seeing their conversions. iOS users account for 40–60% of mobile traffic in most European markets.
- Ad blockers and privacy extensions. uBlock Origin, Privacy Badger, DuckDuckGo browser — these tools block Pixel’s JavaScript requests before it even loads. Ad blocker usage across Europe exceeds 30–40%.
- Third-party cookie restrictions. Chrome is phasing out third-party cookies. Safari and Firefox have already restricted them. Without cookies, click-based attribution degrades significantly.
- Browser content blockers. Brave, Firefox Enhanced Tracking Protection, and others aggressively filter requests to known advertising domains — including
connect.facebook.net.
The result: according to Meta’s own data and independent research, Meta Pixel alone without CAPI captures on average only 60–70% of actual conversions. The remaining 30–40% simply disappear — you spend budget, but the algorithm doesn’t see results and optimises campaigns incorrectly.
Conversions API solves this problem fundamentally: since the request comes from your server, not the browser, no ad blocker, iOS restriction, or browser rule can block it.
CAPI vs Meta Pixel: Key Differences
CAPI is not a replacement for Meta Pixel — it’s a complement. These two tools solve different problems and work best together.

| Parameter | Meta Pixel (browser-side) | Meta Conversions API (server-side) |
|---|---|---|
| Where it runs | User’s browser | Your server |
| Blocked by AdBlock / uBlock | ❌ Yes (~25–35% of traffic) | ✅ No |
| iOS 14.5+ App Tracking Transparency | ⚠️ Partially limited | ✅ No impact |
| Safari ITP (cookie deletion) | ❌ Cookies live ≤24 h | ✅ No cookie dependency |
| Real measurement accuracy | ⚠️ 60–70% of conversions | ✅ 90–98% of conversions |
| Offline conversions (CRM, POS, calls) | ❌ No | ✅ Yes |
| Behavioural data (scroll, clicks, time) | ✅ Yes | ⚠️ Limited |
| Hashed PII (email, phone) | ⚠️ Limited | ✅ Yes (SHA-256) |
| Signal strength for Meta algorithm | ⚠️ Weaker | ✅ Stronger |
| GDPR / e-Privacy compliance | ⚠️ More complex | ✅ Better (data stays on server) |
| Setup complexity | ✅ Simple (1 snippet) | ⚠️ Medium–High |
| Deduplication when used together | ✅ Both require event_id | |
Why Meta Pixel Loses Data
Browser-side Pixel runs inside the browser window — which means it depends on factors you can’t control:
- AdBlock / uBlock Origin block requests to
facebook.comandconnect.facebook.net. According to GlobalWebIndex, ~27% of desktop users in Europe use ad blockers — rising to over 40% among tech-savvy audiences. - iOS 14.5+ App Tracking Transparency (ATT): when a user taps “Ask App Not to Track”, the Pixel in Safari loses the IDFA identifier. In 2024, ~62% of iOS users opt out of tracking in Meta apps.
- Safari ITP (Intelligent Tracking Prevention): even when the Pixel fires, Safari deletes the
_fbpcookie after 24 hours. A conversion made the next day is no longer attributed by Meta.
The combined effect: one in three or four buyers is invisible to Meta Pixel. The algorithm trains on incomplete data — and ends up showing your ads to the wrong people, pushing up CPA and pulling down ROAS.
What CAPI Solves — and Where It Falls Short
Conversions API sends events directly from your server to Meta — no browser, no cookies, no ad blockers. But CAPI has its own limitations:
- ✅ Recovers “lost” conversions — purchases from iOS users and those using ad blockers.
- ✅ Sends offline data — CRM deals, phone calls via VoIP, POS terminal payments.
- ✅ Sends hashed PII (email, phone, name) — Meta matches these against its database and finds the customer without a cookie.
- ❌ Doesn’t capture on-page behaviour — scroll, clicks, and time-on-site remain with Pixel.
- ❌ Doesn’t fully replace Pixel — without browser-side events, Meta loses the behavioural context needed for micro-conversions and retargeting.
When to Use Which
| Situation | Recommendation |
|---|---|
| Blog / content site, no purchases | Pixel only |
| E-commerce or Lead Generation | Pixel + CAPI |
| High iOS audience (mobile e-commerce) | Pixel + CAPI (mandatory) |
| Offline sales, CRM integration | CAPI only or CAPI + Pixel |
| B2B, long sales cycle | CAPI to send CRM pipeline stages |
The golden rule: run Pixel + CAPI simultaneously. Pixel captures behavioural signals (clicks, scroll, micro-conversions) while CAPI handles final conversions (purchases, leads). Together they give Meta the complete signal it needs to train its algorithm — resulting in a lower CPA and better ROAS.
How Meta Conversions API Sends Data
Technically, CAPI is a POST request to Meta’s Graph API. Here’s a simplified example of a Purchase event:
POST https://graph.facebook.com/v19.0/{PIXEL_ID}/events?access_token={TOKEN}

{
  "data": [{
    "event_name": "Purchase",
    "event_time": 1716900000,
    "event_id": "order_12345",
    "action_source": "website",
    "event_source_url": "https://yoursite.com/checkout/success",
    "user_data": {
      "em": ["a665a45920422f9d417e4867efdc4fb8a04a1f3fff1fa07e998e86f7f7a27ae3"],
      "ph": ["1234567890abcdef..."],
      "client_ip_address": "203.0.113.1",
      "client_user_agent": "Mozilla/5.0..."
    },
    "custom_data": {
      "value": 89.99,
      "currency": "EUR",
      "order_id": "12345"
    }
  }]
}
Key details to note:
- PII hashing. Personal data (email, phone) is sent as SHA-256 hashes, never as plain text. This is required by GDPR and Meta’s policies.
- event_id for deduplication. If you’re sending the same event via both Pixel and CAPI, use the same
event_idso Meta doesn’t count it twice. - action_source. Specifies where the event originated:
website,app,email,phone_call, etc. - Access Token. Each request is authenticated via a System User Access Token generated in Business Manager.
3 Ways to Set Up Meta Conversions API
Meta offers several approaches depending on your technical capabilities and platform:

Method 1: Partner Integration (No Code)
The simplest option — connect CAPI through a ready-made integration in Events Manager. Meta has official partnerships with dozens of platforms:
- WooCommerce — Facebook for WooCommerce plugin automatically sends events via CAPI
- Shopify — native integration in Shopify Admin → Sales Channels → Facebook
- Magento / Adobe Commerce — official Meta Business Extension plugin
- BigCommerce, PrestaShop, OpenCart — via Meta Business Extension
- Wix, Squarespace — via built-in marketing integrations
Steps to connect via Events Manager:
- Open Meta Events Manager → select your pixel.
- Go to the Settings tab → Conversions API section.
- Click Connect a partner.
- Choose your platform (e.g., WooCommerce) and follow the instructions.
- Authorise the connection and specify which events to send.
- Verify the setup in the Test Events section.
Method 2: Via Google Tag Manager (GTM)
If your site uses GTM, you can set up CAPI through a dedicated Meta tag without writing any server-side code. This requires Server-Side GTM — a separate Google Cloud container that acts as a server proxy.
- Set up a Server-Side GTM container (Google Cloud Run or App Engine).
- In the server container, add a Facebook Conversions API tag (official from Meta or third-party, e.g., Stape.io).
- Configure triggers — which events to forward (Purchase, Lead, ViewContent, etc.).
- Enter your Pixel ID and Access Token.
- Add
event_id— identical for both Pixel and CAPI to avoid duplicates. - Publish the container and verify in Meta Events Manager → Test Events.
GTM approach advantages: no backend developer needed, logic can be updated quickly through the GTM interface, easily scalable to other platforms. Disadvantage: Server-Side GTM requires Google Cloud hosting (~$5–20/month).
Method 3: Direct Server-Side Integration (Code)
The most flexible option — implement CAPI directly in your backend. Meta provides official SDKs for Python, PHP, Node.js, Ruby, and Java.
PHP example (WordPress/WooCommerce):
// On successful WooCommerce order payment
add_action('woocommerce_payment_complete', function($order_id) {
    $order = wc_get_order($order_id);

    $payload = [
        'data' => [[
            'event_name'       => 'Purchase',
            'event_time'       => time(),
            'event_id'         => 'wc_order_' . $order_id,
            'action_source'    => 'website',
            'event_source_url' => home_url('/checkout/order-received/'),
            'user_data'        => [
                'em' => [hash('sha256', strtolower(trim($order->get_billing_email())))],
                'ph' => [hash('sha256', preg_replace('/D/', '', $order->get_billing_phone()))],
            ],
            'custom_data' => [
                'value'    => (float) $order->get_total(),
                'currency' => get_woocommerce_currency(),
                'order_id' => strval($order_id),
            ],
        ]]
    ];

    wp_remote_post(
        'https://graph.facebook.com/v19.0/YOUR_PIXEL_ID/events?access_token=YOUR_TOKEN',
        ['body' => json_encode($payload), 'headers' => ['Content-Type' => 'application/json']]
    );
});
Deduplication: Avoiding Double Counting
When Pixel and CAPI run simultaneously — both the browser and the server send a Purchase event for the same order. Without deduplication, Meta will count this as 2 conversions instead of 1, distorting your reporting and harming optimisation.
The solution is the event_id field. The principle is simple:
- Generate a unique
event_idfor each event (e.g.,purchase_12345or a UUID). - Pass the same
event_idin the browser Pixel code:
fbq('track', 'Purchase', {value: 89.99, currency: 'EUR'}, {eventID: 'purchase_12345'});- Pass the same
event_idin the CAPI server request (theevent_idfield in JSON). - Meta will automatically identify the duplicate and count the event only once.
Deduplication window: Meta compares events within a 48-hour window. If two requests share the same event_id, the same event_name, and are sent within 48 hours of each other — only one is counted.
Which Events to Send via CAPI
Meta CAPI supports all standard Pixel events and Custom Events. Priority events for CAPI transmission:

| Event | Event Code | When to Send | Priority |
|---|---|---|---|
| Purchase | Purchase | After successful payment | Critical |
| Lead / Form Submission | Lead | After form submission | Critical |
| Registration | CompleteRegistration | After email confirmation | High |
| Add to Cart | AddToCart | When product is added | Medium |
| Checkout Started | InitiateCheckout | When checkout page opens | Medium |
| Content View | ViewContent | On product page load | Low |
| Search | Search | When search query is performed | Low |
Spilno Agency recommendation: always send Purchase and Lead via CAPI — these are the conversions that train the algorithm. Other events can remain in Pixel only.
How to Get an Access Token for CAPI
- Log in to Meta Business Suite → Business Settings.
- Go to System Users → click Add.
- Create a System User with Admin role.
- Click Generate New Token, select the relevant ad account.
- In permissions, enable:
ads_management,business_management. - Save the token — it will only be shown once.
How to Verify Meta CAPI Is Working
- Open Meta Events Manager → your pixel → Test Events tab.
- Copy the test code (
TEST12345) and add it to CAPI requests as thetest_event_codeparameter. - Perform a test purchase or trigger an event on your site.
- In the Test Events section, you’ll see received events in real time.
- Check the Activity section — it shows data quality and completeness.
- Pay attention to Event Match Quality (EMQ) — target a score of 6–10. The more user data you pass (email + phone + IP), the higher the EMQ.
Common CAPI Setup Mistakes
- No deduplication. Running Pixel and CAPI without
event_id— Meta counts duplicates and ROAS appears inflated. - Delayed sending. Sending the CAPI event hours after the actual conversion. The
event_timefield must reflect the actual time of the event (not the time of sending). - Incorrect hashing. Email must be lowercased and trimmed BEFORE hashing:
hashlib.sha256(email.lower().strip().encode()). - Missing
action_source. This is a required field. For website events — use"website". - CAPI only without Pixel. Some behavioural data (ViewContent, AddToCart) is better tracked by Pixel. The optimal strategy is both channels.
Frequently Asked Questions about Meta Conversions API
Is Meta Pixel required for CAPI to work?
No, technically CAPI can work independently. However, Meta recommends using both tools together: Pixel for behavioural data in the browser, CAPI for final conversions on the server. Together they provide the most complete coverage for European advertisers.
Is CAPI GDPR-compliant?
CAPI is inherently more privacy-friendly than Pixel since it doesn’t use browser cookies. However, the responsibility for obtaining user consent (Consent Mode) remains with you. Before sending data via CAPI, ensure you have a legal basis (consent or legitimate interest) for processing personal data under GDPR.
How long does CAPI setup take?
It depends on the method: partner integration (WooCommerce, Shopify) — 30 minutes to 2 hours. Server-Side GTM — 4 to 8 hours (requires Google Cloud setup). Direct server-side integration — 1 to 3 days depending on backend complexity.
What is Event Match Quality (EMQ)?
Event Match Quality (EMQ) is a score from 0 to 10 in Meta Events Manager that measures how well your server events match Facebook user profiles. Higher EMQ = better attribution = more accurate optimisation. To achieve EMQ 7+, pass: email (hashed), phone (hashed), IP address, User Agent, fbp/fbc cookies.
Can CAPI send offline conversions?
Yes. CAPI supports the action_source: "physical_store" field and other offline sources. This allows you to pass data from CRM systems, point-of-sale, or call centres — and attribute offline sales to online advertising campaigns.
Conclusion
Meta Conversions API is no longer optional — it’s essential for any European business seriously investing in Facebook and Instagram advertising. With iOS 14.5+, ad blockers, and cookie restrictions, Pixel alone loses 30–40% of conversion data — which directly undermines campaign optimisation.
The recommended approach: run Pixel + CAPI simultaneously, always configure deduplication via event_id, and monitor Event Match Quality. If you’re just getting started — use partner integration via Events Manager. For maximum control — Server-Side GTM or direct server integration.
Have questions about setting up Meta CAPI for your project? Contact Spilno Agency — we’ll configure server-side tracking and recover your lost conversion data.
Step-by-Step: Setting Up Meta CAPI via Server-Side GTM
Step 1: Open Events Manager and select your dataset

Go to Meta Events Manager and open the dataset you want to connect CAPI to. If you don’t have one yet, click ‘Connect data’ to create a new dataset.
Step 2: Connect ad accounts to the dataset

Select the ad accounts that should have access to this dataset. This is usually your main Meta Ads account.
Step 3: Click ‘Connect data’

From the Events Manager overview screen, click the ‘Connect data’ button to start the data source connection process.
Step 4: Select ‘Internet’ as your data source
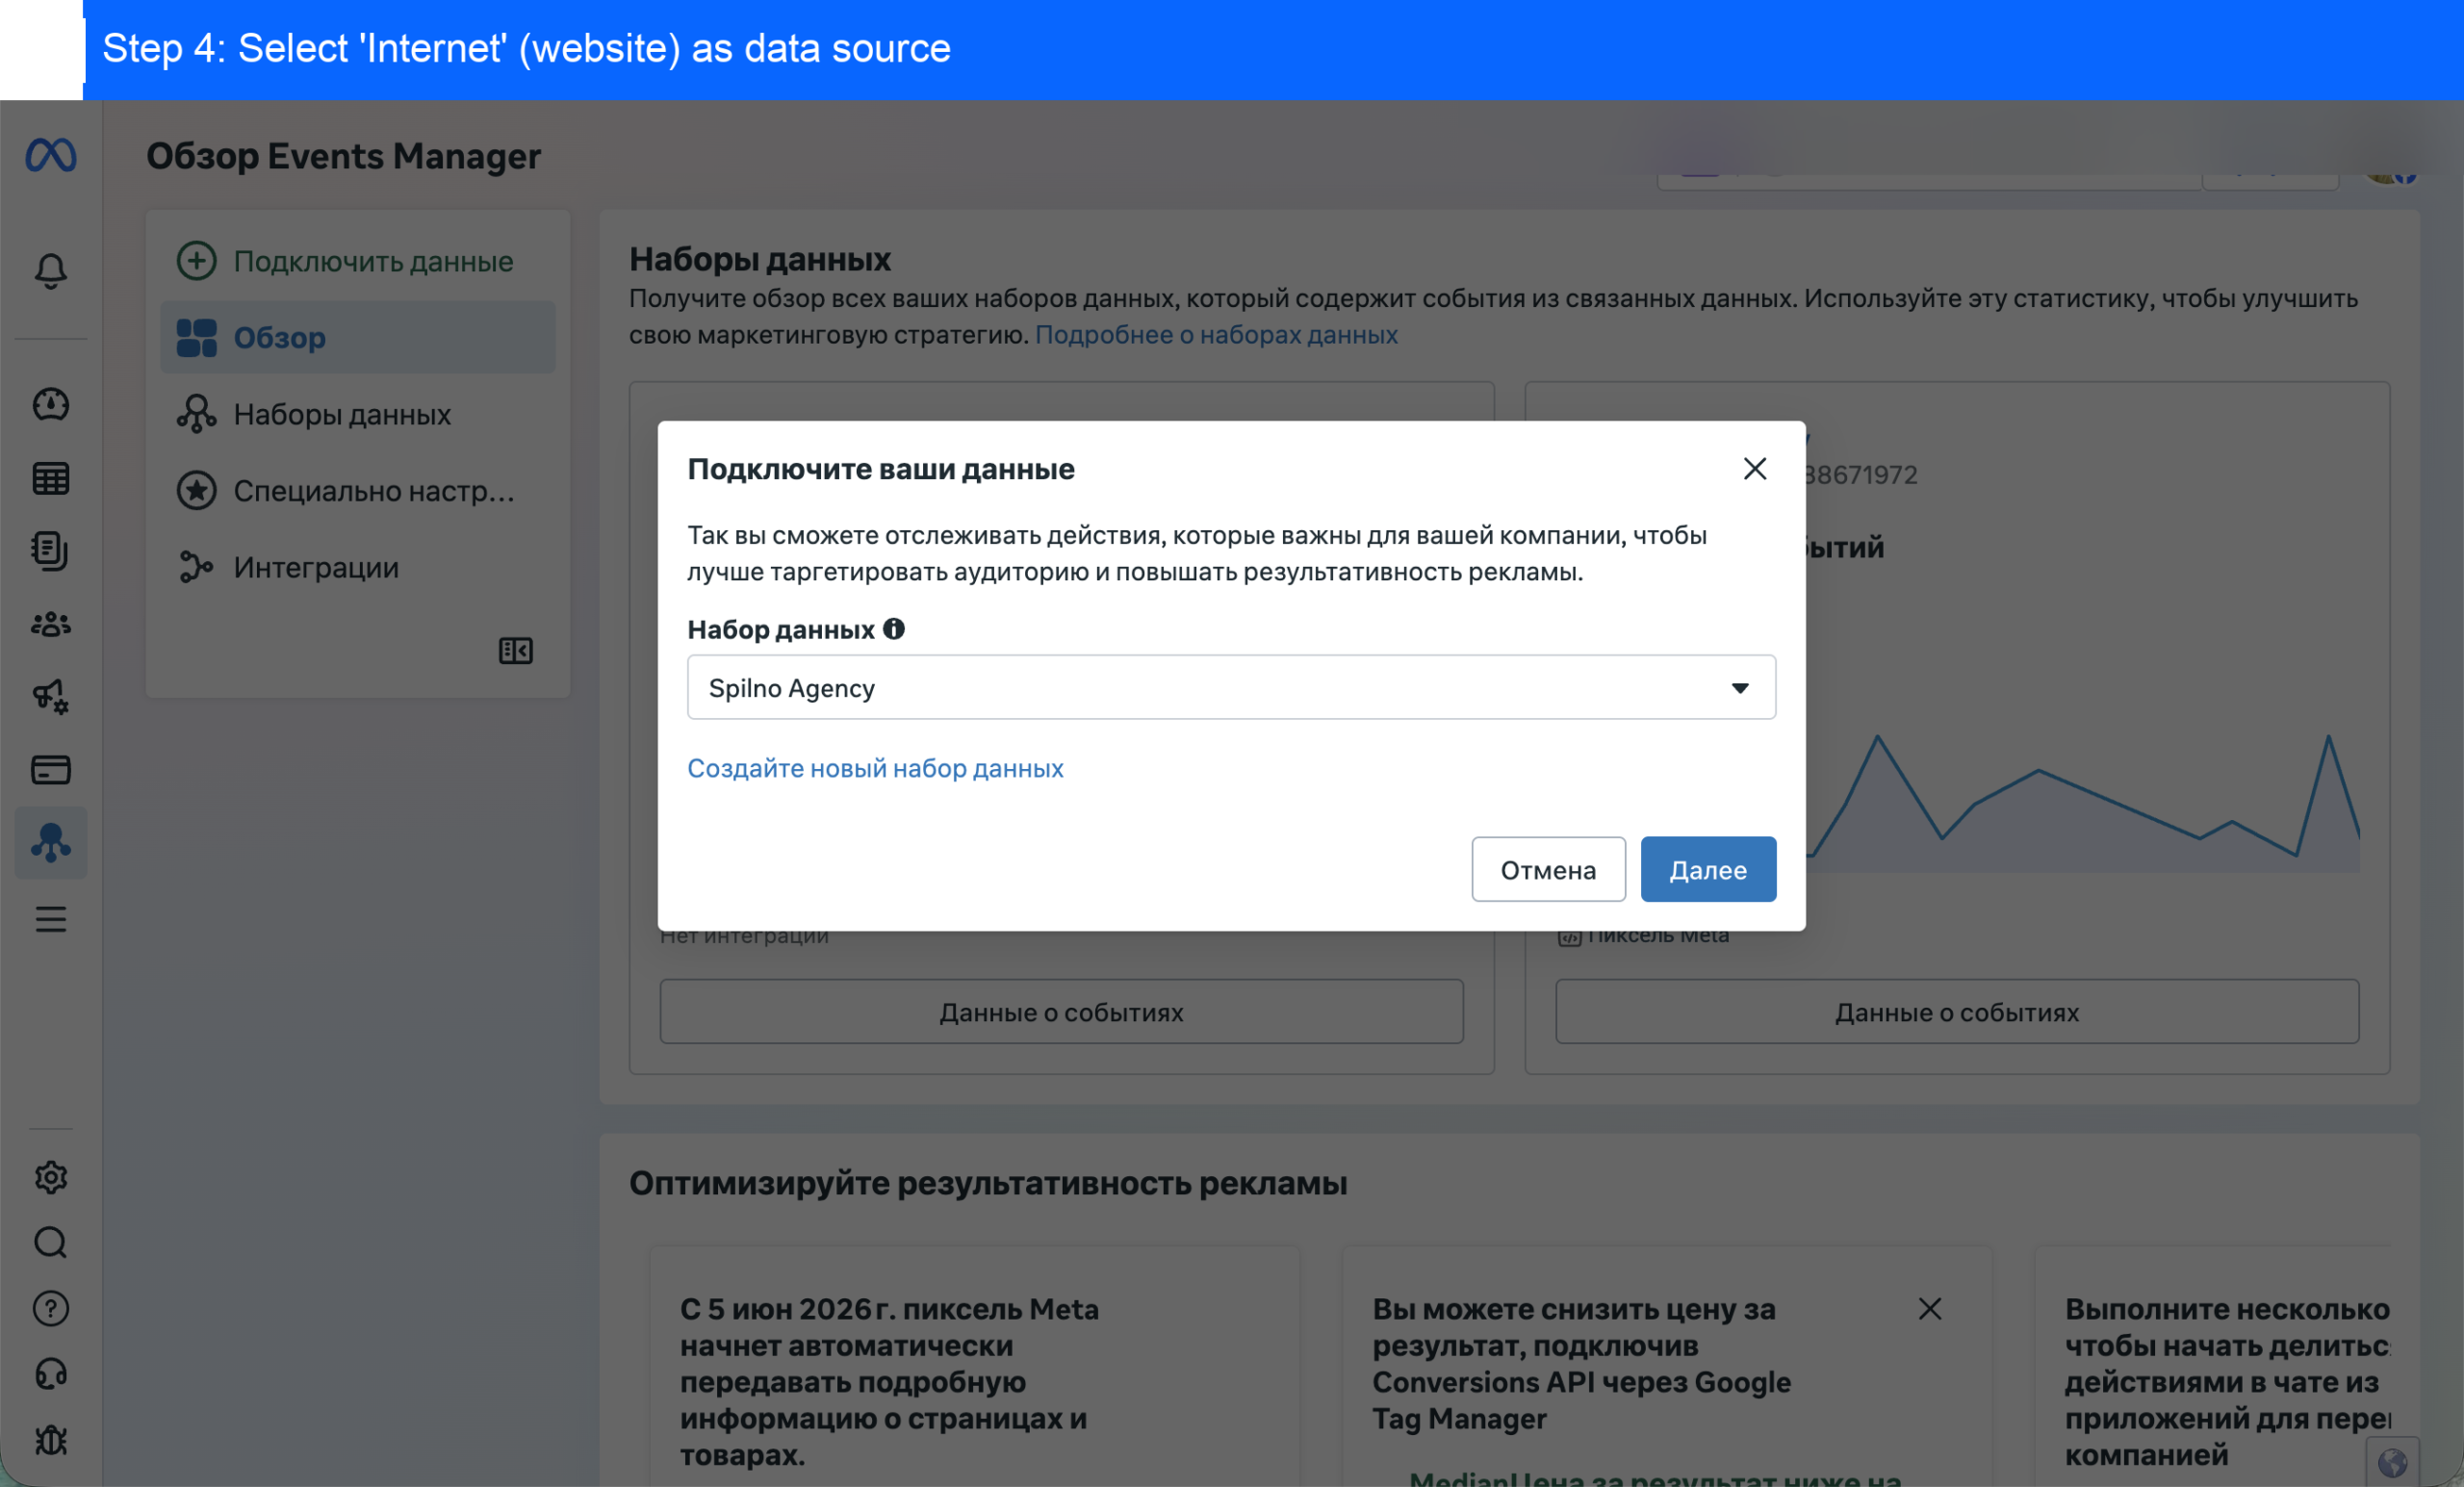
From the list of data sources, choose ‘Internet’ — this means tracking events on your website. Click ‘Next’.
Step 5: Select ‘Set up Conversions API’

On the website data connection screen, select ‘Set up Conversions API’. Meta shows an estimated ~19% cost per result reduction when using CAPI alongside Meta Pixel.
Step 6: GTM method is recommended

Meta automatically recommends setting up CAPI via Google Tag Manager, noting a ~31% reduction in cost per result. Click ‘Next’ to proceed.
Step 7: What you will need

To set up CAPI via GTM you need: a GTM web container (already installed on your site) and a GTM server container (new, on Google Cloud or Stape). The full process takes ~30 minutes and requires no developer.
Step 8: Select your GTM web container

From the dropdown, select your Google Tag Manager account and the GTM web container that is already installed on your website. If GTM is not yet connected, add it to your site first.
Step 9: Choose hosting for the server container

Choose your server container hosting: Google Cloud (~$5–20/mo, auto-provisioning in ~30 min) or Stape (freemium, easier setup in ~15 min). For beginners, Google Cloud is recommended — it integrates directly with GTM.
Step 10: Create a new server container in GTM
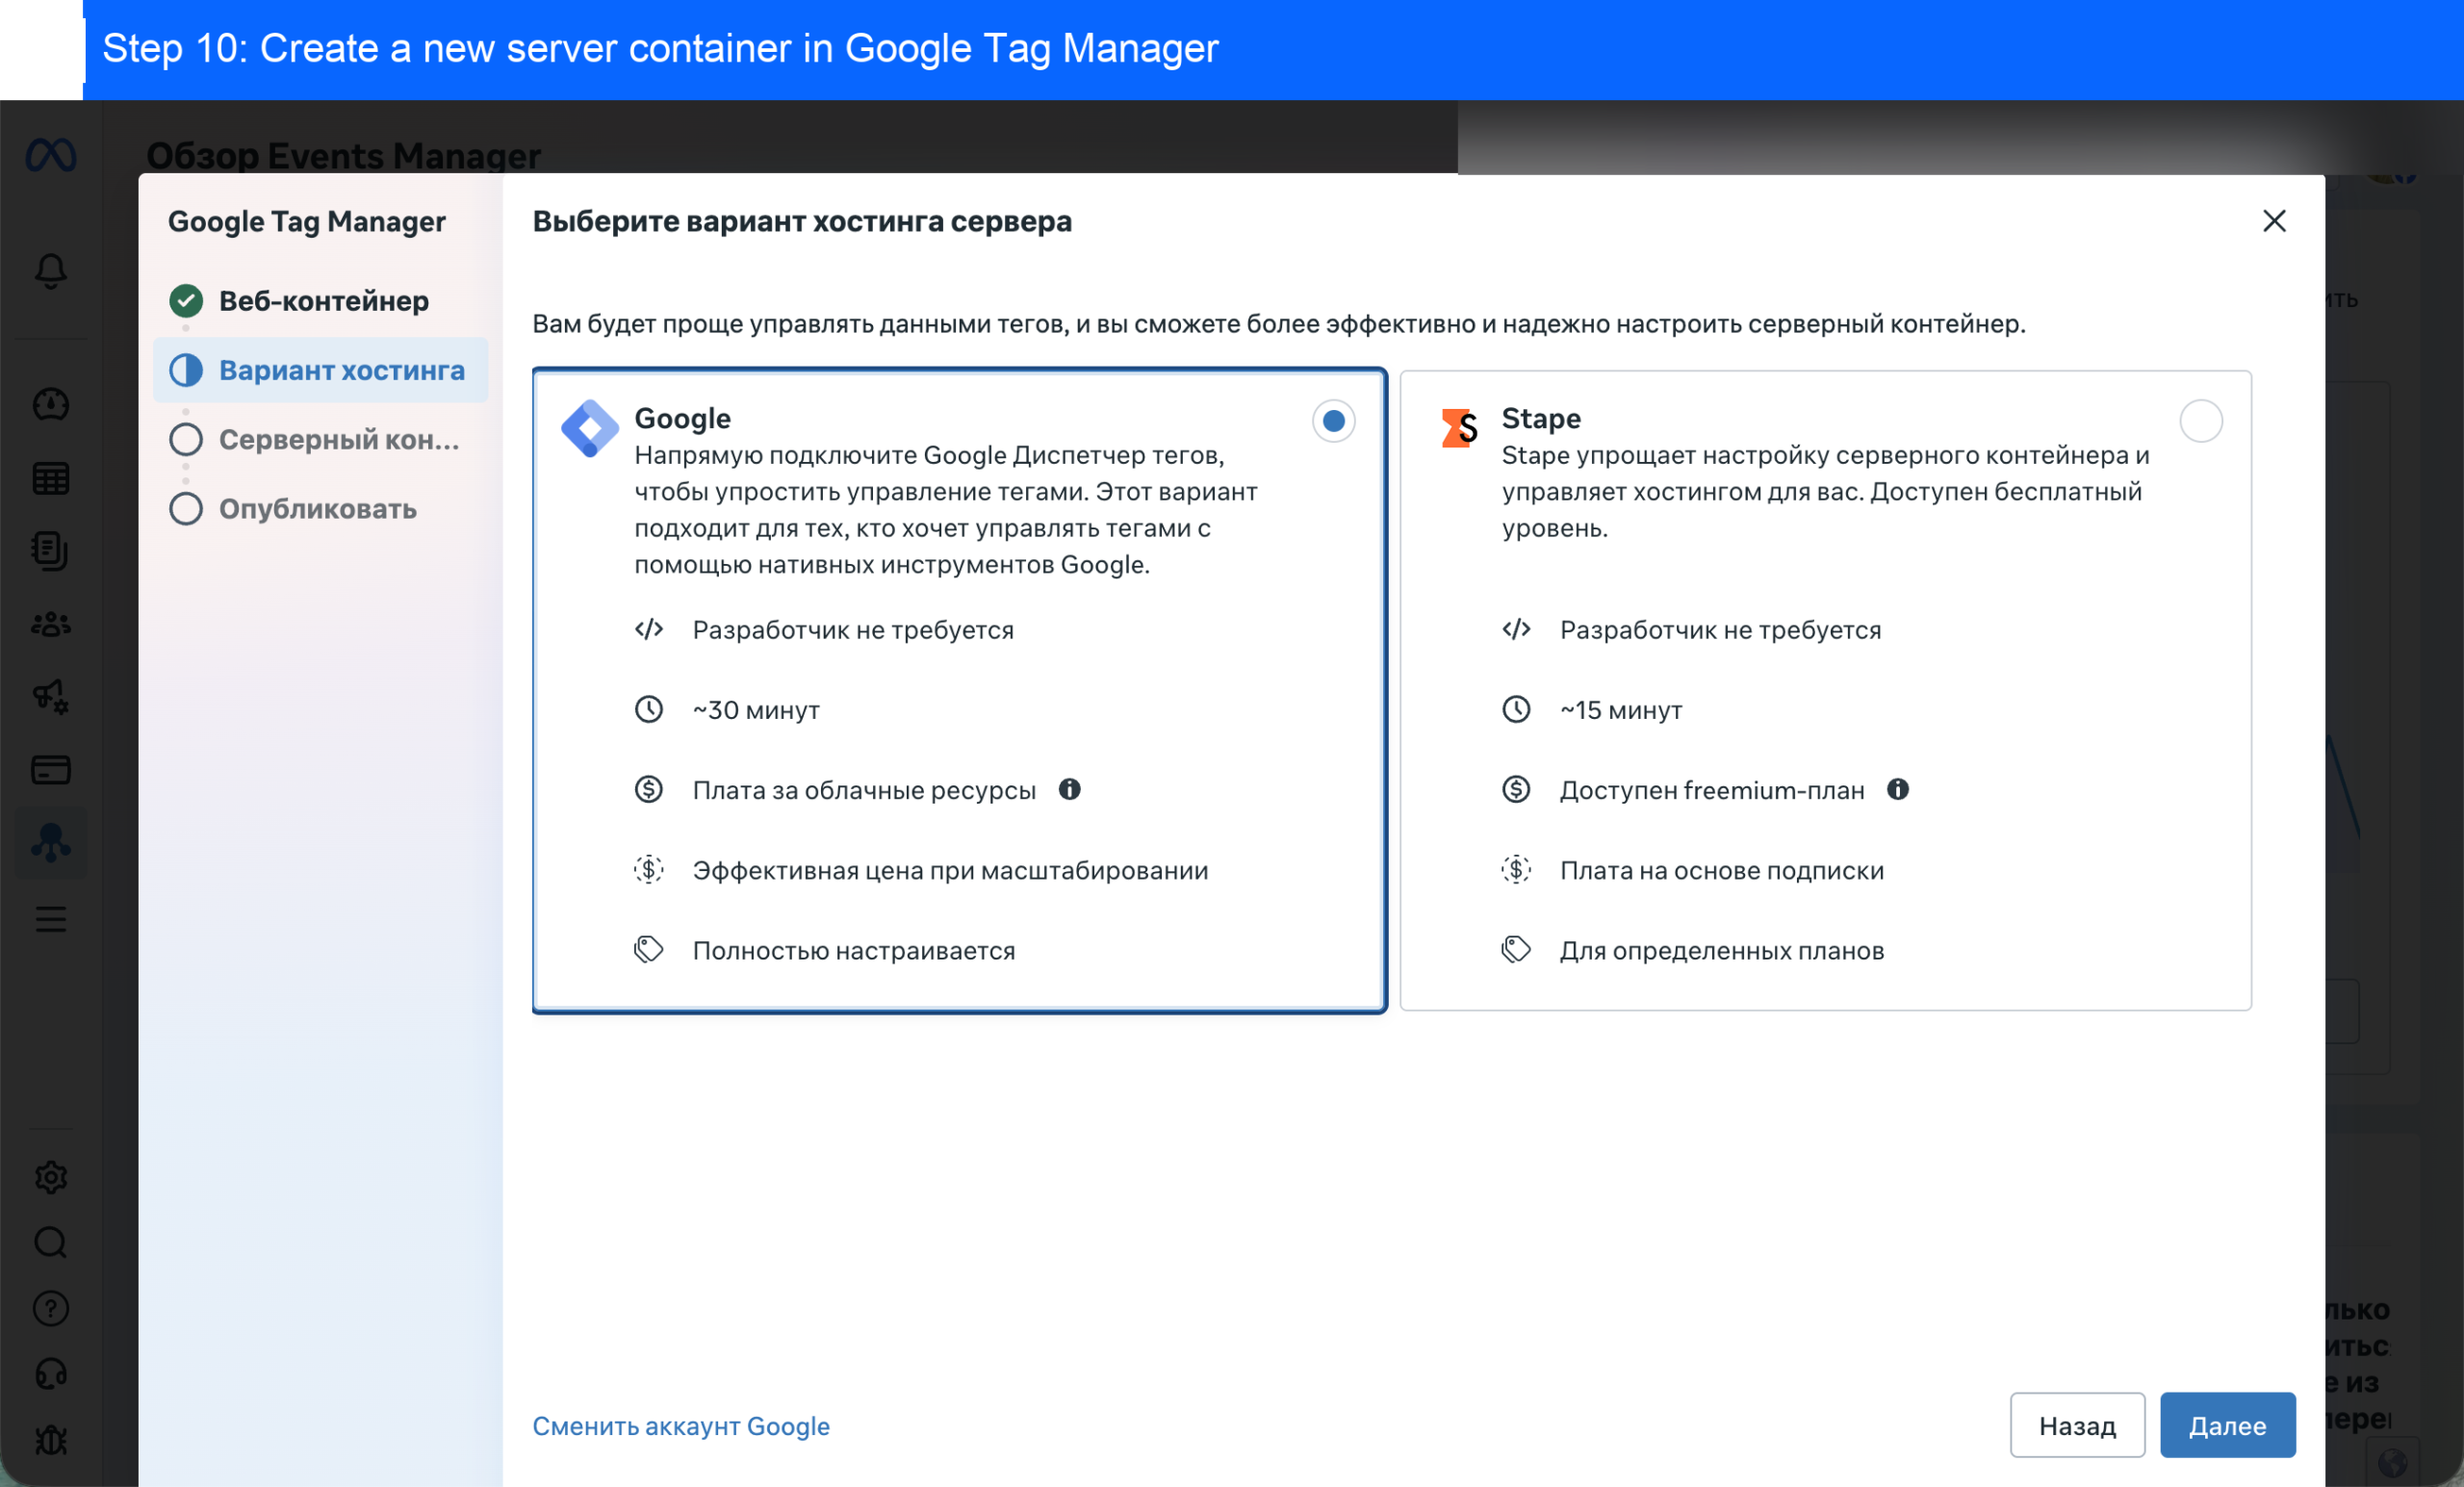
Go to your Google Tag Manager account and click ‘Create container’. You need a new container with the platform type set to ‘Server’.
Step 11: Set platform type to ‘Server’

Enter a container name (e.g. yoursite.com - server) and in the ‘Platform’ field select ‘Server’. Click ‘Create’.
Step 12: Auto-provision Google Cloud server

Select ‘Automatically provision server’ — GTM will deploy a Cloud Run container in your Google Cloud project. This is the easiest approach with no manual infrastructure setup required.
Step 13: Select a billing account and create the server

Choose a Google Cloud billing account (or create a new one) and click ‘Select billing account and create server’. Google will automatically deploy the Cloud Run instance (~5–10 minutes).
Step 14: Server successfully created
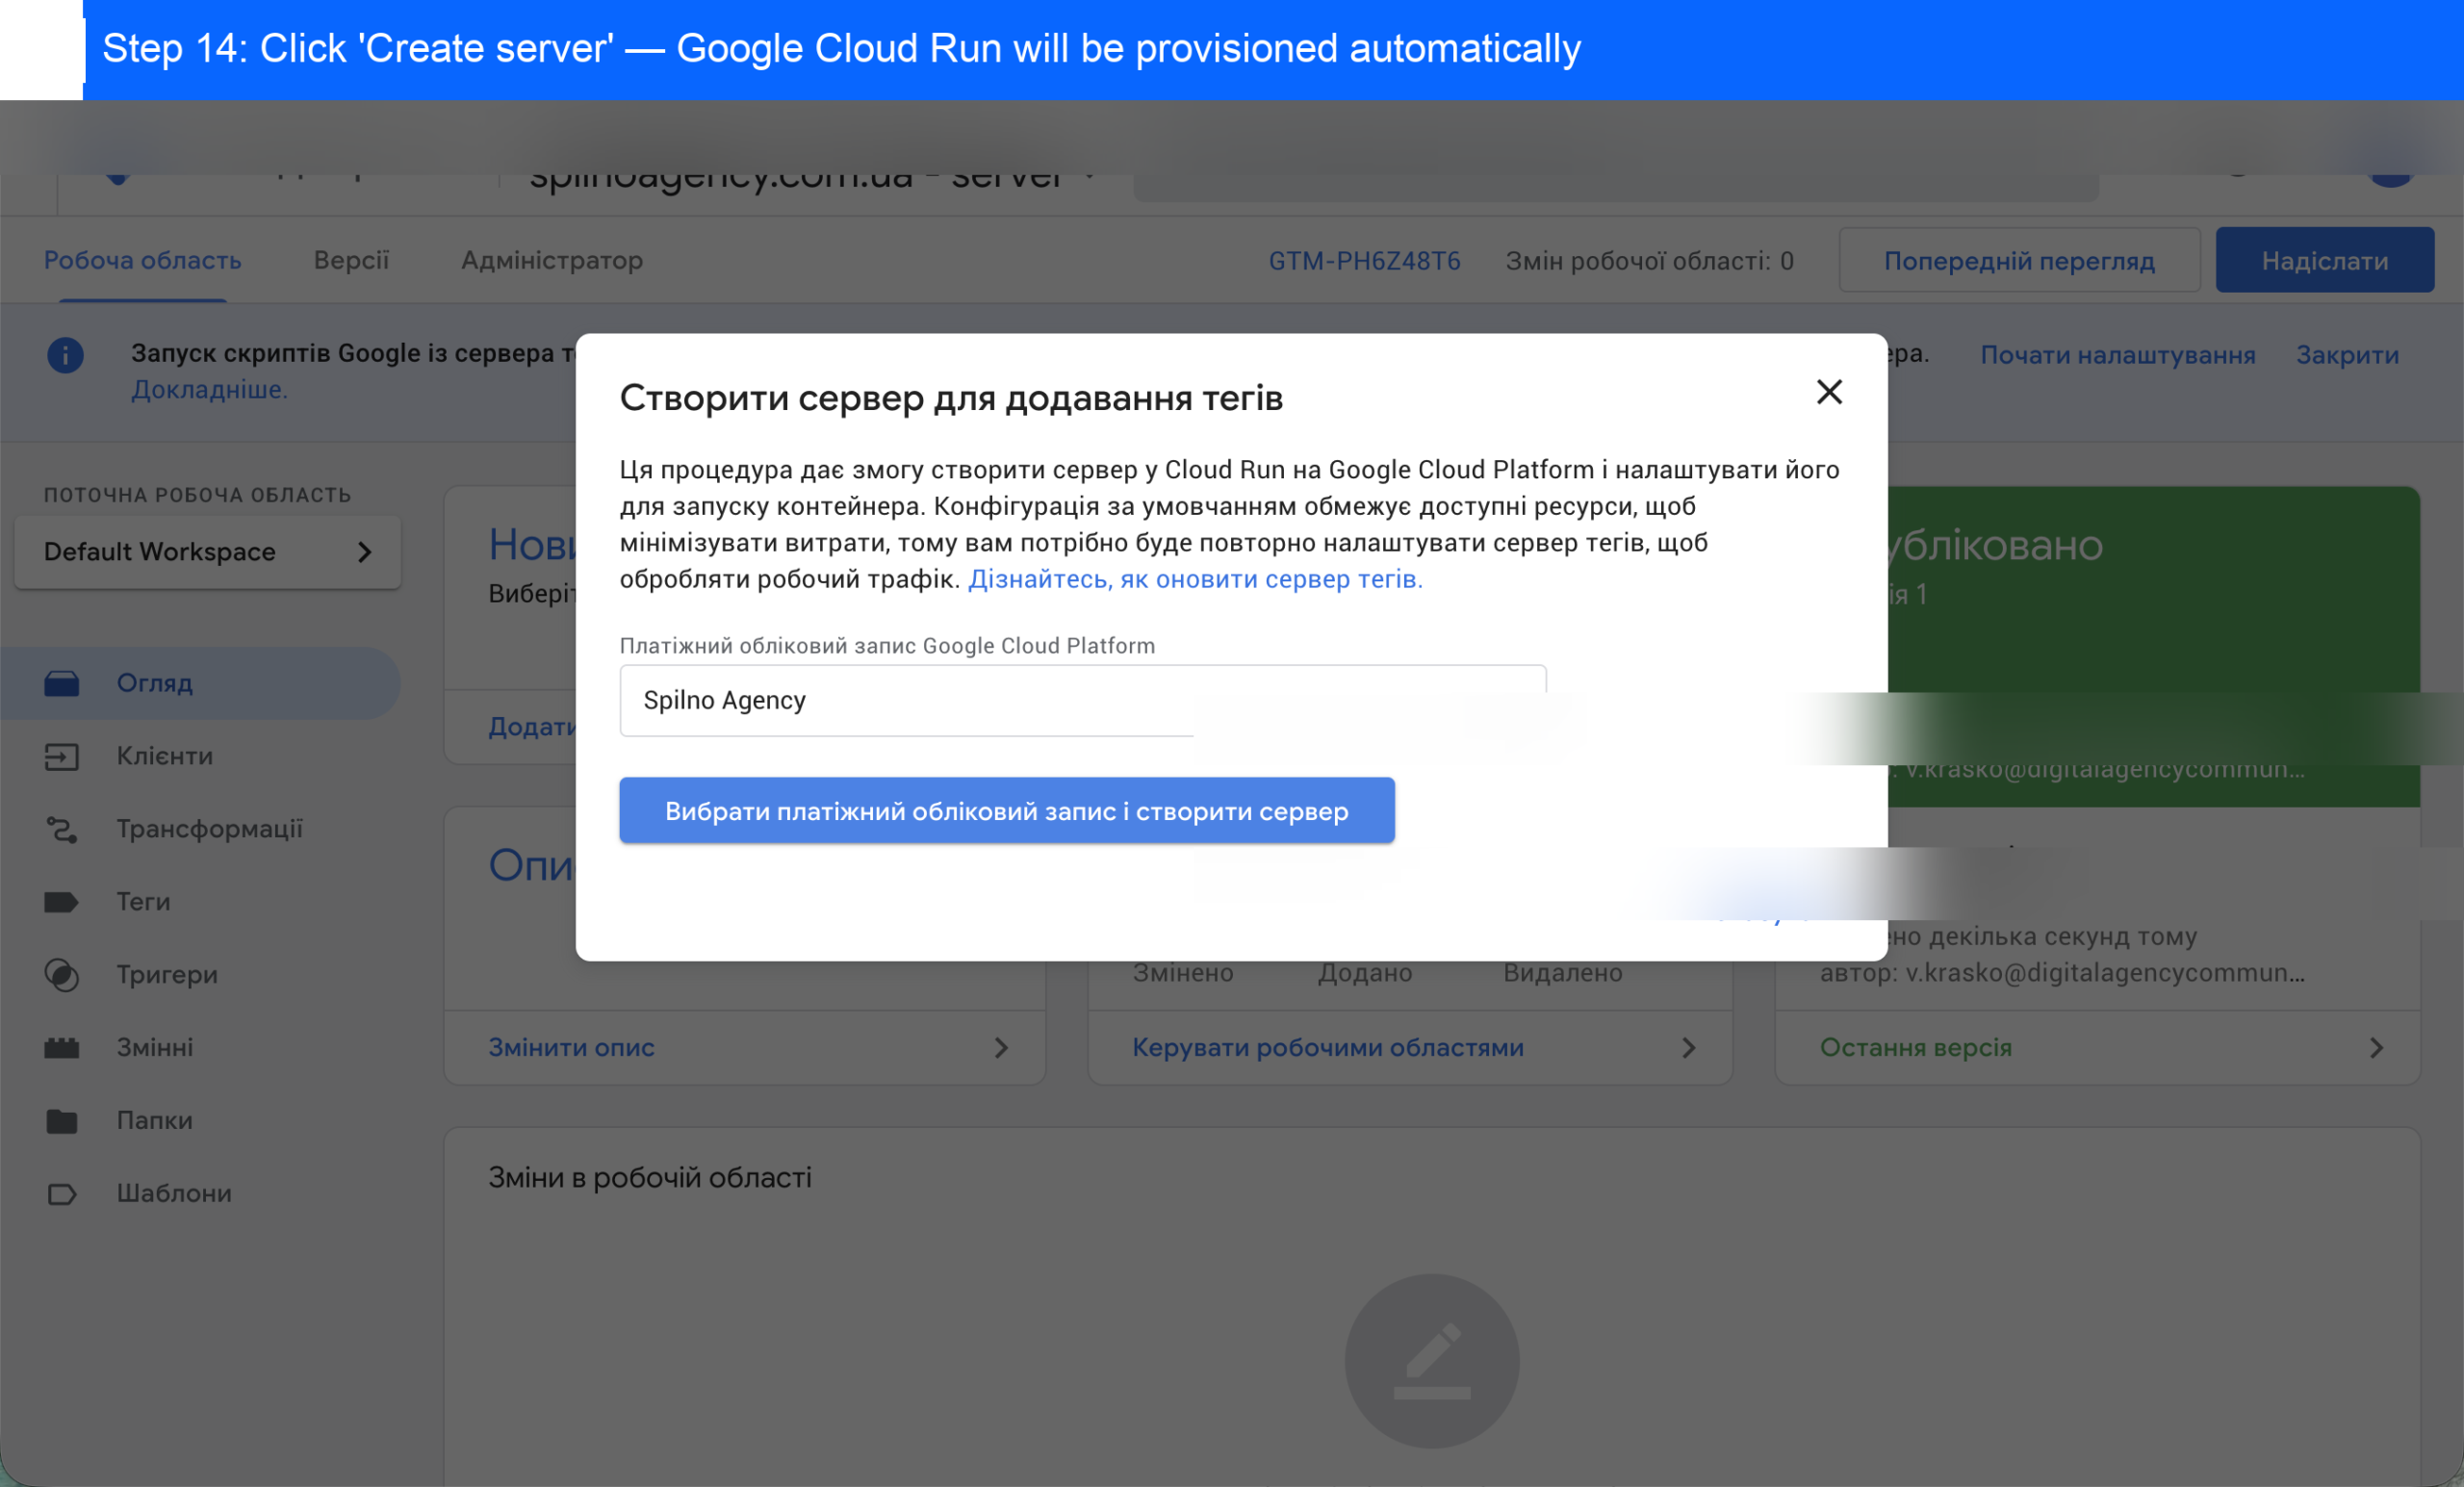
GTM will display the server container URL (format: https://server-side-tagging-xxxxxxxx-uc.a.run.app) and the Google Cloud project ID. Copy this URL — you will need it in the next step.
Step 15: GTM — server created. Copy the Cloud Run URL

Once auto-provisioning completes, GTM shows a ‘Server created’ dialog with the container configuration and Cloud Run URL. Copy this URL — you will need it in the next step when returning to Meta Events Manager.
Step 16: Find your GA4 Measurement ID
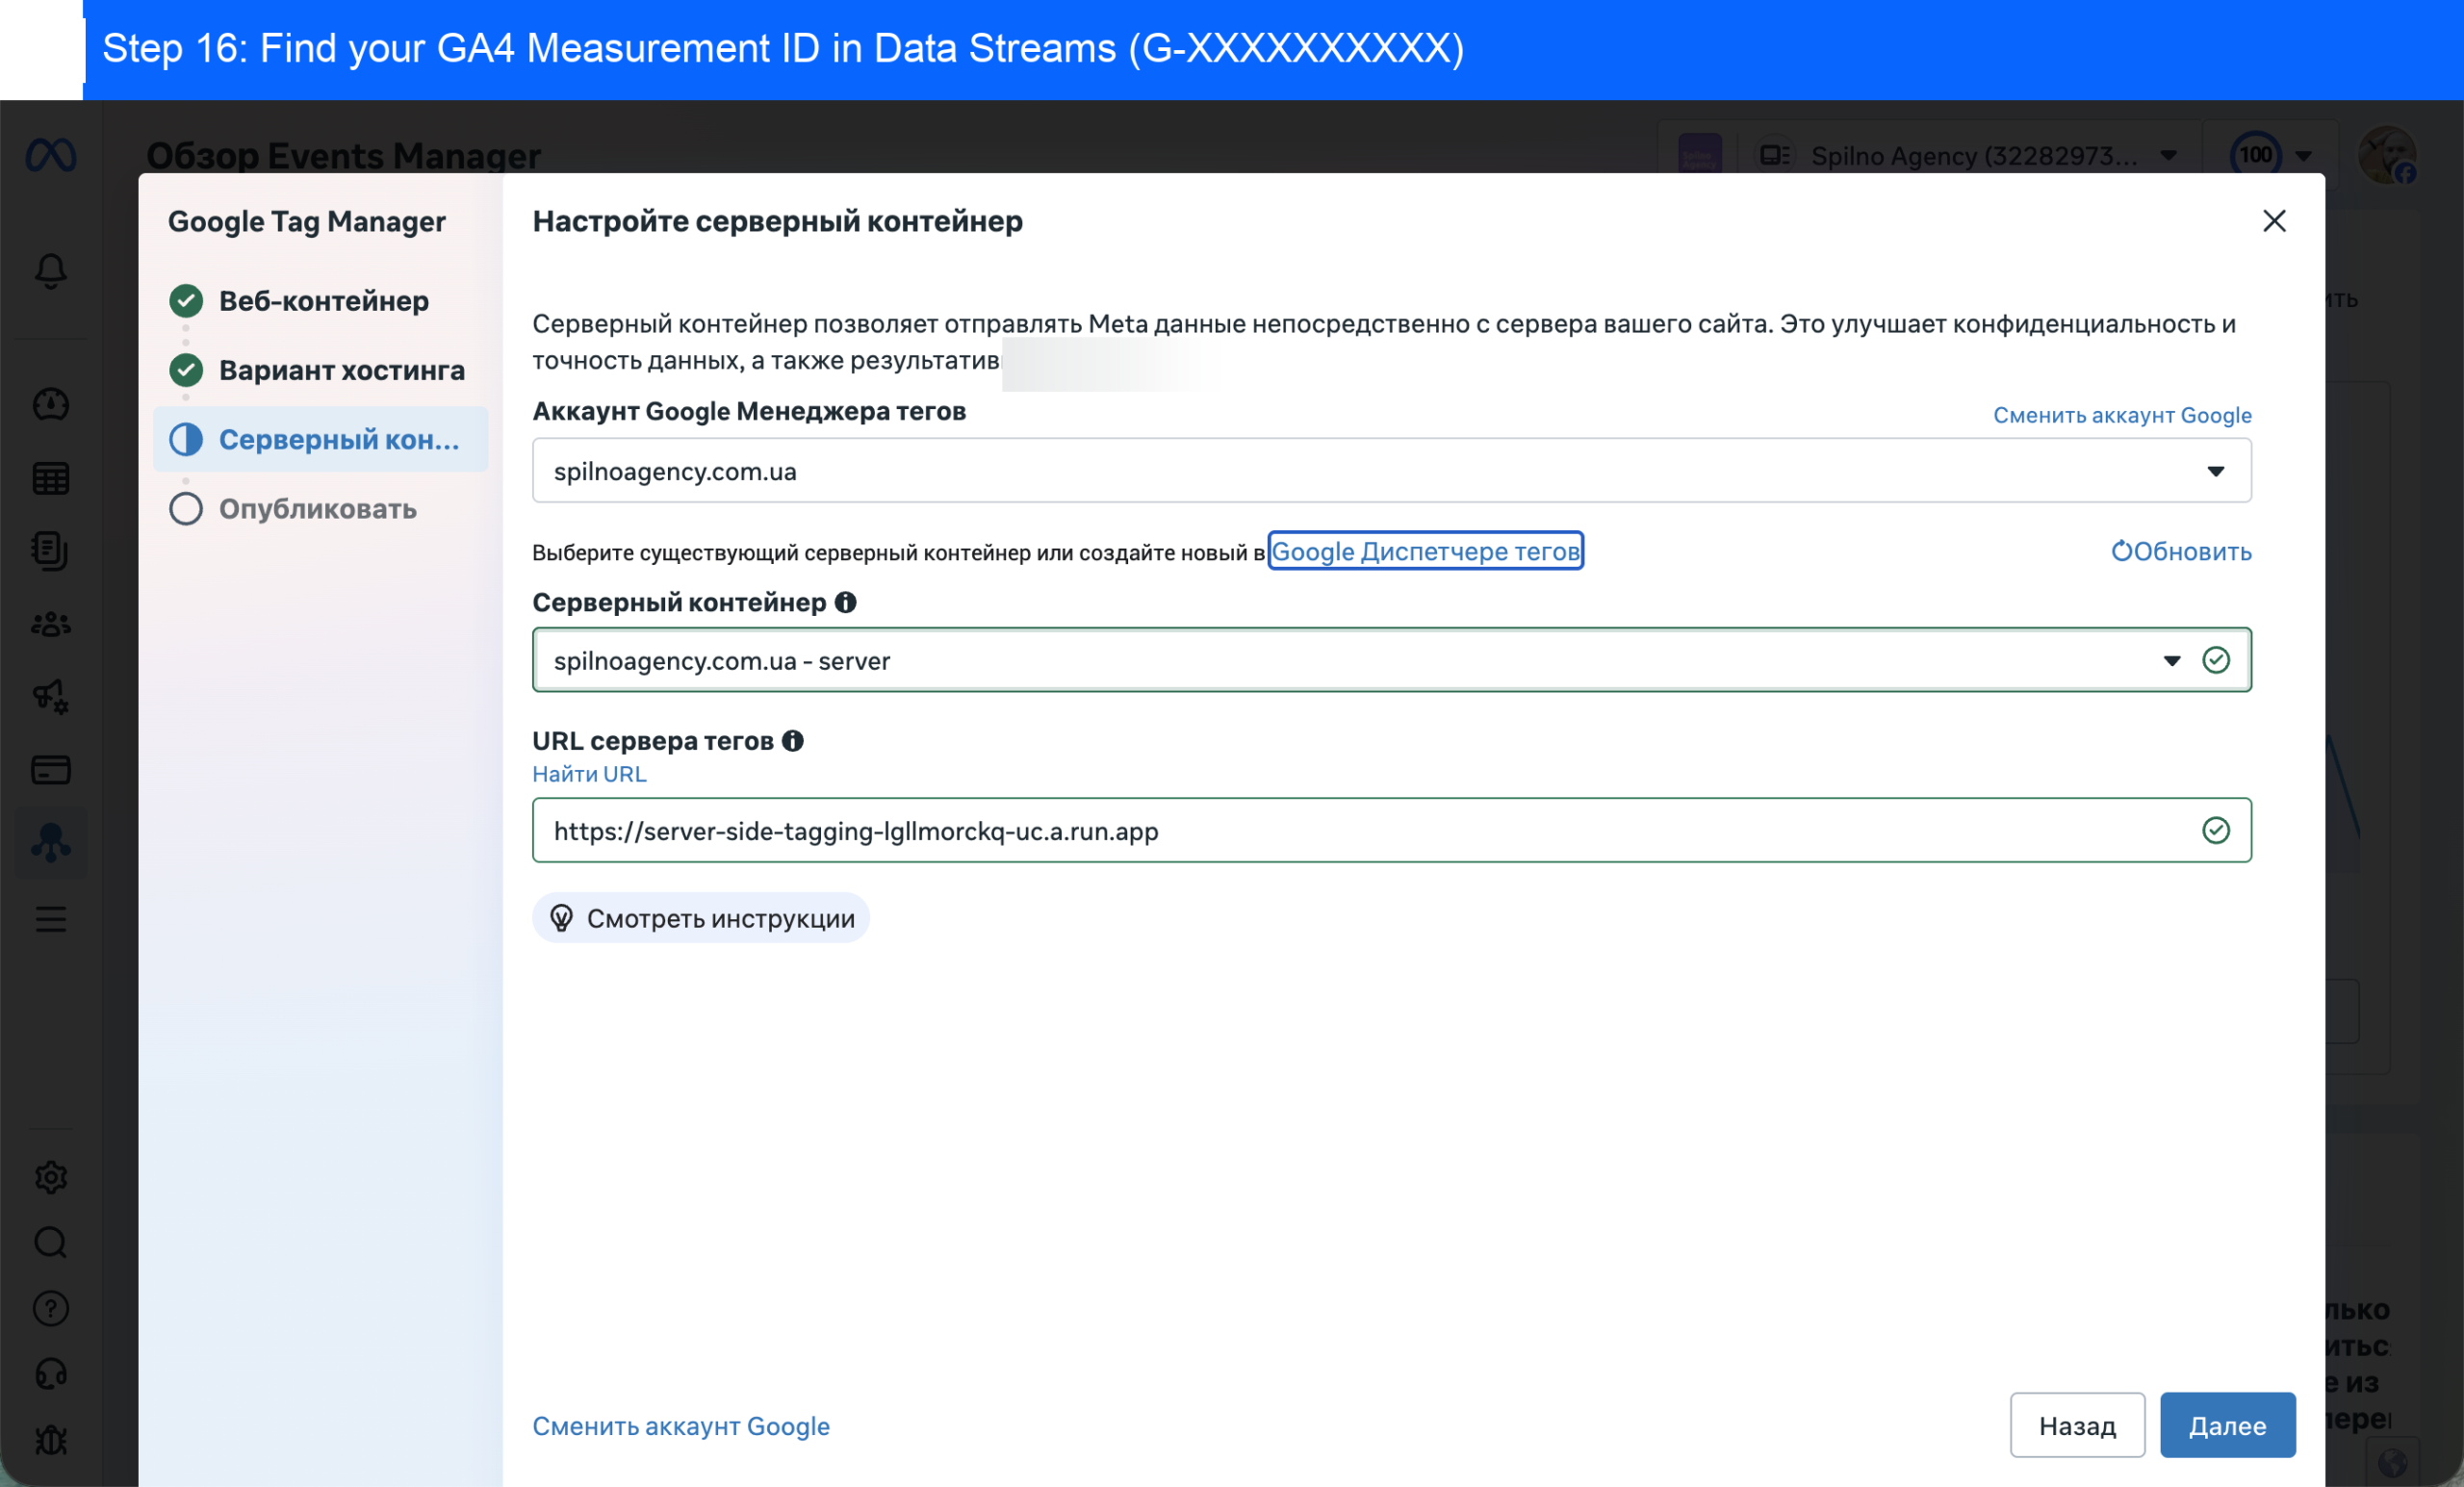
Go to Google Analytics 4 → Admin → Data Streams → your stream. Here you will see the Measurement ID in the format G-XXXXXXXXXX. Meta needs this ID for proper attribution.
Step 17: Copy the GA4 Measurement ID

Click the copy icon next to your Measurement ID (G-XXXXXXXXXX). A ‘Copied to clipboard’ confirmation will appear at the bottom of the screen.
Step 18: Enter the GA4 ID and publish

Return to Meta Events Manager. On the ‘Publish’ step, paste the copied GA4 Measurement ID into the field and click ‘Publish’. CAPI via GTM is now live!

Read also
BANT Lead Qualification Methodology: What It Is and How It Works
BANT is a lead qualification framework built on four criteria: Budget, Authority, Need, Timeline. What it is, example…
Best Claude Skills for Threads (2026)
Claude skills and MCPs for Threads: posts and threads, captions, carousel design, cross-posting from Instagram, the official Threads…
Best Claude Skills for X (Twitter) (2026)
Claude skills and MCPs for X (Twitter): tweets and threads, content planning, X Ads, analytics, outreach. Official X…