Meta Pixel: What It Is and How to Install It on Your Website

What Is Meta Pixel
Meta Pixel is a web analytics and advertising tool from Meta Platforms (the company behind Facebook and Instagram). It works by placing a small piece of JavaScript code on every page of your website. When a visitor lands on your site, the pixel fires — silently logging their behaviour and linking it back to the Meta ads they previously interacted with.
The tool was originally called Facebook Pixel and operated under that name for over six years. In October 2021, when Facebook Inc. rebranded its parent company to Meta, the pixel was renamed Meta Pixel. Despite the rebrand, both names refer to the exact same technology — and search terms like facebook pixel and how to install meta pixel still point to the same official documentation.
Technically, Meta Pixel is an event-based tracking tag — similar in principle to Google Ads Conversion Tracking or Google Analytics 4 tags. The key difference is its purpose: while GA4 provides broad website analytics, Meta Pixel is purpose-built to feed data back into Meta’s advertising platform so its machine-learning algorithms can optimise ad delivery across Facebook, Instagram, Messenger, and the Audience Network.
How Meta Pixel Works
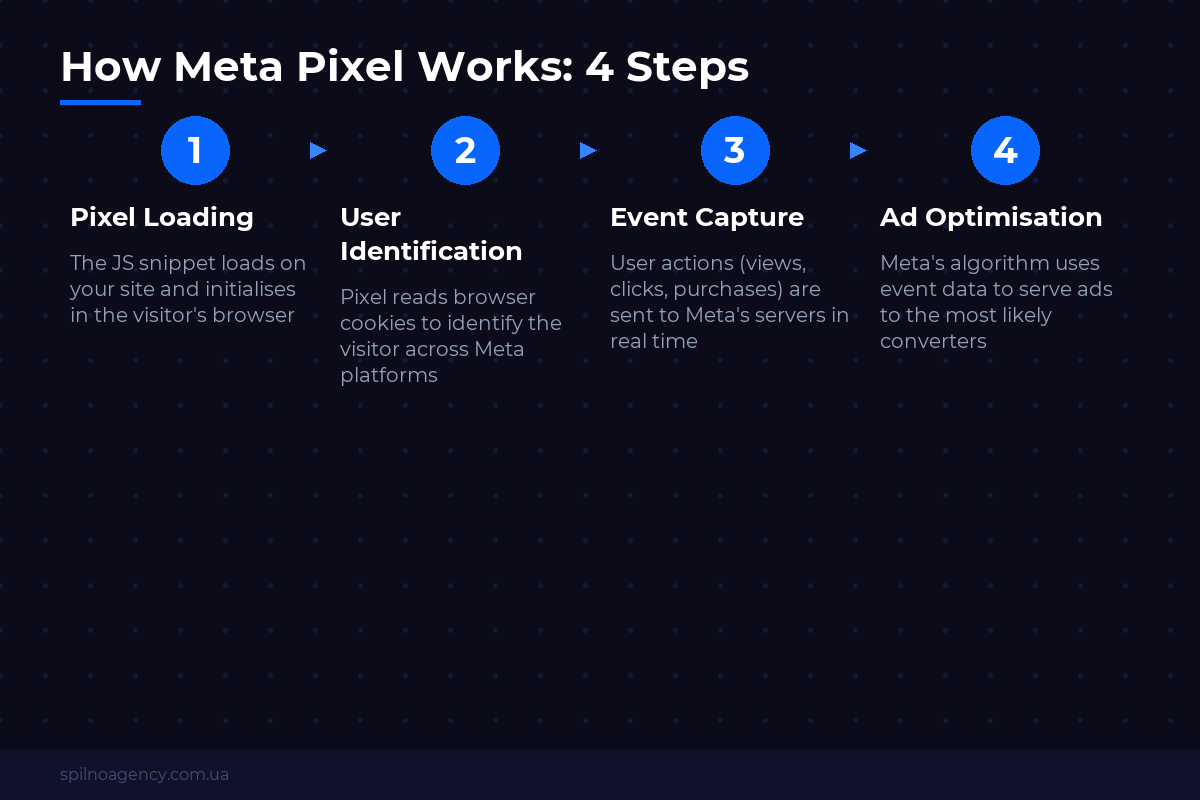
When a user visits your website, the pixel code executes in their browser and goes through the following sequence:
- User identification. The pixel reads the browser’s cookies and attempts to match the visitor to a Facebook or Instagram profile — if they’re logged in to either platform.
- Event capture. Based on the visitor’s behaviour (page load, button click, form submission, purchase completion), the pixel sends a corresponding event to Meta’s servers.
- Attribution. Meta cross-references the event with your running ad campaigns to determine which ad influenced that visitor’s behaviour.
- Algorithm feedback. The attributed conversion data is fed back to Meta’s delivery algorithm, which uses it to find more people likely to convert and optimise your cost per result.
Beyond browser-side cookie tracking, Meta offers the Conversions API (CAPI) — a server-side integration that sends event data directly from your server to Meta’s servers, bypassing the browser entirely. This is especially important since Apple’s iOS 14.5 ATT (App Tracking Transparency) framework and growing browser-level cookie restrictions have significantly reduced the reliability of client-side pixel data across European markets.
Why European Businesses Need Meta Pixel
For any business running paid social advertising across Europe, Meta Pixel is not optional — it unlocks capabilities that are simply unavailable without it.
Retargeting
The pixel enables you to show ads specifically to people who have already visited your website but didn’t convert. You can retarget visitors who viewed a product page but didn’t add to cart, users who started checkout but abandoned it, or customers who purchased once but haven’t returned. Across European e-commerce, retargeting campaigns typically deliver conversion costs 3–5× lower than cold-audience campaigns, simply because the audience already has intent.
Lookalike Audiences
Based on pixel data, Meta can build Lookalike Audiences — finding users across Europe whose behaviour closely mirrors your best customers. You can create lookalikes from: all website visitors (last 30–180 days), users who triggered the Purchase event, or lead form completers (Lead event). A 1% lookalike built on purchasers often outperforms broad interest targeting by a significant margin.
Conversion Optimisation
Without the pixel, Meta’s algorithm has no way to know which ad clicks resulted in purchases. With pixel data flowing in, the algorithm receives real conversion signals and can shift ad delivery toward the users most likely to buy — reducing your effective CPM and improving ROAS over time.
Accurate Performance Measurement
The pixel feeds conversion data directly into Ads Manager, giving you visibility into which campaigns, ad sets, and individual creatives are generating actual business outcomes — purchases, leads, registrations — and at what cost. This makes it possible to compare performance across campaigns and make data-driven budget decisions.
How to Create a Meta Pixel in Meta Business Suite
Before you can install the pixel on your website, you need to create it inside Meta Business Suite. Here is the step-by-step process:
- Go to business.facebook.com and log in to your Business Manager account. If you don’t have one yet, create it — you’ll need a Facebook account and a business name.
- In the left navigation, go to Business Settings → Data Sources → Pixels.
- Click the Add button.
- Enter a name for your pixel (your website or brand name works well) and your website URL. Click Continue.
- Choose your installation method: manually, via a partner integration (GTM, Shopify, WooCommerce, etc.), or via Conversions API.
- Copy your Pixel ID — a 15-digit numeric code. You’ll need this for any installation method.
- In the pixel settings, go to the Ad Accounts tab and connect the pixel to your advertising account so campaigns can use it for optimisation and reporting.
Once the pixel is created, Meta generates the base installation code with your unique Pixel ID already embedded. This ID is what tells Meta’s servers which advertiser’s account to attribute the data to.
How to Install Meta Pixel on Your Website
There are three main installation methods. Choose the one that matches your platform and technical setup.
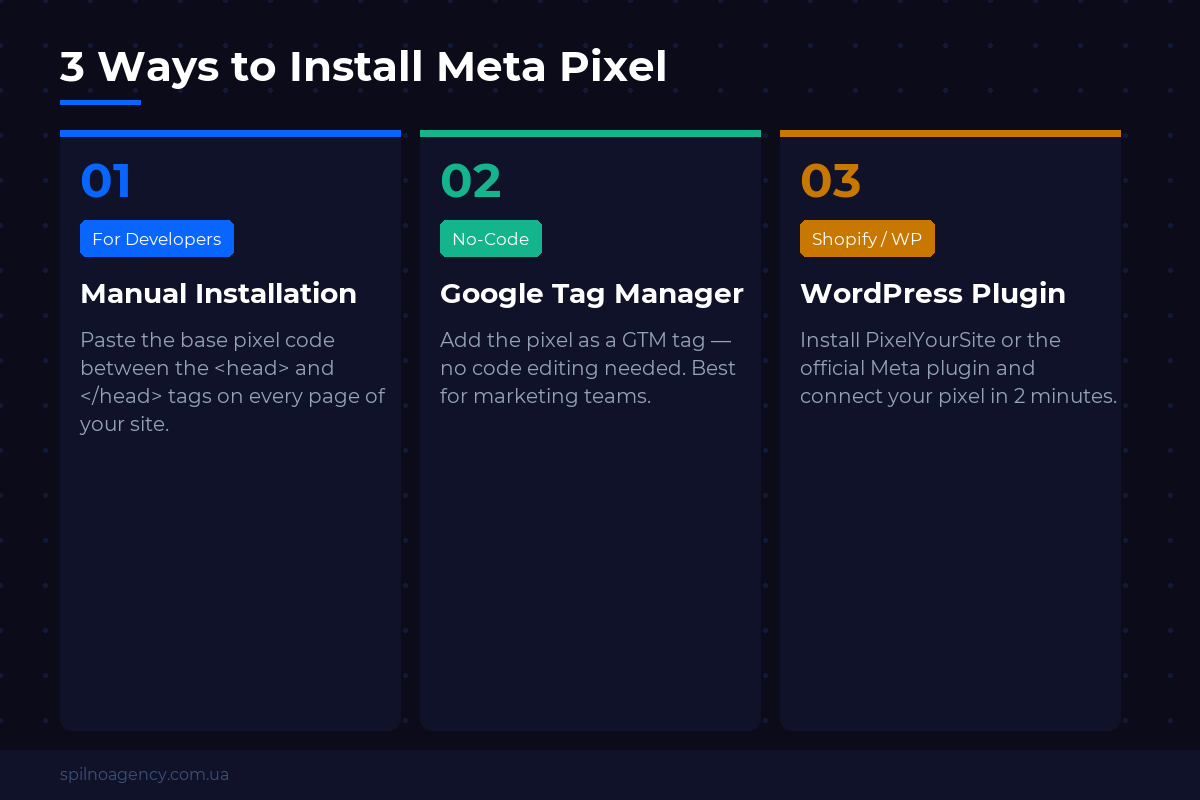
Method 1: Manual Installation (Direct Code)
This method works on any website where you have access to the HTML templates. You insert the base pixel code between the <head> and </head> tags on every page of your site.
The base Meta Pixel code looks like this:
<!-- Meta Pixel Code -->
<script>
!function(f,b,e,v,n,t,s)
{if(f.fbq)return;n=f.fbq=function(){n.callMethod?
n.callMethod.apply(n,arguments):n.queue.push(arguments)};
if(!f._fbq)f._fbq=n;n.push=n;n.loaded=!0;n.version='2.0';
n.queue=[];t=b.createElement(e);t.async=!0;
t.src=v;s=b.getElementsByTagName(e)[0];
s.parentNode.insertBefore(t,s)}(window, document,'script',
'https://connect.facebook.net/en_US/fbevents.js');
fbq('init', 'YOUR_PIXEL_ID');
fbq('track', 'PageView');
</script>
<noscript><img height="1" width="1" style="display:none"
src="https://www.facebook.com/tr?id=YOUR_PIXEL_ID&ev=PageView&noscript=1"
/></noscript>
<!-- End Meta Pixel Code -->
Replace YOUR_PIXEL_ID with your actual Pixel ID from Meta Business Suite. Place this code as high as possible in the <head> section — before other scripts load — to maximise the number of events captured. The <noscript> fallback provides basic tracking for browsers with JavaScript disabled.
Method 2: Via Google Tag Manager (GTM)
If Google Tag Manager is already installed on your website, this is the most efficient installation method. You manage everything from the GTM interface without touching your site’s code.
- Log in to your GTM container at tagmanager.google.com.
- Go to Tags → New.
- Click Tag Configuration → select Custom HTML as the tag type.
- Paste the full Meta Pixel base code (with your
Pixel ID) into the HTML field. - Under Triggering, select All Pages (or Initialization — All Pages for earlier firing).
- Name the tag (e.g. “Meta Pixel — Base Code”) and save.
- Click Submit → Publish to push the changes live.
The advantage of GTM is centralised tag management: your pixel, GA4, and other tracking tools all managed from one interface. GTM also makes it straightforward to add custom events without modifying your site’s code each time — ideal for marketing teams that need to move quickly.
Method 3: Via a WordPress Plugin
For WordPress sites, a dedicated plugin is the fastest route — no code editing required. Two reliable options:
- PixelYourSite — the most popular option. The free version handles base pixel installation; the Pro version adds automatic WooCommerce event tracking (ViewContent, AddToCart, Purchase) with revenue data passed automatically.
- Meta Pixel for WordPress — Meta’s own official plugin. Simpler configuration, covers basic events, suitable for sites without complex e-commerce requirements.
Installing via PixelYourSite:
- In WordPress Admin, go to Plugins → Add New.
- Search for “PixelYourSite”, install, and activate it.
- A new PixelYourSite menu item will appear in your WordPress admin sidebar — open the settings.
- In the Facebook Pixel ID field, enter your Pixel ID.
- Save settings. The plugin automatically injects the base pixel code on all pages.
- For WooCommerce: navigate to the WooCommerce tab in PixelYourSite settings and enable the relevant events.
For Shopify, the setup is even simpler: in your Shopify Admin go to Settings → Customer events → Meta and connect your Business Manager directly. Shopify handles all pixel firing natively, including the Purchase event with order value.
How to Verify Your Pixel Installation
After installation, always verify that the pixel is firing correctly before running any campaigns. Two tools to use:
Meta Pixel Helper (Chrome Extension)
Meta Pixel Helper is a free Chrome browser extension from Meta. Install it from the Chrome Web Store, open your website, and click the extension icon in the browser toolbar.
The extension will show you:
- Whether a pixel was detected on the page (green icon = healthy, red = errors present).
- The Pixel ID — verify it matches your ID from Business Manager.
- Which events are firing (you should see
PageViewat minimum). - Any configuration errors with diagnostic details.
Test Events Tool in Meta Events Manager
In Meta Business Suite, go to Events Manager → select your pixel → Test Events tab. This shows you real-time event data flowing in from your website. Open your site in another tab, browse around, add products to cart, complete a test purchase — the events will appear within seconds, confirming exactly what data Meta is receiving and with what parameters.
Standard Events Setup
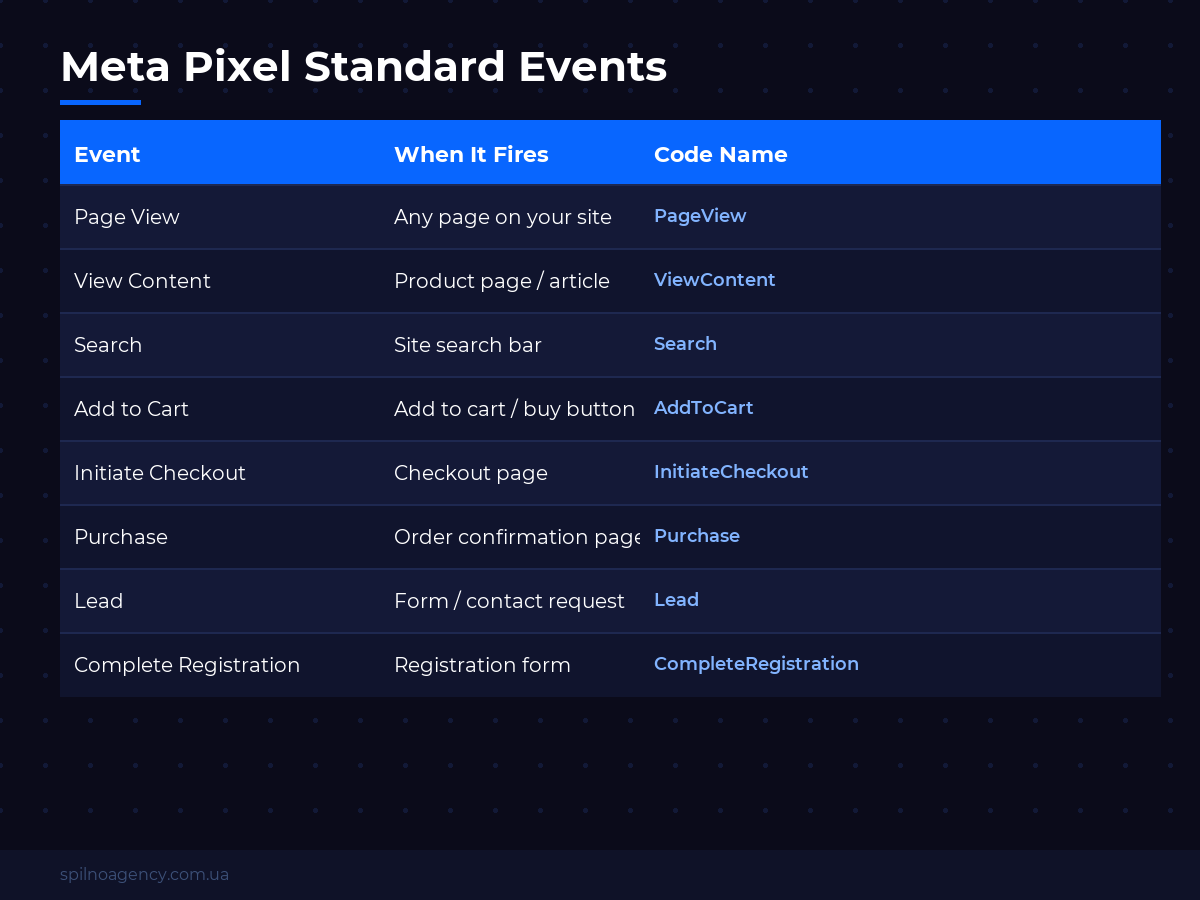
Meta Pixel supports a set of Standard Events — predefined actions that Meta recognises and uses for campaign optimisation. Here are the most important ones for e-commerce and lead generation:
| Event | Code | When to fire |
|---|---|---|
| Content view | ViewContent | When a product page or key content page loads |
| Search | Search | When a visitor uses the on-site search function |
| Add to wishlist | AddToWishlist | When a visitor saves a product to favourites |
| Add to cart | AddToCart | When a visitor clicks “Add to Cart” |
| Initiate checkout | InitiateCheckout | When a visitor enters the checkout flow |
| Add payment info | AddPaymentInfo | When payment details are entered |
| Purchase | Purchase | After a successful order (thank-you page) |
| Lead | Lead | After a form submission or newsletter sign-up |
| Complete registration | CompleteRegistration | After account creation |
For the Purchase event, always pass the order value and currency as parameters — this is what enables ROAS tracking in Ads Manager:
fbq('track', 'Purchase', {
  value: 89.99,
  currency: 'EUR',
  content_type: 'product',
  content_ids: ['SKU_101', 'SKU_204']
});
Passing value, currency, and content_ids enables Meta to calculate ROAS automatically in Ads Manager, optimise campaigns toward higher-value purchasers, and power Dynamic Ads (automatically showing the right product to the right user).
Privacy, GDPR, and Consent Mode
Running Meta Pixel in European markets comes with regulatory obligations. Getting this right is both a legal requirement and good business practice.
GDPR Compliance
Under GDPR, loading Meta Pixel (which sets cookies and processes personal data) requires a lawful basis — typically explicit user consent. This means:
- Display a cookie consent banner before the pixel code initialises.
- Only fire the pixel after the user has accepted marketing/analytics cookies.
- Document the data processing in your Privacy Policy (what data is collected, how long it’s retained, who it’s shared with).
- Provide a clear opt-out mechanism.
If you’re using GTM, implement Consent Mode: configure the Meta Pixel tag to fire only when ad_storage is set to granted. This integrates cleanly with consent management platforms (CMPs) like Cookiebot, OneTrust, or CookieYes.
iOS 14.5+ and Signal Loss
Since Apple’s ATT framework launched in April 2021, a significant share of iOS users across Europe have opted out of cross-app tracking. This directly reduces the match rate of browser-based pixel data — Meta receives fewer identifiable signals per conversion.
The recommended response is a dual-tracking approach:
- Keep the browser pixel — it still captures data from consenting users and Android devices.
- Add Conversions API (CAPI) — sends server-side events using hashed customer data (email, phone number) that don’t depend on browser cookies.
- Use deduplication — pass the same
event_idfrom both pixel and CAPI so Meta doesn’t count a single conversion twice.
Together, browser pixel + CAPI typically recovers 15–30% of conversions that would otherwise be lost to iOS privacy restrictions — a meaningful improvement for any campaigns running at scale across European markets.
Frequently Asked Questions About Meta Pixel
What is the difference between Meta Pixel and Facebook Pixel?
There is no functional difference — they are the same tool. Facebook rebranded its parent company to Meta in October 2021, and Facebook Pixel was renamed Meta Pixel at the same time. The underlying technology, the Pixel ID format, and the installation process are all unchanged. You may still see “Facebook Pixel” in older documentation and third-party plugins; both names refer to the same tracking system.
Can I use multiple pixels on one website?
Technically yes, but it’s not recommended. Multiple pixels on one site can cause duplicate event fires and distort your analytics. If you need to give multiple ad accounts access to the same pixel data, do it through Business Manager by sharing the pixel with those accounts — rather than installing separate pixels. One pixel per website is the standard best practice.
How long before the pixel has enough data to optimise?
Meta’s algorithm enters a “learning phase” when a campaign starts. To exit learning and reach stable optimisation, Meta needs a minimum of 50 optimisation events per week at the ad set level. For lower-volume businesses, this may take several weeks. Until then, the algorithm is still gathering data and delivery can be inconsistent. This is one reason to install the pixel as early as possible — the sooner it starts collecting audience data, the sooner you can run retargeting campaigns without waiting to build the audience from scratch.
Does Meta Pixel slow down my website?
Its impact is minimal. The pixel code loads asynchronously (t.async=!0), meaning it does not block your page from rendering. It will not meaningfully affect your Core Web Vitals scores. The only scenario where pixel-related code can create a performance issue is when firing many complex custom events with large data payloads — but this is uncommon in standard setups.
Should I install the pixel even if I’m not running ads yet?
Yes — install it immediately. The pixel starts building your website visitor audience from day one. When you launch your first campaigns, you’ll have a ready-made retargeting pool of people who already know your brand, instead of starting from zero. Custom audiences built from pixel data also tend to convert significantly better than interest-based targeting alone.
How does Meta Pixel interact with Google Analytics 4?
Meta Pixel and GA4 are independent tools that don’t integrate directly. They serve different purposes: GA4 gives you the full picture of website traffic, user journeys, and channel attribution across all sources. Meta Pixel provides attribution specifically for Meta ads and feeds that data back into Ads Manager. It’s standard practice to run both simultaneously. If you notice conversion count discrepancies between GA4 and Meta Ads Manager, this is typically due to different attribution windows — Meta defaults to 7-day click + 1-day view attribution, while GA4 uses last-click or data-driven models.
Meta Pixel Helper shows “No pixel found” — what should I check?
Work through this checklist: confirm the pixel code is placed in the <head> section (not the footer), verify the Pixel ID in the code matches the one in your Business Manager, temporarily disable any ad blockers or browser extensions (they can interfere with Pixel Helper’s detection), and use View Source (Ctrl+U / Cmd+U) to search for fbq('init' — if it’s absent, the code didn’t install correctly. If using GTM, confirm the container snippet is present on the page and the pixel tag is published (not just saved in preview mode).
Conclusion
Meta Pixel is the essential foundation for any business advertising on Facebook or Instagram. Without it, you’re running campaigns blind — no retargeting, no lookalike audiences, no conversion optimisation. With pixel data flowing, Meta’s algorithm has the signals it needs to find buyers rather than browsers, which translates directly into lower cost per acquisition and higher ROAS.
For European businesses operating in competitive markets — e-commerce, SaaS, professional services — a correctly configured pixel with Conversions API support is the difference between a campaign that scales profitably and one that burns budget without results. Install the pixel today, even if your Meta Ads campaigns are still on the roadmap. The audience data it collects will be waiting for you when you’re ready to launch.
To close the loop between Meta Pixel data and your broader analytics, make sure every ad link carries proper UTM parameters — so GA4 correctly attributes the traffic source and you can compare performance across all channels. Use our free UTM builder to generate properly structured tracking links in seconds.
Meta Pixel vs Meta CAPI: What’s the Difference
Meta Pixel and Meta Conversions API (CAPI) are two tracking tools from Meta that solve the same problem in different ways. The Pixel runs in the user’s browser; CAPI runs on your server. Together they provide the most accurate conversion attribution possible.
| Parameter | Meta Pixel | Meta Conversions API (CAPI) |
|---|---|---|
| Where tracking happens | User’s browser (client-side) | Your server → Meta API (server-side) |
| Technology | JavaScript snippet on the page | HTTP request from your server or CRM to the Meta API |
| iOS 14.5+ / App Tracking Transparency impact | Loses 30–40% of events due to ATT restrictions | Not affected — data is sent directly, bypassing iOS restrictions |
| Ad blockers (uBlock, AdBlock) | Blocked along with the pixel script | Not blocked — requests come from the server, not the browser |
| Offline event tracking (calls, CRM, payments) | Not supported | Supported — any event can be sent manually |
| Setup complexity | Easy — via GTM or a WordPress plugin | Moderate/high — requires a developer or partner integration |
| Data freshness | Real-time | Slight delay (seconds to minutes depending on implementation) |
| Event deduplication | Not needed (single channel) | Required when used alongside Pixel — use event_id |
| Best for | Getting started, SMBs, quick setup | E-commerce, finance, high attribution accuracy, GDPR-compliant data |
| Use both together? | ✅ Yes — both together give the most accurate results | ✅ Yes — CAPI fills the gaps that Pixel misses |
Bottom line: if you’re just starting out — install Meta Pixel via GTM (see the guide above). Once traffic grows or you notice data discrepancies — add Meta Conversions API for server-side tracking. Together they ensure accurate attribution even with iOS 14.5+ and active ad blockers.
Step-by-Step Guide: How to Connect Meta Pixel via GTM
Step 1: Open Ads Manager
Go to facebook.com/adsmanager and find Events Manager in the left-hand menu.
Step 2: Open Events Manager
From the Events Manager overview screen, click the blue ‘Connect data’ button.
Step 3: Select ‘Internet’ as data source
In the ‘Connect a new data source’ dialog, choose ‘Internet’ (website) and click ‘Next’.
Step 4: Create a new dataset
In the dataset field, click the ‘Create a new dataset’ link.
Step 5: Name your pixel and click ‘Create’
Enter a name for your pixel (e.g., your website or brand name) and click ‘Create’.
Step 6: Select ad accounts
Check the ad accounts that should use this pixel and click ‘Next’.
Step 7: Connect website data
Choose ‘Set up Meta Pixel’ — this enables real-time tracking of user actions on your website.
Step 8: Choose Google Tag Manager method
Select ‘Set up Meta Pixel with Google Tag Manager’ (recommended) and click ‘Next’.
Step 9: Automatic events via GTM
Review how automatic events work — Meta sets up standard events without any coding required. Click ‘Next’.
Step 10: Advanced Matching settings
Optionally enable ‘Advanced audience matching’ for better targeting accuracy. Click ‘Next’.
Step 11: Select GTM account and container
Choose your Google Tag Manager account and the container for your website. Click ‘Finish setup’.
Step 12: Events setup (optional)
If needed, enter your website URL and add events using the event setup tool. Click ‘Next’.
Step 13: Setup complete
Verify events in Events Manager — Meta recommends using the ‘Test events’ section to confirm your pixel is sending data. Click ‘Finish’.
Done! Meta Pixel is installed
Your Meta Pixel is now set up via Google Tag Manager. Meta will automatically track standard events on your website and send data to optimise your ad campaigns.

Read also

BANT Lead Qualification Methodology: What It Is and How It Works
BANT is a lead qualification framework built on four criteria: Budget, Authority, Need, Timeline. What it is, example…

Best Claude Skills for Threads (2026)
Claude skills and MCPs for Threads: posts and threads, captions, carousel design, cross-posting from Instagram, the official Threads…

Best Claude Skills for X (Twitter) (2026)
Claude skills and MCPs for X (Twitter): tweets and threads, content planning, X Ads, analytics, outreach. Official X…