How to Track Revenue, Transactions and Purchases in Google Analytics 4 from WordPress WooCommerce

Introduction
WooCommerce store owners are often convinced that Google Analytics 4 already shows them revenue, transaction counts and purchase behaviour. In practice, most sites only send page views to GA4 — there’s no view_item, add_to_cart, or purchase events at all. That means:
- GA4 has no “Revenue by traffic source” report;
- Google Ads can’t see the real value of conversions (there’s nothing to calculate ROAS from);
- decisions about scaling ad spend are made blind.
This article is a step-by-step case study of how we diagnosed and fully configured ecommerce tracking on a real client WooCommerce store: from the first check of “is anything even being sent” to a confirmed, working purchase event in GA4.
Step 0. How to check whether ecommerce tracking works at all
Before installing anything, check the current state. The fastest way is to open the product page source code (Ctrl+U / Cmd+Option+U) and search for dataLayer.push.
A common trap: if you search for the word add_to_cart on a WooCommerce product page, you’ll almost certainly find it — but it will just be the button’s CSS class:
<button class="single_add_to_cart_button ... add_to_cart_button ajax_add_to_cart" data-product_id="124">
This is not proof that tracking works. A real event looks different — it’s a dataLayer.push() call with an ecommerce object:
dataLayer.push({
  "ecommerce": {
    "currency": "USD",
    "value": 358,
    "items": [{
      "item_id": 591,
      "item_name": "Product name",
      "price": 358,
      "item_category": "Products"
    }]
  },
  "event": "view_item"
});
If there’s no such block on the product page, ecommerce data isn’t reaching GA4 — even if a basic gtag('config', ...) for page views is in place and working.
What else is worth checking at this stage:
– how many times googletagmanager.com/gtm.js loads on the page — it should load exactly once. Two calls mean duplicated data in GA4 (a classic problem when the GTM code is both hand-inserted and added by a plugin at the same time);
– whether there’s already an installed but inactive connector plugin (e.g. Site Kit by Google) — it’s often left “just in case” but doesn’t perform any ecommerce function at all.
Step 1. Installing GTM4WP (Google Tag Manager for WordPress)
For WooCommerce ecommerce tracking, the optimal choice is the free plugin GTM4WP (author Thomas Geiger, WordPress.org slug: duracelltomi-google-tag-manager). Why this plugin specifically:
- it already officially implements the GA4 E-commerce specification for WooCommerce out of the box;
- it requires no manual PHP coding whatsoever;
- it works well alongside a Google Tag Manager container already on the site.
Install it the standard way: Plugins → Add New → search “GTM4WP” → Install → Activate.

Step 2. Configuring the General tab
After activating the plugin, go to Settings → Google Tag Manager, the General tab.
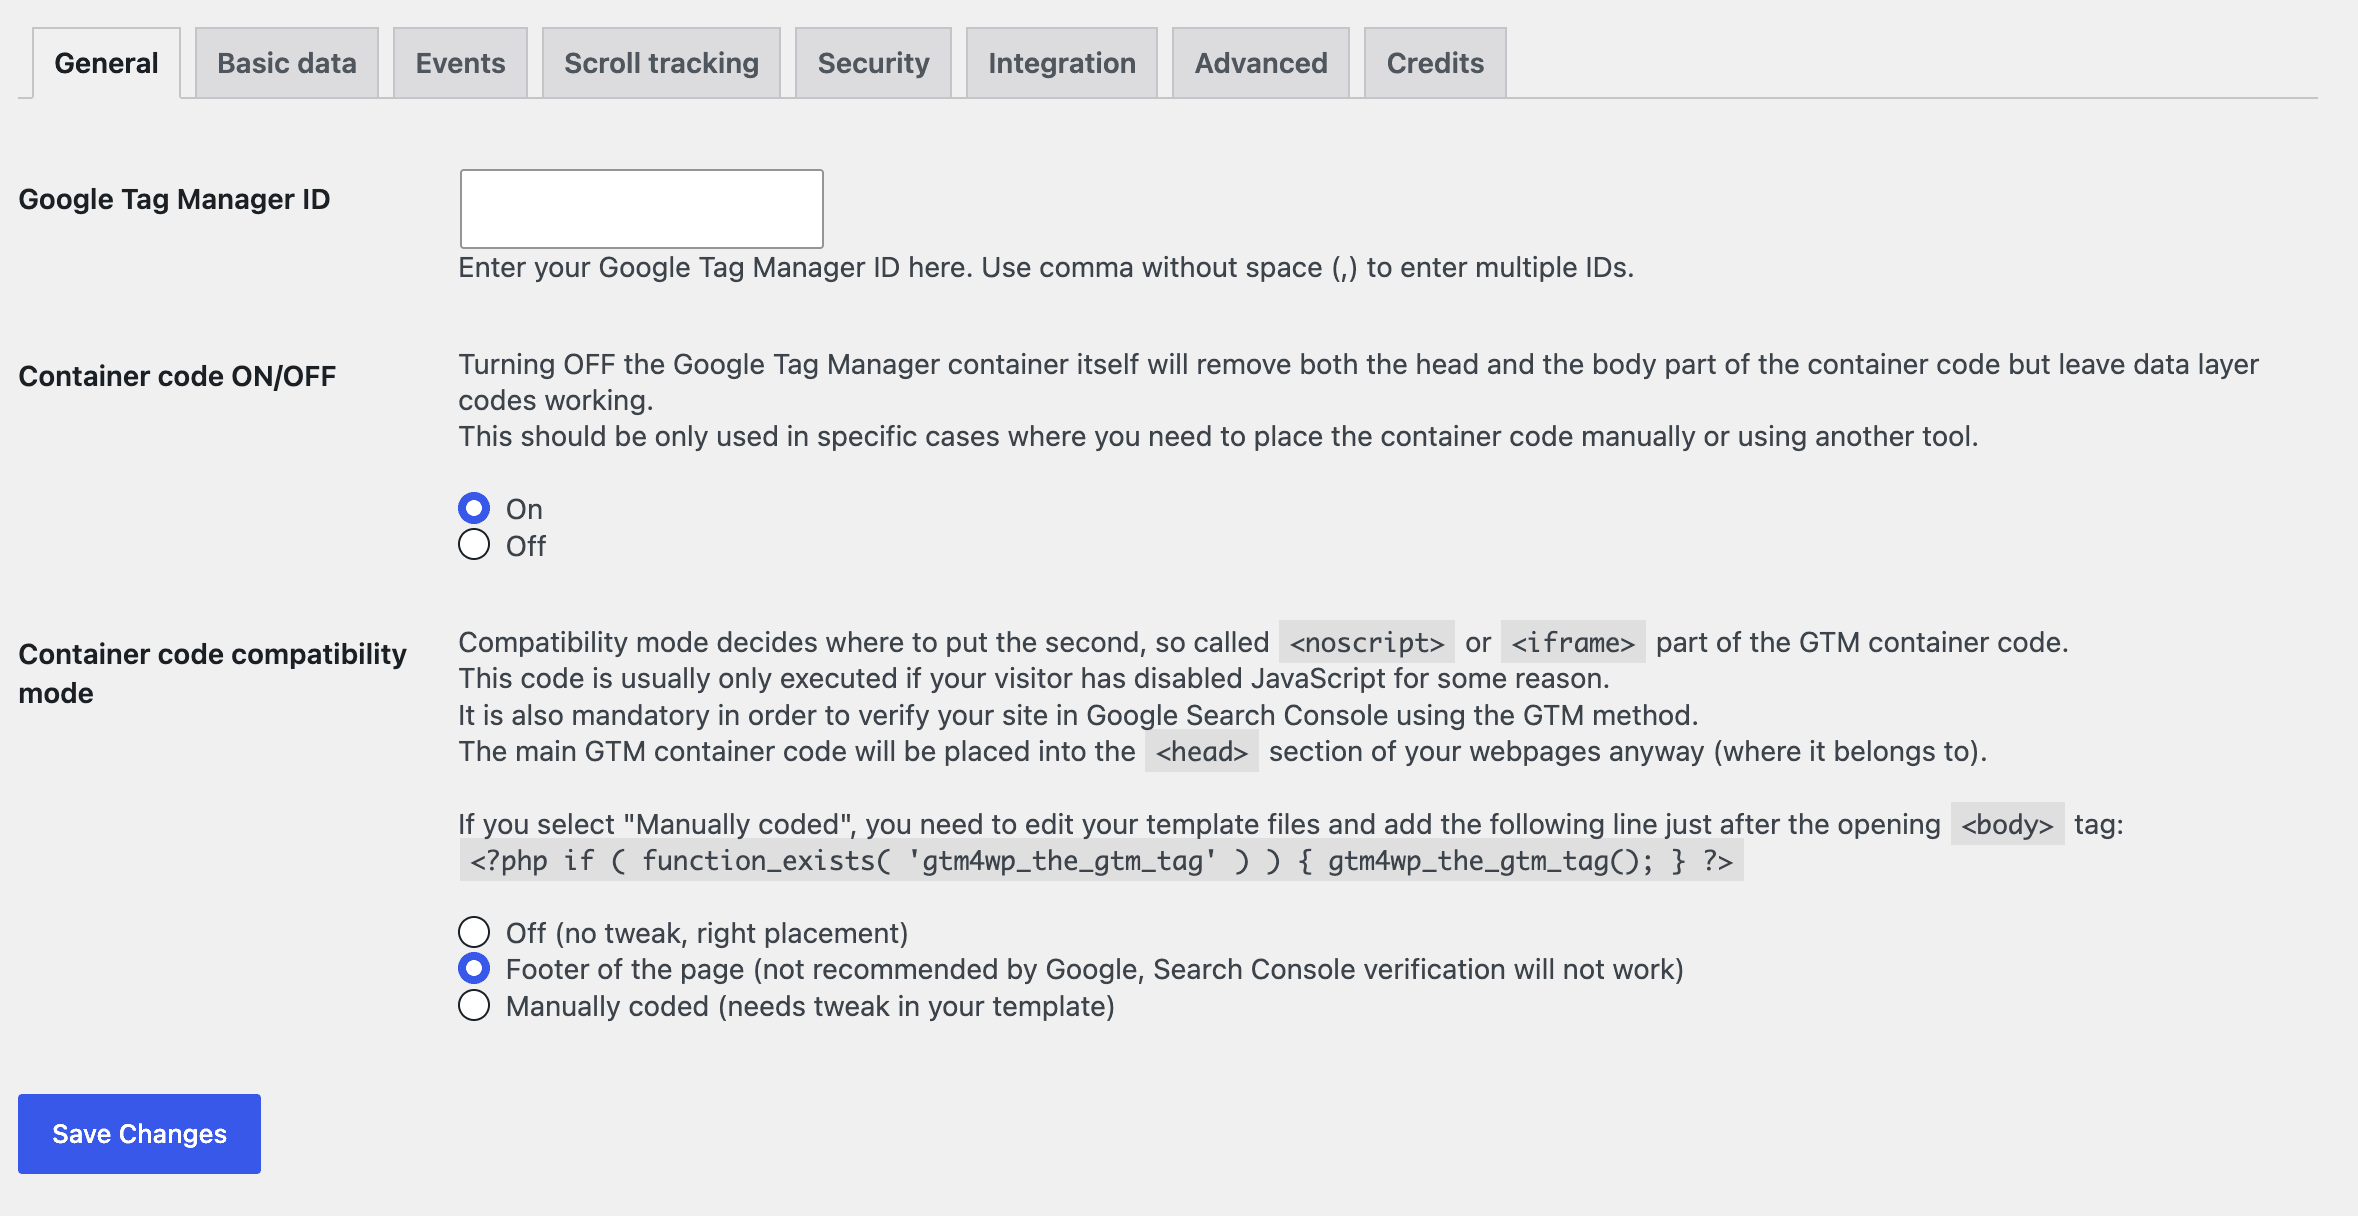
There are three key fields here:
Google Tag Manager ID
Paste the ID of your existing GTM container, e.g. GTM-XXXXXXX. Use the same container that’s already on the site — don’t create a new one, or you’ll have to manually migrate every other tracking element (ad pixels, conversions, etc.) that may already be configured there.
Container code ON/OFF — the most important setting
This field decides whether the GTM container gets duplicated on the site:
| Situation | What to choose |
|---|---|
| The GTM code hasn’t been inserted manually anywhere on the site yet | On — let the plugin insert the <head>/<body> snippets itself |
| The GTM code is already inserted manually (e.g. via Code Snippets, Insert PHP, or directly in the theme) | Off — the plugin keeps feeding the dataLayer with data but won’t insert a duplicate of the container itself |
The plugin itself states this directly in the field description: “This should be only used in specific cases where you need to place the container code manually or using another tool” — this is an officially documented scenario precisely for the case when GTM is already installed some other way.
Why this is critical: if you leave it On while manual code is already in place, the container loads twice on every page, and GA4/Google Ads start counting twice as many events and page views as actually happened. This is one of the most common yet least noticeable mistakes in ecommerce tracking — the numbers look plausible, so the problem is often discovered only months later, when reconciling GA4 revenue with actual sales.
Container code compatibility mode
This affects the placement of the second (<noscript>) part of the GTM code. If Container code = Off is selected above, this field doesn’t matter (the plugin inserts nothing). If you chose On and the site is built on Elementor, the plugin’s official documentation directly recommends setting “Off (no tweak, right placement)”, since Elementor is natively supported.
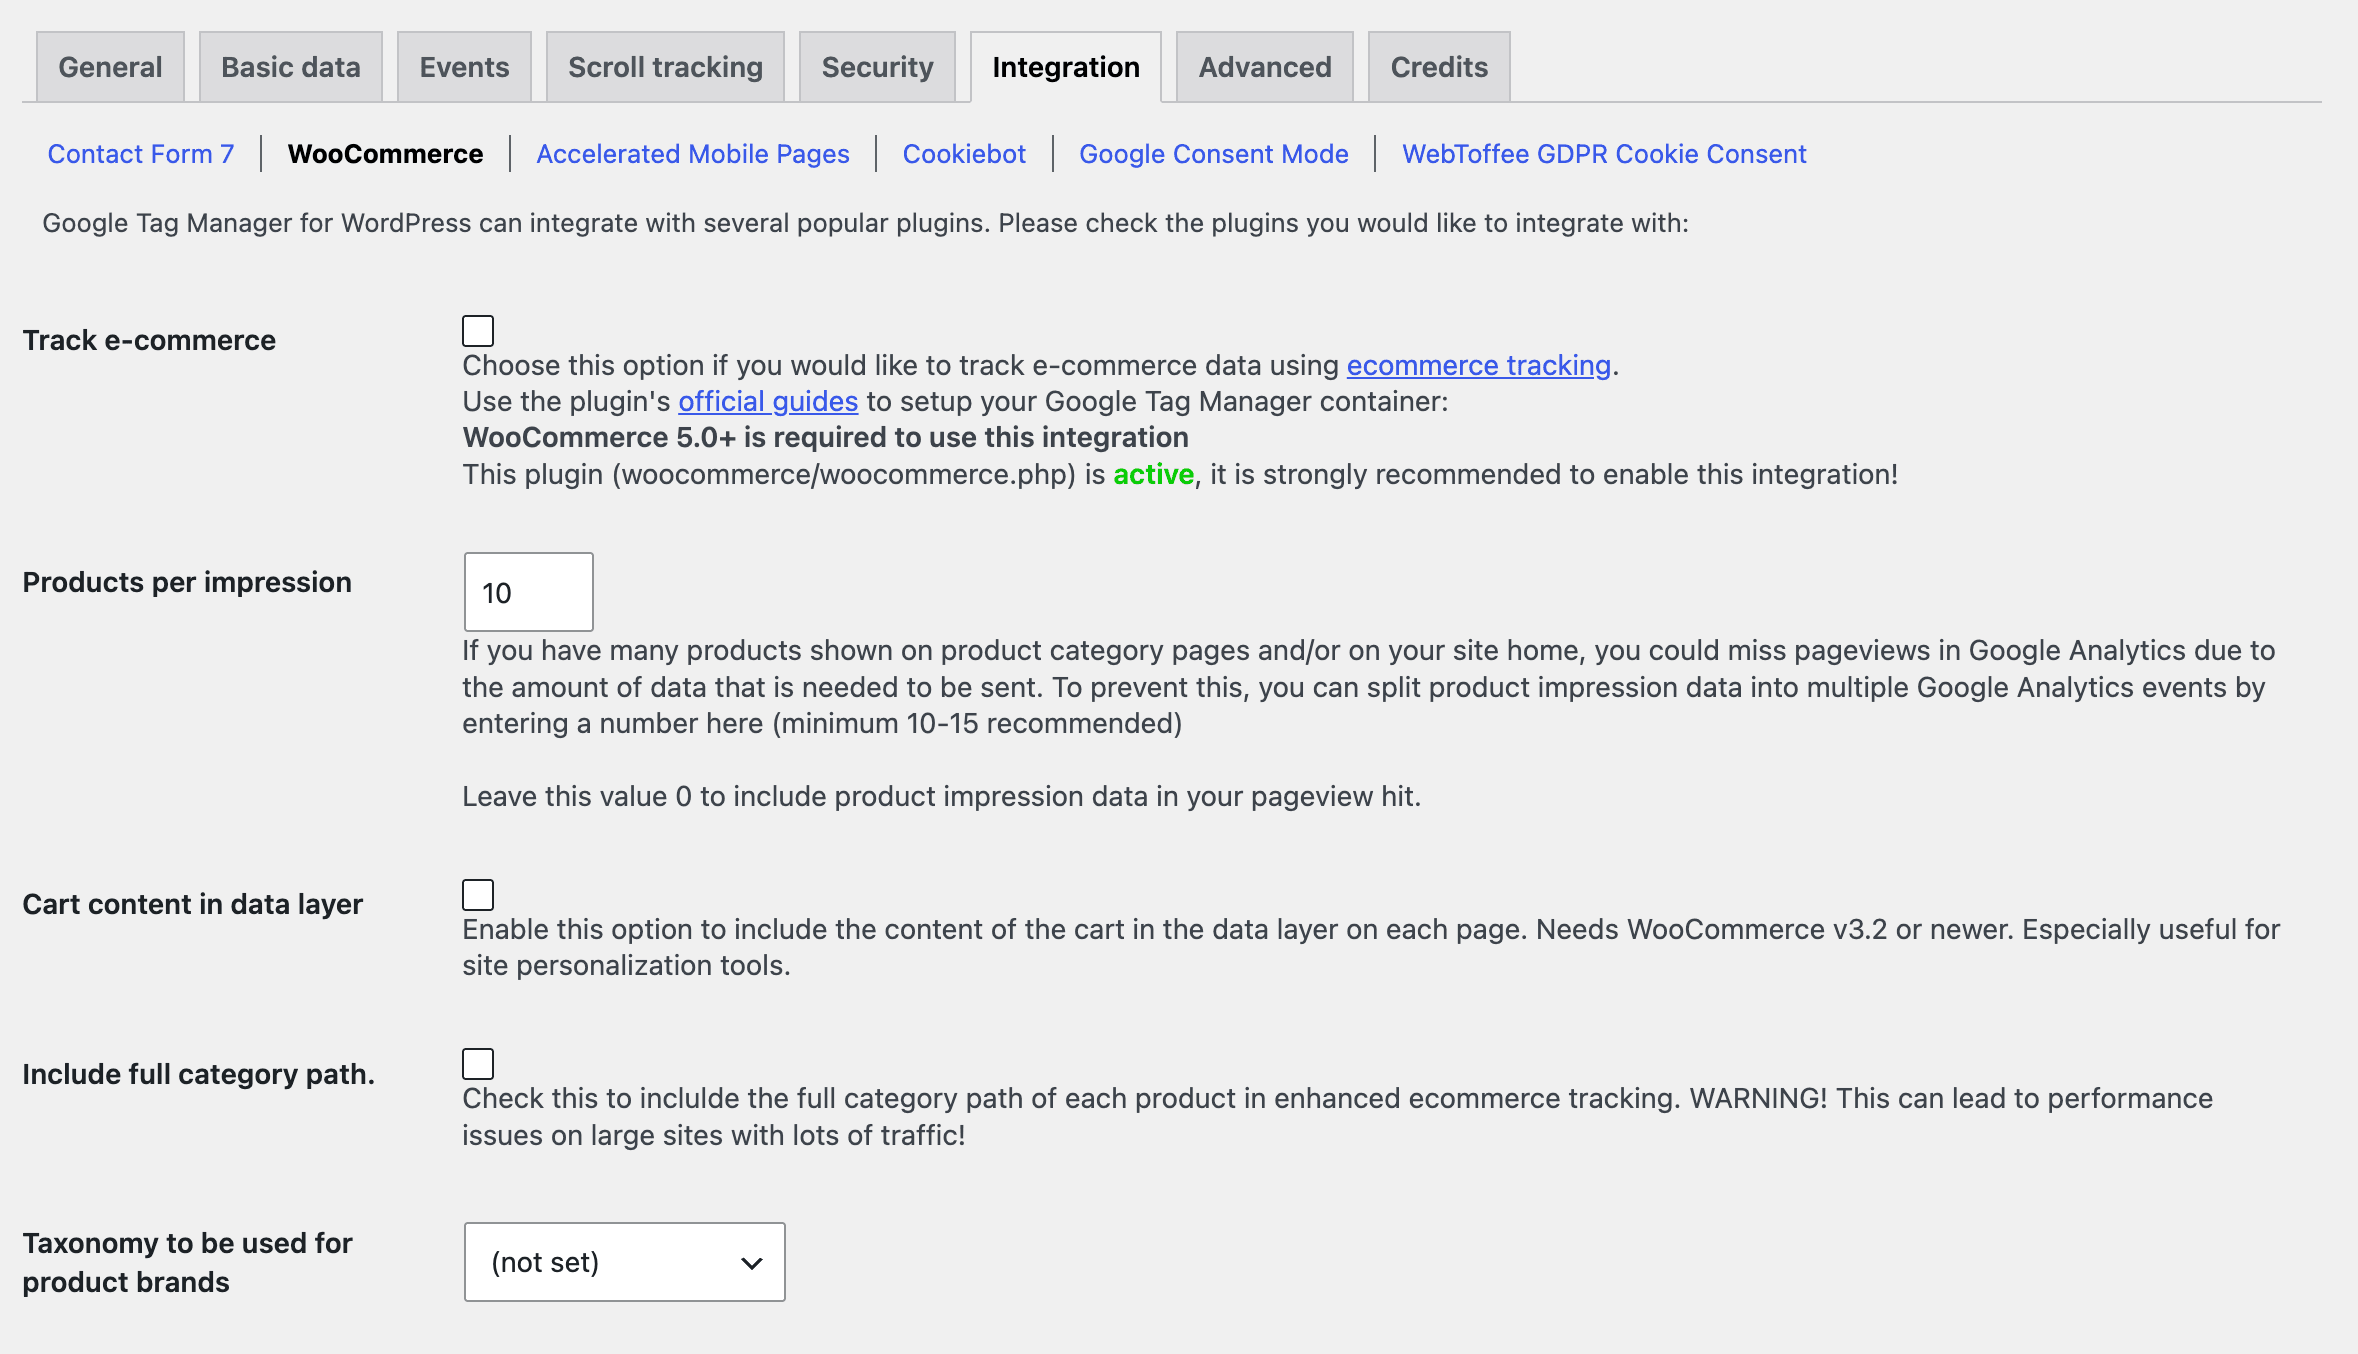
Step 3. Integration → WooCommerce tab
This is where the actual ecommerce tracking logic gets switched on.
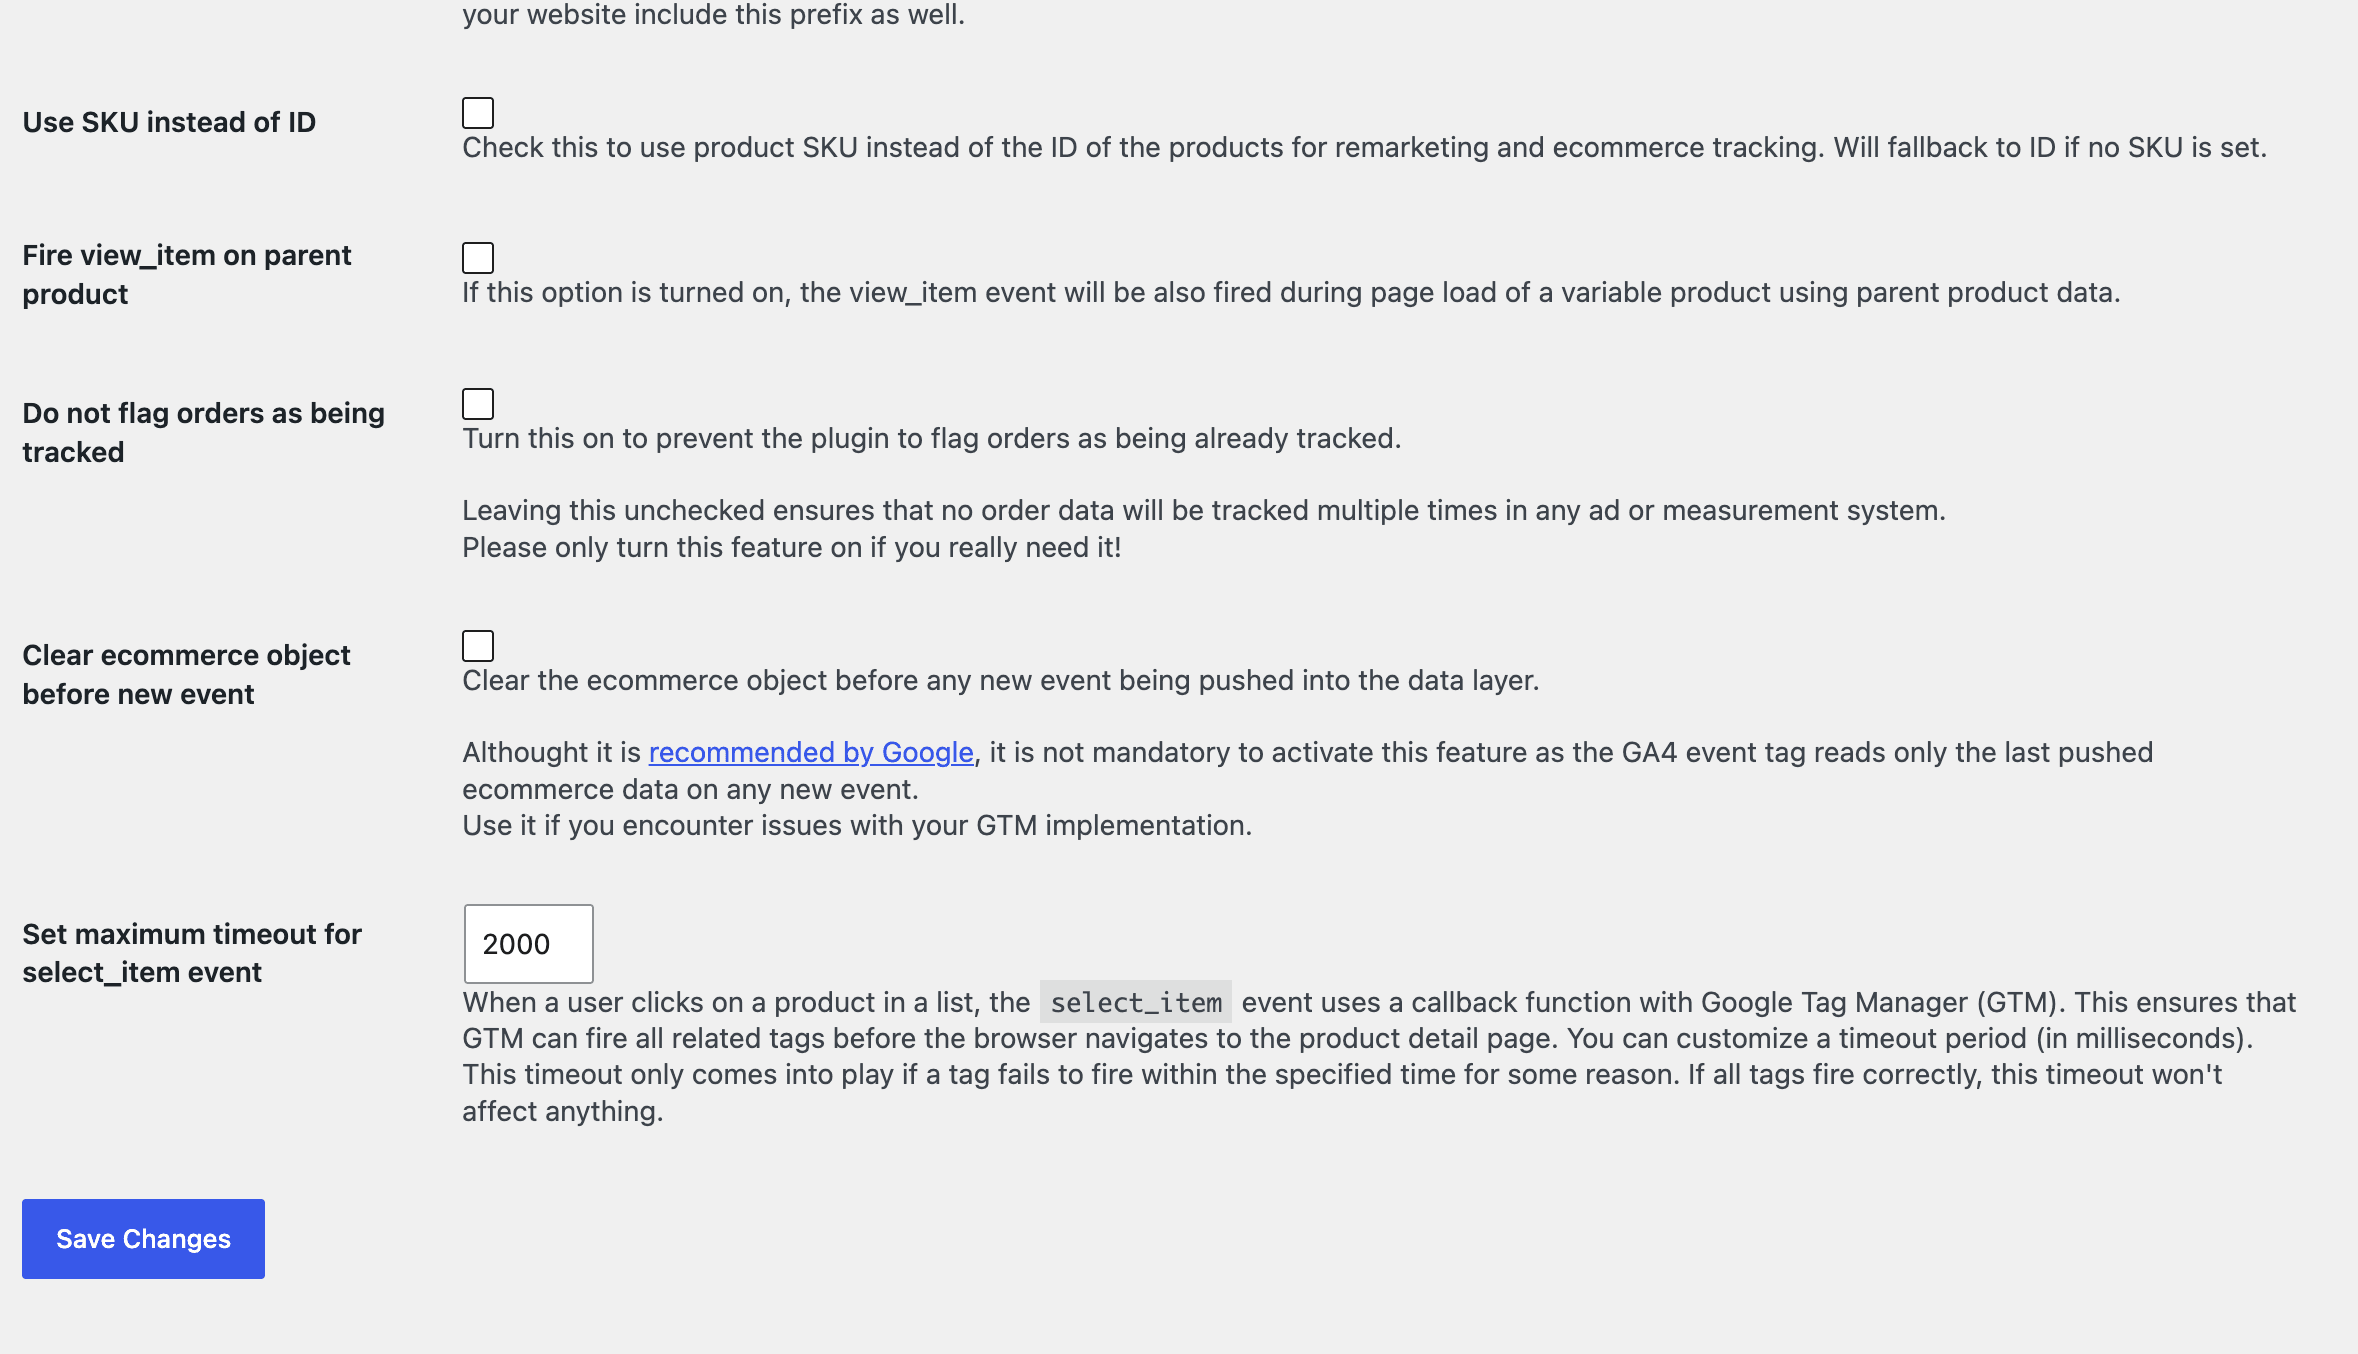
Required fields
Track e-commerce → turn on. This is the main switch: without it, WooCommerce doesn’t communicate with the dataLayer at all. The plugin itself flags this in its description when it detects an active WooCommerce install: “strongly recommended to enable this integration”.
Clear ecommerce object before new event → turn on. This is Google’s official recommendation for GA4 dataLayer implementations: it clears the previous ecommerce object before every new event, so data from a previous funnel step (e.g. products from view_item) doesn’t “leak” into the next event (add_to_cart).
Fields worth leaving at their defaults
- Products per impression (
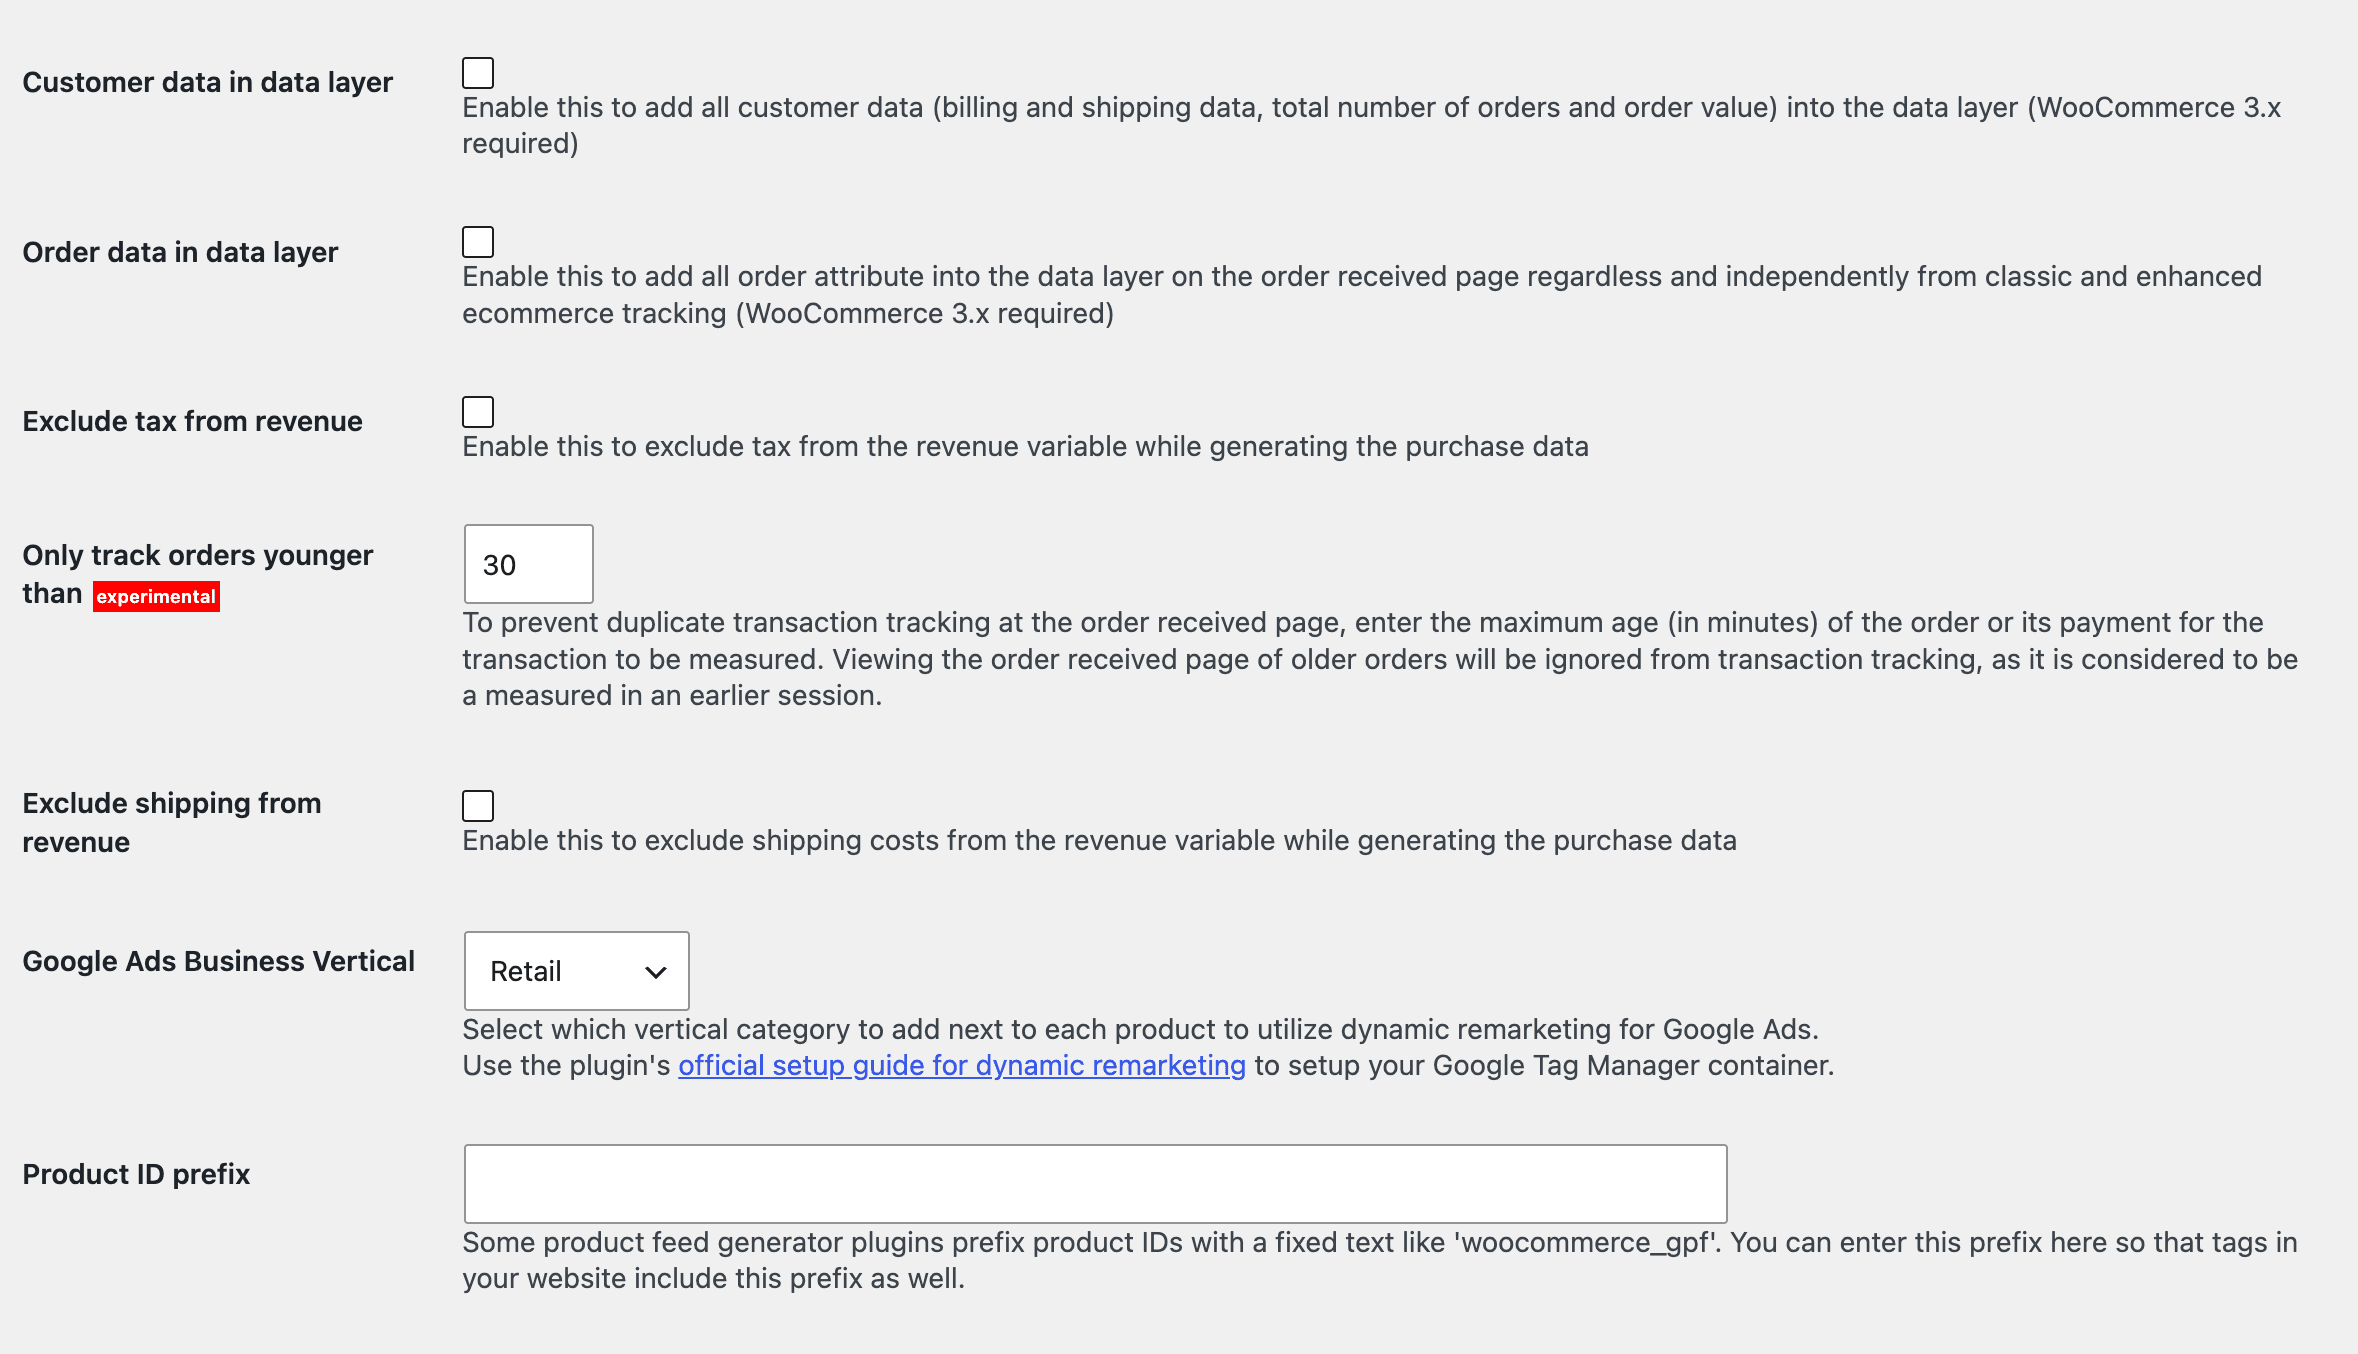
10) — splits large product lists into several events so you don’t lose impressions when a category page has a lot of products. - Only track orders younger than 30 min (experimental) — protects against re-tracking a transaction if a customer reopens the “Thank you for your order” page.
- Do not flag orders as being tracked → leave off. The plugin itself warns to only enable this if you genuinely need to, otherwise the risk of duplicated transactions in analytics increases.
- Google Ads Business Vertical →
Retail, if you run a standard online store.
Optional fields (not critical for basic revenue tracking)
- Cart content in data layer, Include full category path — useful for site personalization or detailed category reports, but not needed just for revenue/transaction tracking. The plugin directly warns that
Include full category pathcan affect performance under heavy traffic. - Customer data in data layer / Order data in data layer — this is not about basic ecommerce revenue tracking. It’s data preparation for Enhanced Conversions in Google Ads (passing a hashed customer email for more accurate conversion matching). Very useful if you run ads for the site, but it’s a separate task — see the section below.
- Exclude tax from revenue / Exclude shipping from revenue — a business decision: should GA4 revenue include tax/shipping (i.e. match the full order total), or just the “net” product revenue. There’s no universally correct answer — align this with whoever reconciles your financial figures.
Step 4. Checking the dataLayer on the live site
After saving your settings, check the result directly in the page source (Ctrl+U) by walking through an imaginary buyer funnel:
Product page — should show:
dataLayer.push({"ecommerce":{"currency":"USD","value":358,"items":[{"item_id":591,"item_name":"...","price":358,...}]},"event":"view_item"});
Cart with a product (view_cart) and checkout with a product (begin_checkout) — a similar structure, but with a different event and a quantity field on the items.
An important nuance: if you check the cart/checkout without an added product — there will be no event, and that’s normal. GTM4WP deliberately doesn’t generate view_cart/begin_checkout for an empty cart, so it doesn’t clutter analytics with fake zero-value transactions. Actually add a product to the cart first, then check the page source.
The purchase event can’t be checked this way — it only fires after a real completed order (the woocommerce_thankyou hook). The simplest way to test it is to place one test order for the minimum amount or with a 100%-off coupon.
Step 5. Setting up tags in Google Tag Manager
Data in the dataLayer is only half the journey. Google Analytics 4 will receive nothing until Google Tag Manager itself has tags that listen for these events and send them to GA4.
Option A: manually through the GTM interface
- GA4 Configuration tag — type “Google Analytics: GA4 Configuration”, enter your Measurement ID (
G-XXXXXXXXXX). If the site already has a directgtag.jsfor basic page views (outside GTM), make sure to disable the “Send a page view event when this configuration loads” checkbox, or you’ll get a duplicatepage_view. Trigger — All Pages. - For every event (
view_item,add_to_cart,view_cart,begin_checkout,purchase) create: – a Custom Event trigger with an event name that exactly matches what GTM4WP pushes; – a GA4 Event tag referencing the GA4 Configuration tag, with the “Send Ecommerce Data” option enabled — GTM will then automatically read the wholedataLayer.ecommerceobject, so you don’t need to manually mapitems/value/currency.
Option B: importing a ready-made file (faster)
Instead of manually clicking through all 6 tags and 5 triggers, you can prepare a JSON container export file with all the required elements and import it with one click:
Admin → Import Container → choose the file → choose the workspace → the “Merge” option (NOT “Overwrite”).
⚠️ It’s important to pick “Merge”, not “Overwrite” — Overwrite completely replaces the selected workspace’s contents with only what’s in the file, wiping out anything else that may already be configured there.
After importing, always check the result in GTM’s Preview mode before publishing — don’t publish blind: walk through the site (product → cart → checkout) and confirm in the debug panel that every tag actually fires on its own event.
Step 6. Publishing and final verification
After Preview testing — Submit → Publish in Google Tag Manager. In the Versions section you can see the full list of what went into the new version:
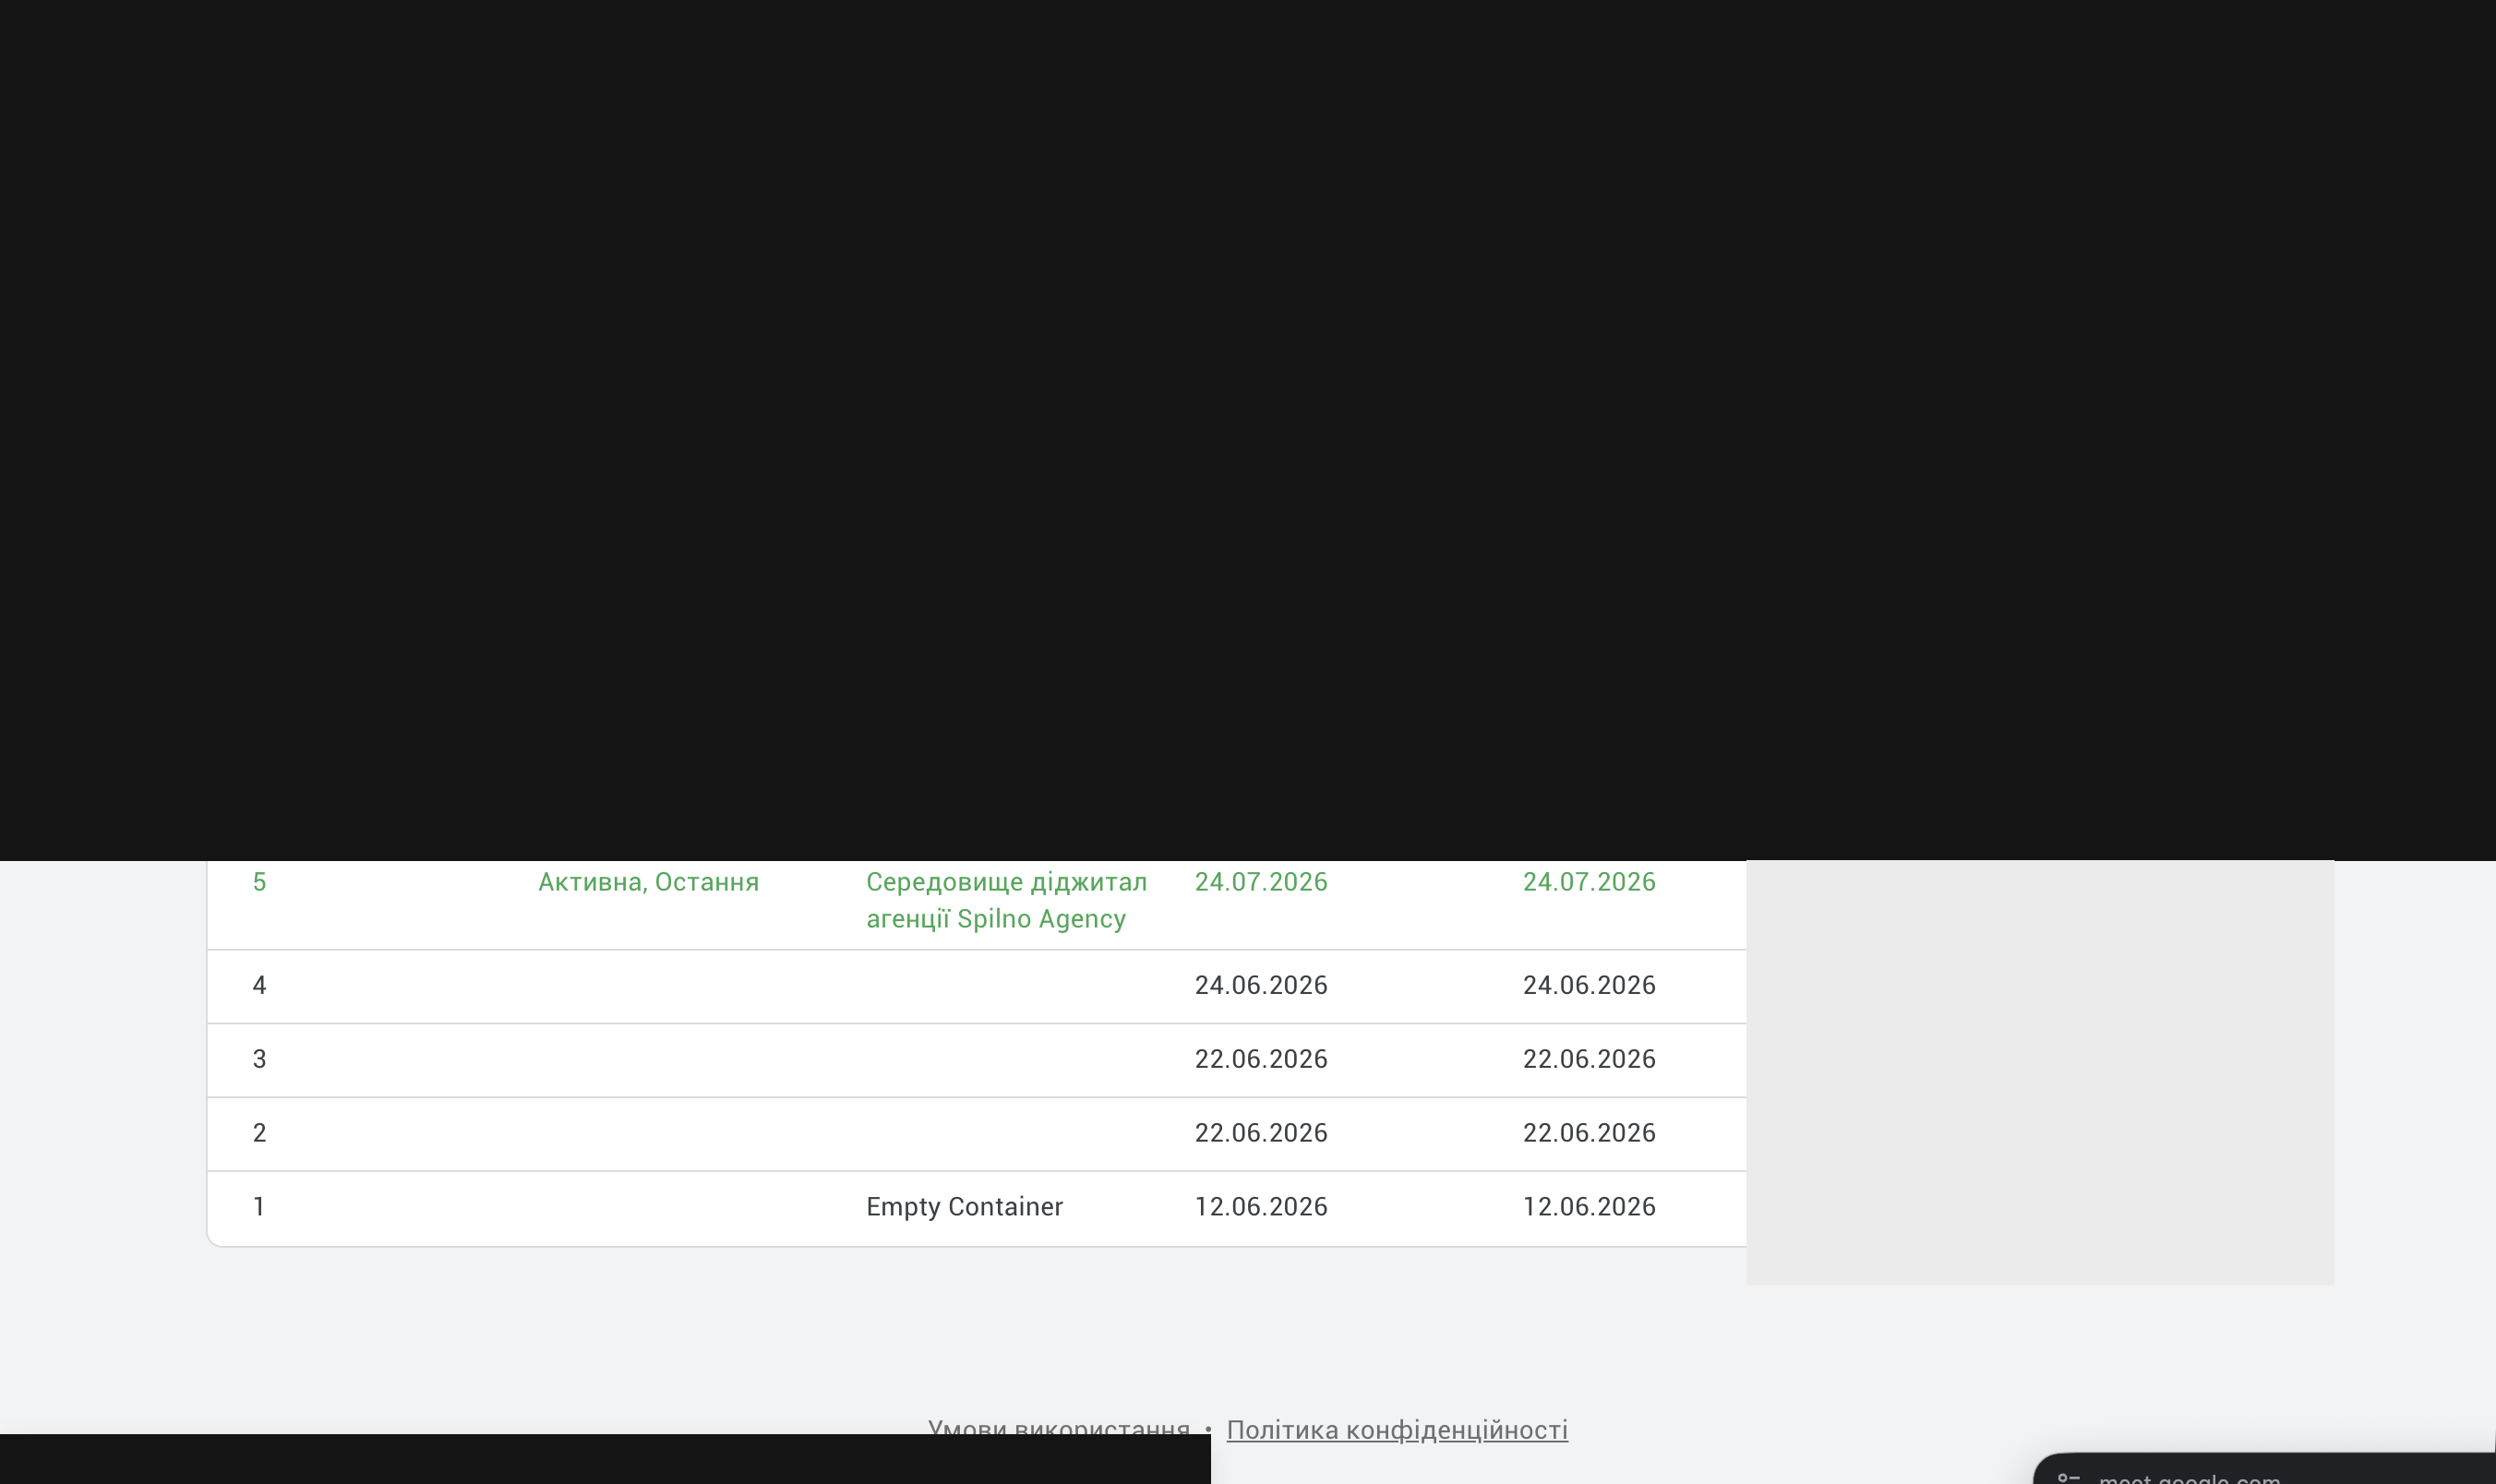
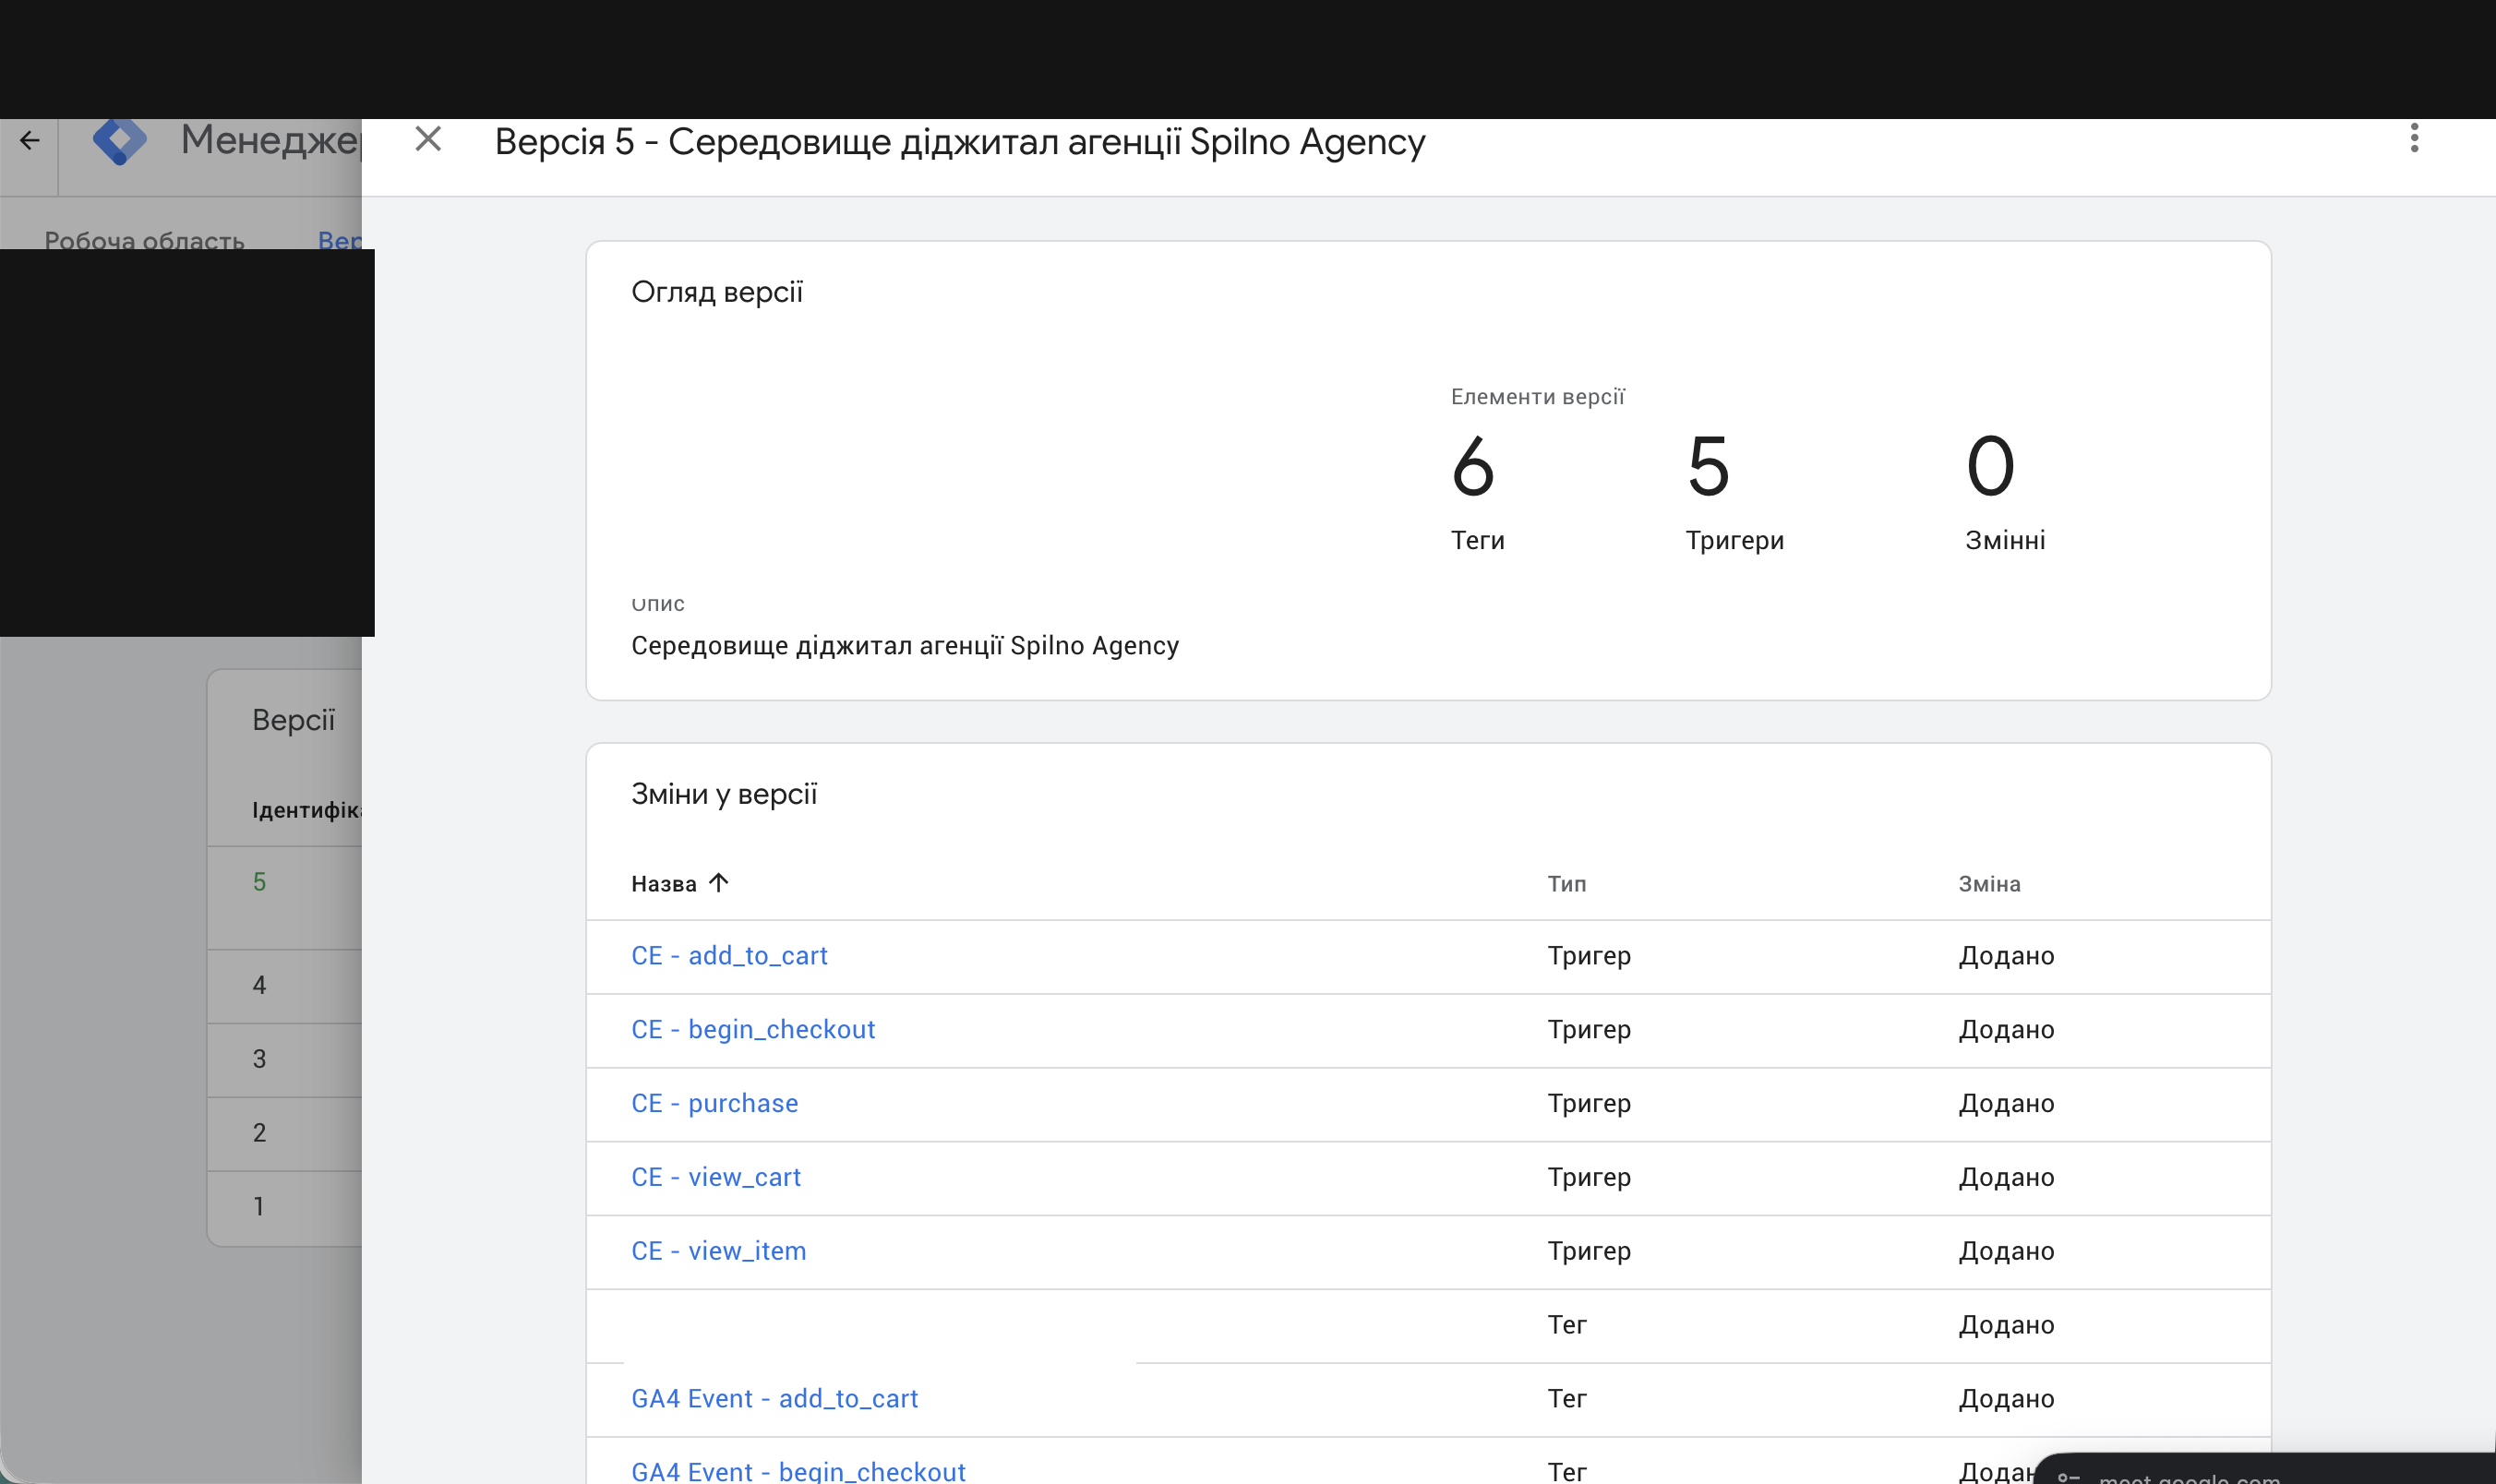
The final check is to confirm the published changes are actually being served on the live site right now. The fastest way is to download the public container script directly:
curl -s "https://www.googletagmanager.com/gtm.js?id=GTM-XXXXXXX" | grep -oE "gaawc|gaawe|view_item|add_to_cart|purchase" | sort | uniq -c
If the response shows gaawc (GA4 Configuration) and gaawe (GA4 Event) alongside your event names, the tags are genuinely live and being served to site visitors, not just saved in a draft.
The last step, which only the GA4 account owner can check, is to open GA4 → Realtime reports or DebugView, walk through the site as a regular visitor, and confirm that view_item/add_to_cart/purchase events actually arrive with the value, currency, and items fields.
That’s exactly what happened in our case — within a few minutes of publishing, the standard GA4 “Event count by event name” report showed new events with the expected parameters:
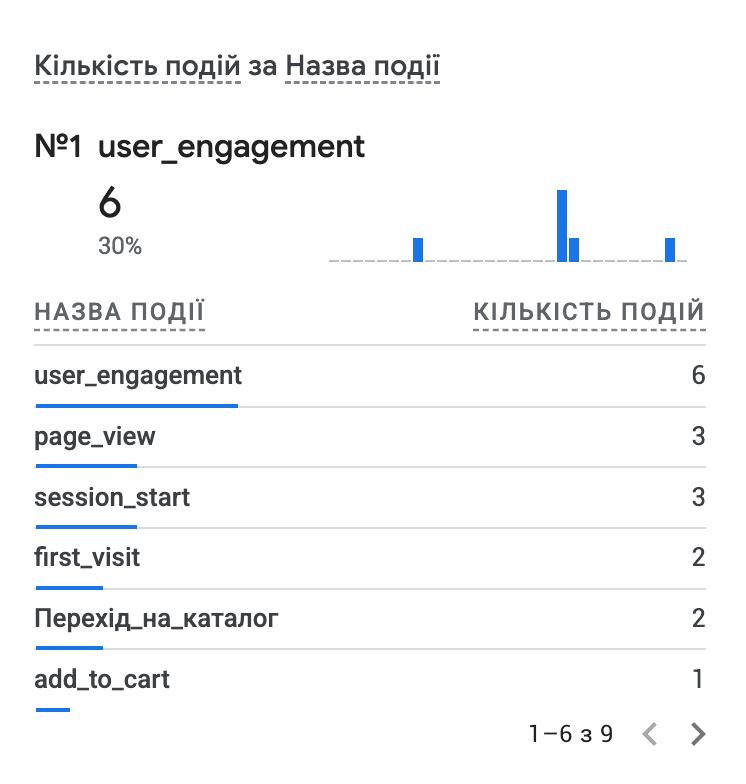
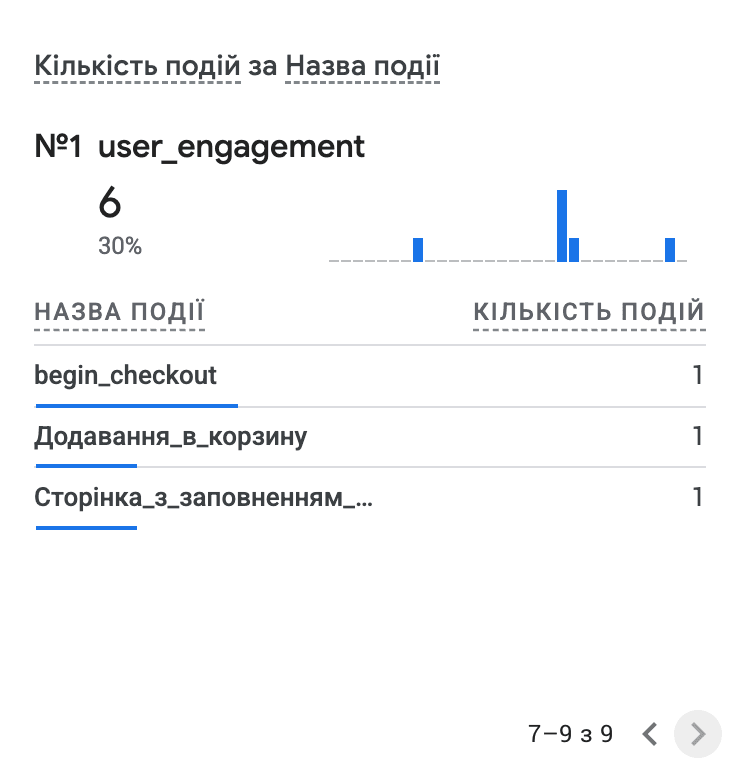
This is the final proof: the data made it through the entire chain from WooCommerce to GA4 reports.
Bonus: if you’re running Google Ads for the site
Basic ecommerce tracking solves the “seeing revenue in GA4 reports” problem. But if the agency or store owner also runs Google Ads, it’s worth setting up Enhanced Conversions separately — this significantly improves conversion attribution accuracy, which matters especially given third-party cookie restrictions.
Briefly, what’s needed for this (a separate stage, don’t mix it up with the basic setup):
1. Enable the “Order data in data layer” option in GTM4WP — it adds an orderData object to the dataLayer on the thank-you page, which already contains the customer’s hashed email.
2. Enable Enhanced Conversions in the client’s Google Ads account itself.
3. Add a Google Ads Conversion Tracking tag in GTM with Enhanced Conversions mode, mapped to the orderData fields.
4. Make sure this tag only fires when there’s consent for ad_storage/ad_user_data (Consent Mode) — since personal data is being sent, even in hashed form.
Common mistakes — quick checklist
- ❌ Confusing button CSS classes (
add_to_cart_button) with realdataLayer.pushevents. - ❌ Leaving manual GTM code enabled at the same time as the plugin’s automatic insertion → data duplication.
- ❌ Checking the cart/checkout without an actually added product and concluding “it doesn’t work”.
- ❌ Choosing “Overwrite” instead of “Merge” when importing a container into GTM.
- ❌ Publishing changes in GTM immediately, without checking Preview mode.
- ❌ Confusing basic ecommerce tracking with Enhanced Conversions — these are different tasks with different goals.
Conclusion
The full chain “WooCommerce → dataLayer → GTM → GA4” consists of three independent layers, and each one needs to be checked separately: whether WordPress generates the right data, whether GTM catches and sends it correctly, and whether GA4 actually receives it. Skip any of the three steps, and your reports will show silence instead of revenue — while it will still look like “everything’s supposedly configured”.

Read also
Google Tag Manager Workspaces: Why You Need Them and How to Use Them in 2026
A workspace in Google Tag Manager is a “draft” of a container — a place to safely edit…
How to Analyze Hourly Statistics in Google Analytics 4
Google Analytics 4 has no dedicated “hourly statistics” menu item, but you can get that exact breakdown in…

cPanel SEO: How to Optimize Your Hosting for Search in 2026 (Enable & Disable)
cPanel is a hosting control panel that packs dozens of features with a direct impact on SEO: HTTPS…