How to Install Google Analytics 4 in 2026: GTM & Manual Code Guide

Google Analytics 4 is the only free analytics tool that in 2026 supports Consent Mode v2, AI-powered insights, and cross-platform tracking. This step-by-step guide shows two ways to install GA4 on your website: via Google Tag Manager (recommended) and directly via code — with screenshots of every key step.
What Is Google Analytics 4 and Why Install It in 2026
Google Analytics 4 (GA4) is Google’s fourth-generation web analytics platform, which replaced Universal Analytics in July 2023. Unlike its predecessor, GA4 is built on an event-based data model where every user action on your site is captured as an individual event with parameters.
In 2026, GA4 is far more than a visitor counter. It gives European businesses and e-commerce sites:
- AI-powered analytics — automatic conversion predictions, traffic anomaly detection, machine-learning-based audience segments
- Consent Mode v2 support — a mandatory requirement for sites targeting EU audiences under GDPR
- Cross-platform tracking — a unified view across website, mobile app, and offline data
- Free BigQuery export — raw data export with no row limits
- Google Ads integration — automatic conversion import and remarketing audiences
If your website still doesn’t have GA4 — you’re not just missing data. You’re making decisions blind.
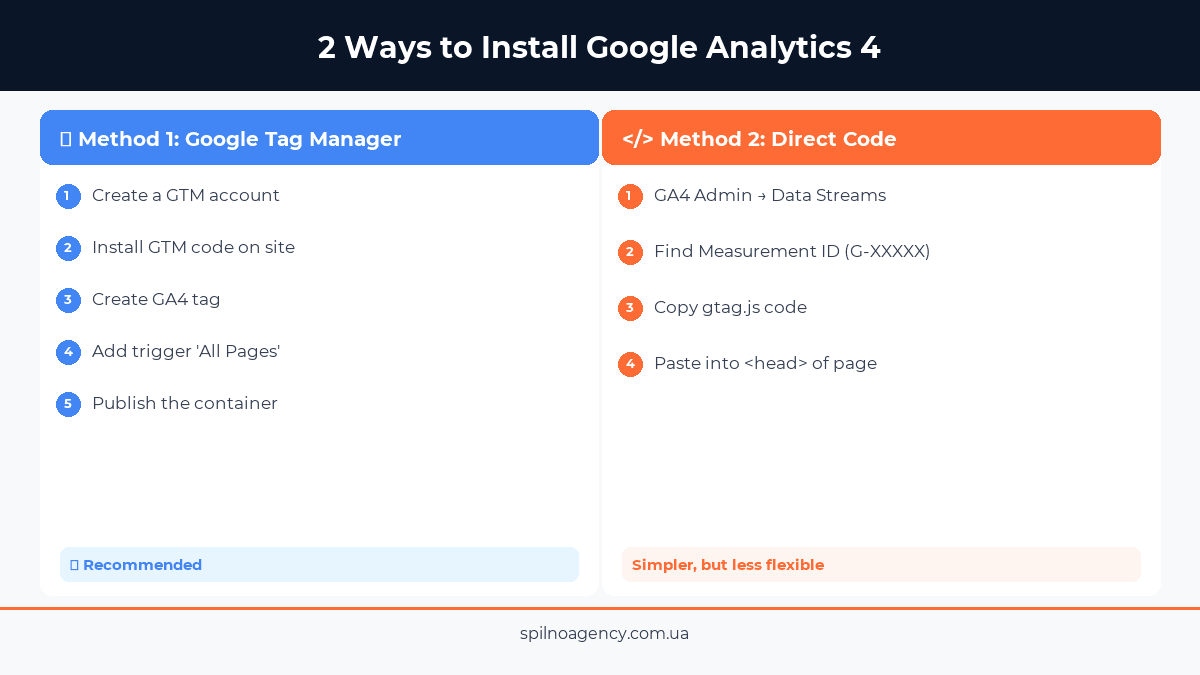
Method 1: Install GA4 via Google Tag Manager (Recommended)
Google Tag Manager (GTM) is a tag management system that lets you add and update tracking codes on your site without editing HTML. We recommend this approach for most websites — here’s why:
- Add new tags (Google Ads, Meta Pixel, Hotjar) without involving a developer
- Version control — roll back changes at any time
- One GTM snippet on your site instead of dozens of separate scripts
- Flexible trigger configuration — control when and where each tag fires
Step 1: Create a Google Tag Manager Account
Go to tagmanager.google.com and sign in with your Google account. Click the Create Account button in the top right corner.
- In the Account Name field, enter your company or website name
- In Container Name, enter your website URL (e.g.,
example.com) - Under Target Platform, select Web
- Click Create and accept the Terms of Service
After creation, GTM will show you the container code — two JavaScript snippets that need to be installed on your site.
Step 2: Install the GTM Snippet on Your Site
GTM provides two code snippets. The first goes in the <head> tag, the second in the <body> tag:
<!-- Google Tag Manager -->
<script>(function(w,d,s,l,i){w[l]=w[l]||[];w[l].push({'gtm.start':
new Date().getTime(),event:'gtm.js'});var f=d.getElementsByTagName(s)[0],
j=d.createElement(s),dl=l!='dataLayer'?'&l='+l:'';j.async=true;j.src=
'https://www.googletagmanager.com/gtm.js?id='+i+dl;f.parentNode.insertBefore(j,f);
})(window,document,'script','dataLayer','GTM-XXXXXXX');</script>
<!-- End Google Tag Manager -->
This code is placed immediately after the opening <head> tag. The second snippet (noscript) goes immediately after the opening <body> tag.
For WordPress sites, you have several options:
- Plugin Insert Headers and Footers (or WPCode) — the simplest option without editing theme files
- Plugin GTM4WP (Google Tag Manager for WordPress) — specialized plugin with dataLayer enhancements
- Editing header.php in your theme — for experienced users
Step 3: Create a Google Analytics 4 Tag in GTM
With GTM installed on your site, it’s time to create the GA4 tag. In GTM, go to the Tags section in the left menu and click New.

In the tag configuration window, click the Tag Configuration block. A panel will open for choosing the tag type. Under Recommended, select Google Analytics.

In the Measurement ID field, enter your GA4 Measurement ID (format: G-XXXXXXXXXX). We’ll show you exactly where to find this ID in the next section.
Step 4: Add the “All Pages” Trigger
Scroll down to the Triggering block and click on it. Select Initialization – All Pages (or All Pages). This trigger ensures GA4 fires on every page load across your entire website.
Best practice in 2026: use Initialization – All Pages instead of plain All Pages — this ensures GA4 initialises before other tags and doesn’t miss early events.
Step 5: Save and Publish the Container
Click Save in the top right corner. The tag is now created but not yet live on your site — you need to publish the container.
Return to the GTM main screen and click the blue Submit button in the top right. Enter a version description (e.g., “Added GA4”) and click Publish.
After publishing, GA4 starts collecting data from your site. Changes take effect within a few minutes.
Method 2: Install GA4 Manually (Direct Code)
If you don’t plan to use GTM or want the simplest possible solution — GA4 can be installed directly via code. This approach suits simple websites with minimal tag management needs.
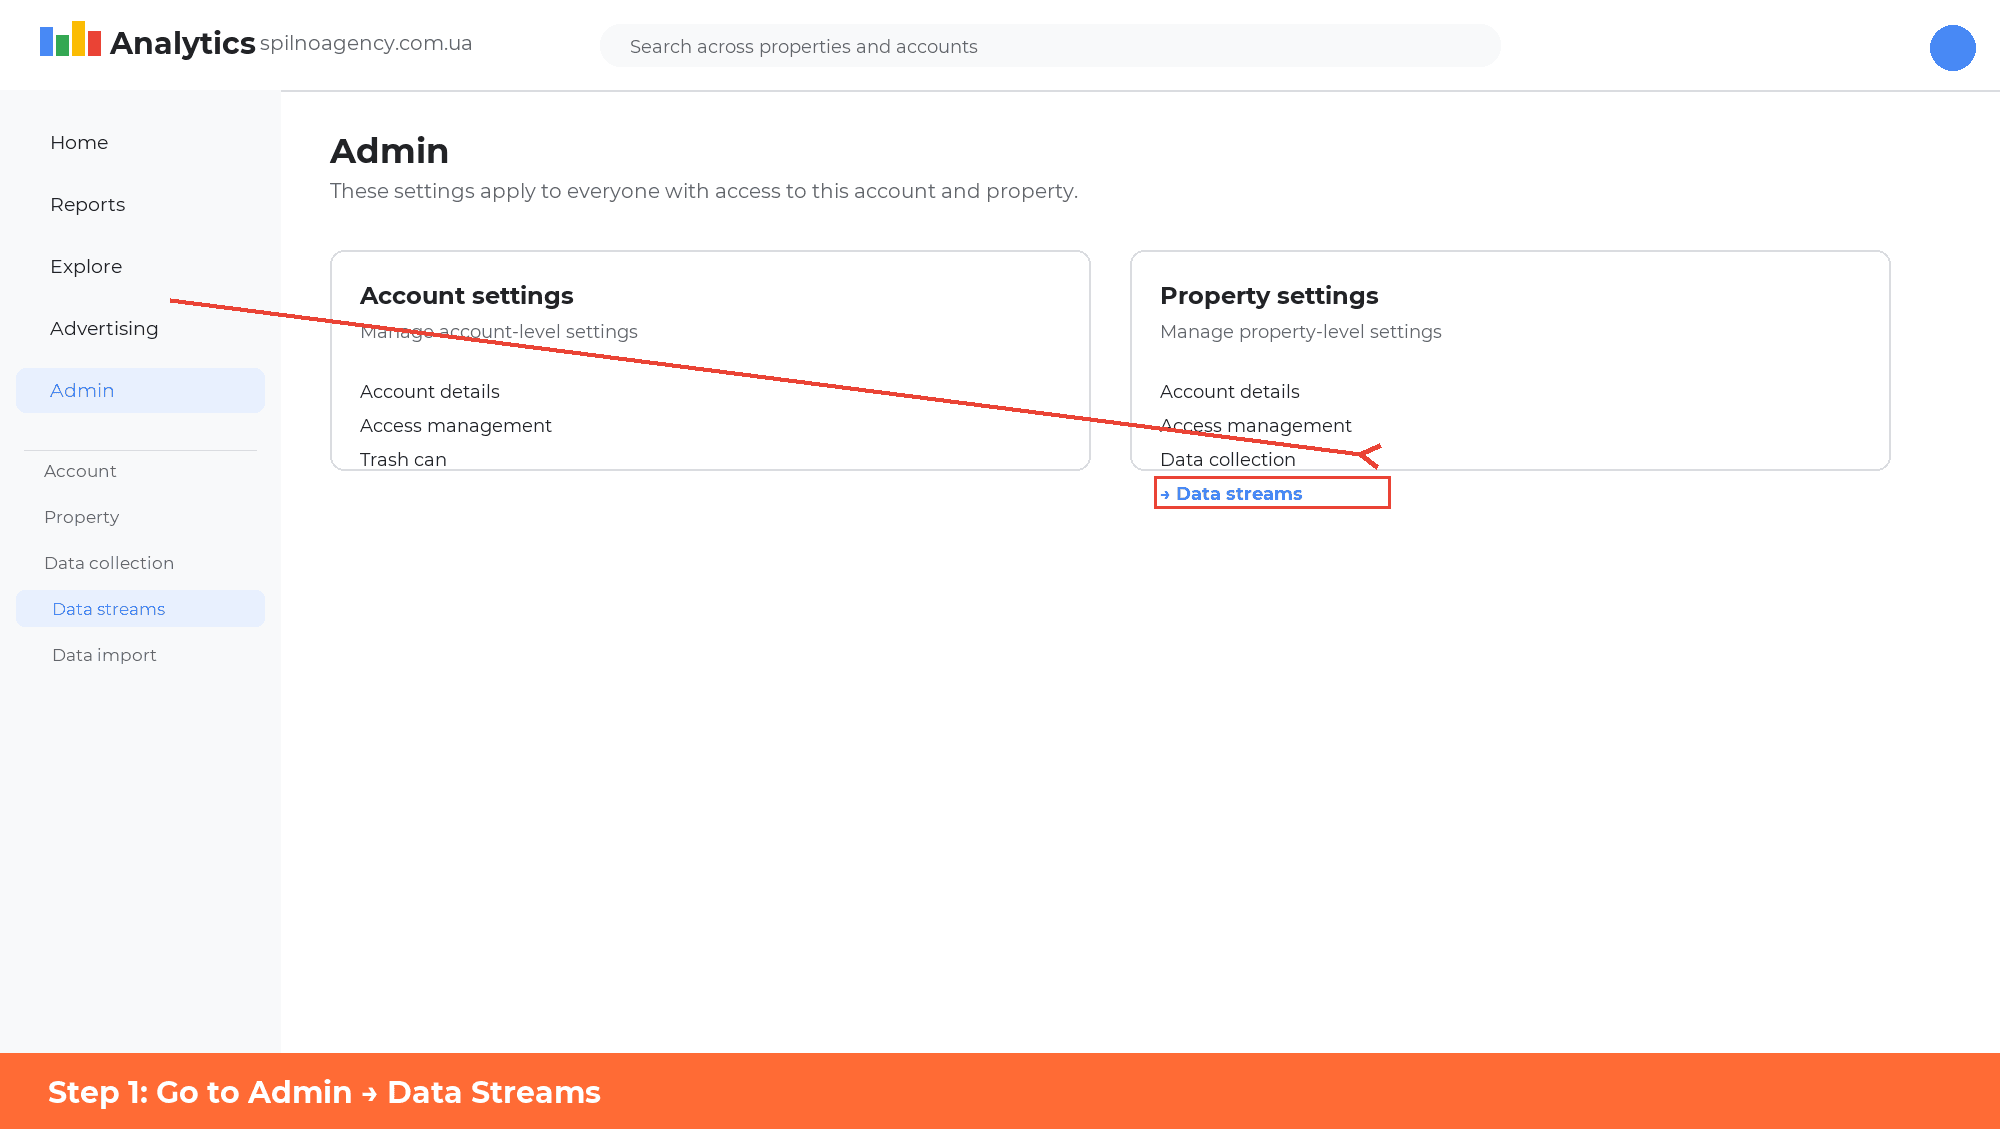
Step 1: Go to GA4 → Admin → Data Streams
If you don’t yet have a GA4 property — you’ll need to create one first. Go to analytics.google.com and sign in. Click Admin (the gear icon at the bottom left), then select Data Streams.
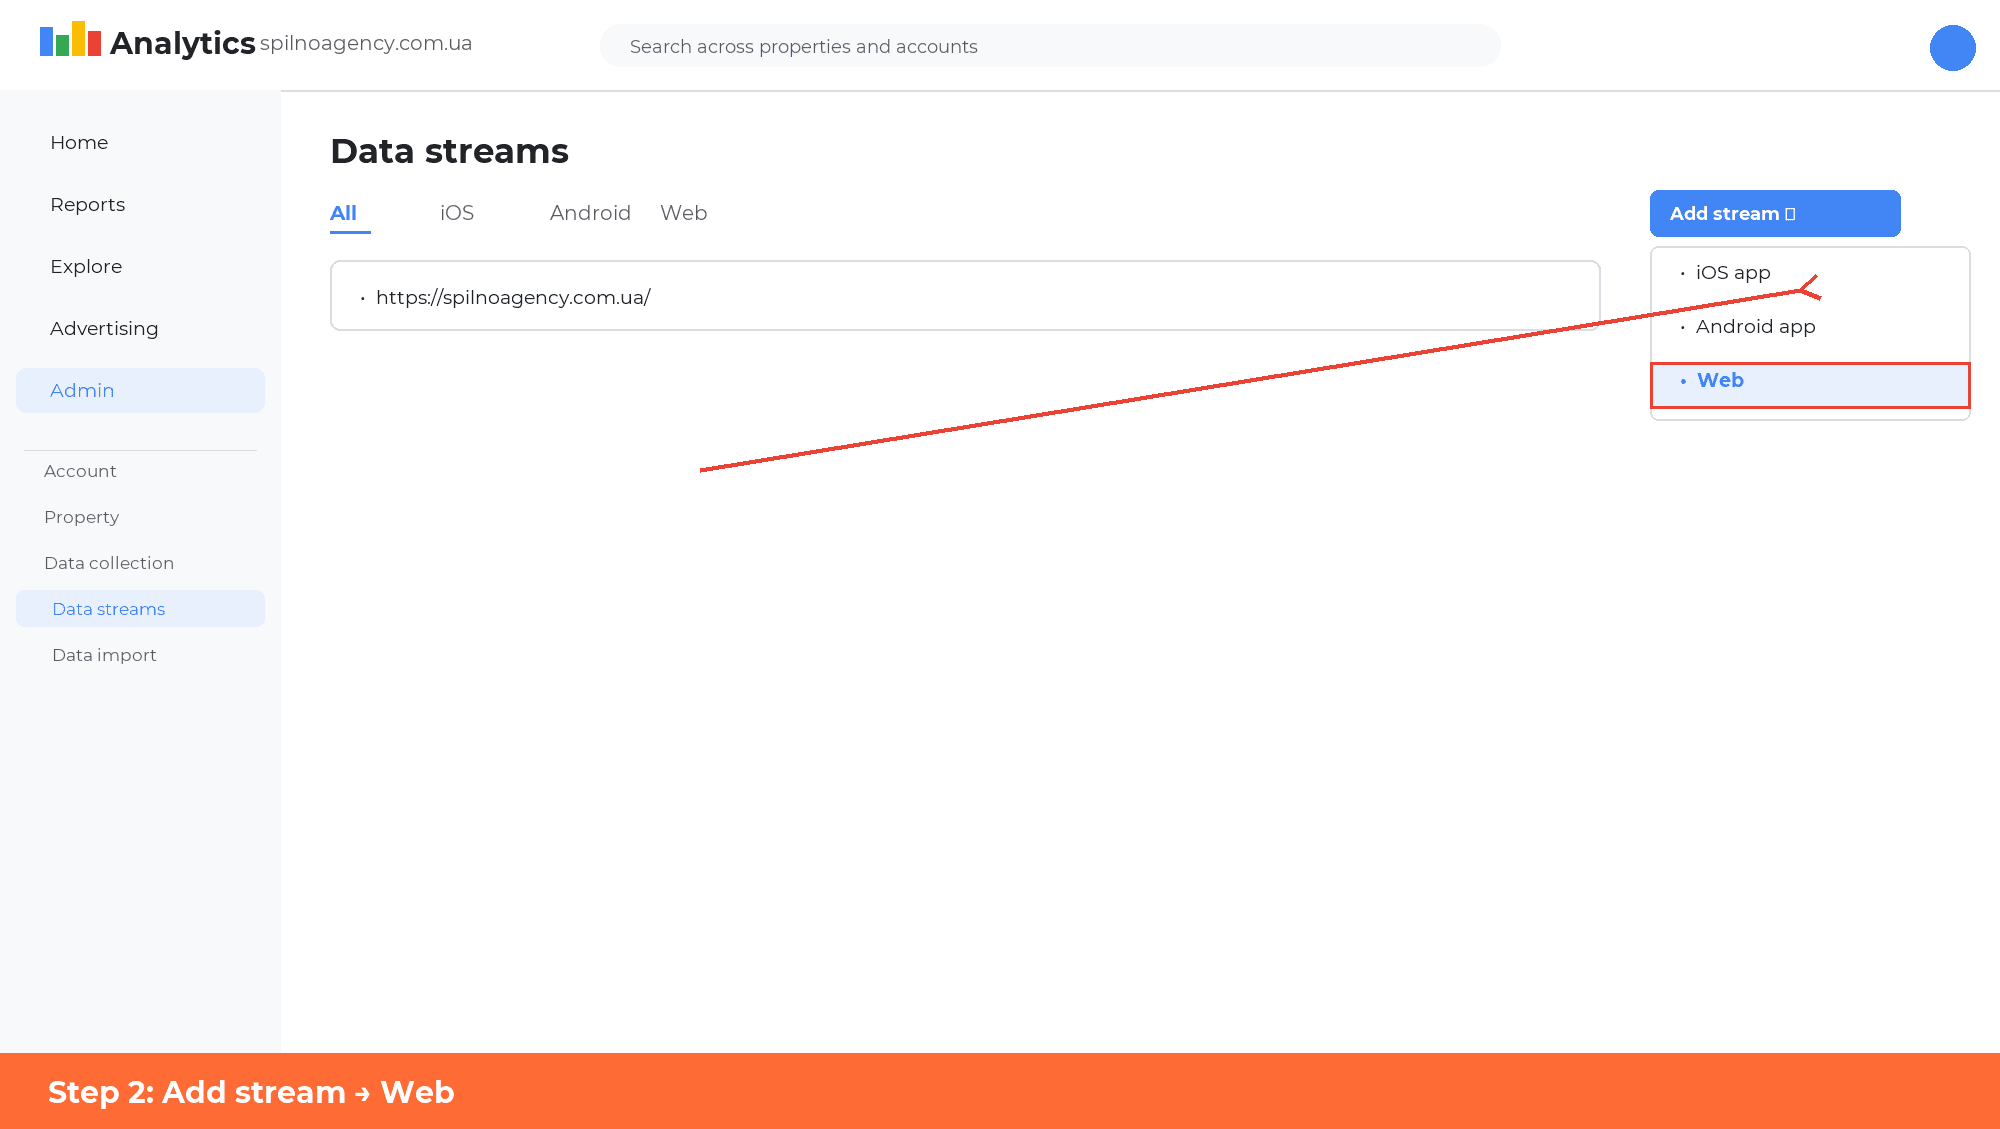
If this is a new GA4 account — click Add Stream → Web, enter your site URL and stream name, then click Create Stream.
Step 2: Find Your Measurement ID
In the Data Streams list, click on your website name. The Web stream details panel will open. At the top of the panel you’ll see the Measurement ID in the format G-XXXXXXXXXX.
Copy this ID — you’ll need it for configuring the tag (in GTM or in the code).
Step 3: Get the gtag.js Tracking Code
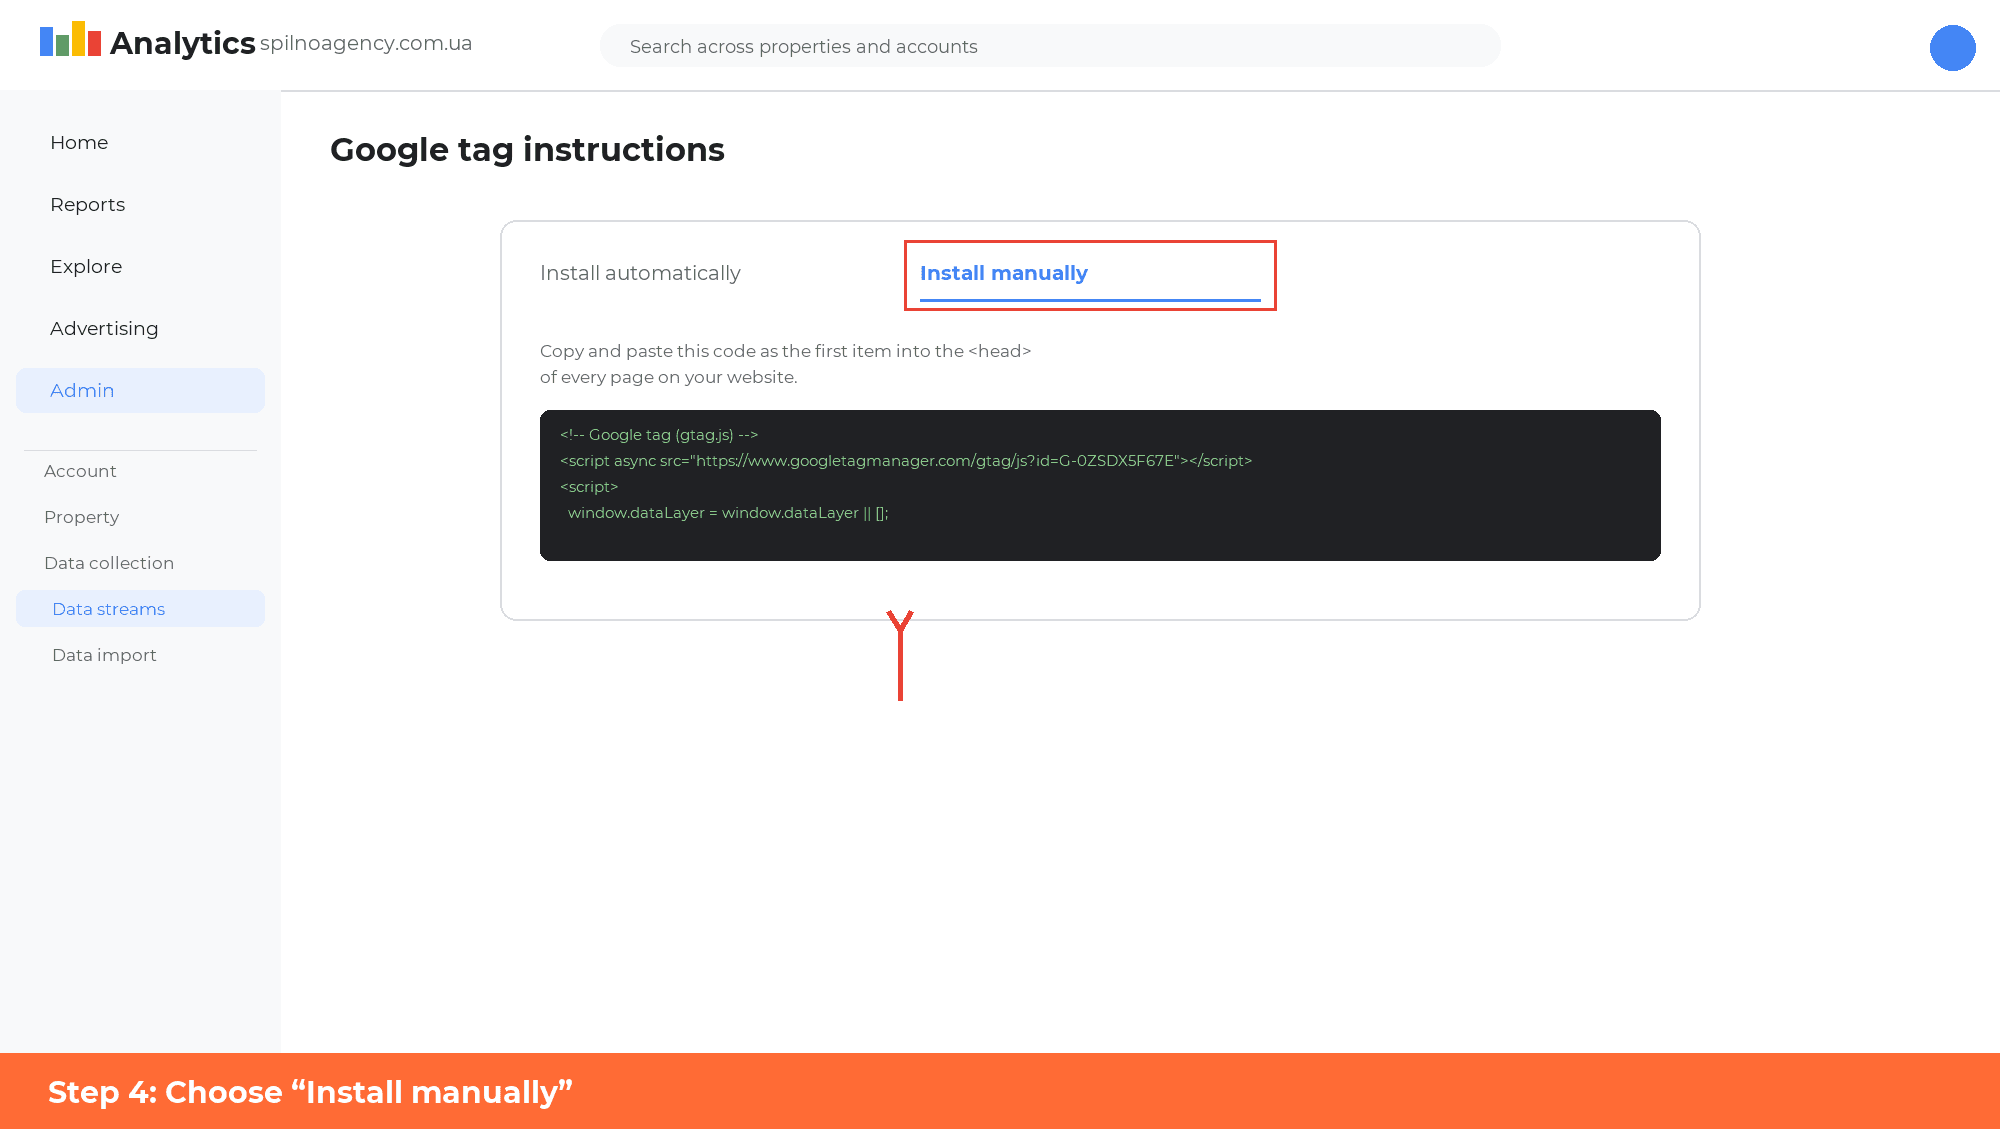
In the same panel, scroll down to the Google tag section and click View tag instructions. In the window that opens, go to the Install manually tab.
You’ll see a code snippet like this:
<!-- Google tag (gtag.js) -->
<script async src="https://www.googletagmanager.com/gtag/js?id=G-XXXXXXXXXX"></script>
<script>
  window.dataLayer = window.dataLayer || [];
  function gtag(){dataLayer.push(arguments);}
  gtag('js', new Date());

  gtag('config', 'G-XXXXXXXXXX');
</script>
Click the copy button in the top right of the code block to copy the entire snippet.
Step 4: Paste the Code Inside <head> on Every Page
The code must be pasted inside the <head> tag — that is, between <head> and </head>. Place it as close to the beginning of <head> as possible.
For WordPress:
- Install and activate the Insert Headers and Footers plugin (or WPCode)
- Go to Settings → Insert Headers and Footers
- Paste the GA4 code in the Scripts in Header field
- Click Save
Warning: do not install both GTM and direct GA4 code simultaneously — this causes double-counting of all visits.
Verifying Your GA4 Installation
After installing, confirm that GA4 is correctly collecting data. There are two quick verification methods:
Method 1: Realtime Report
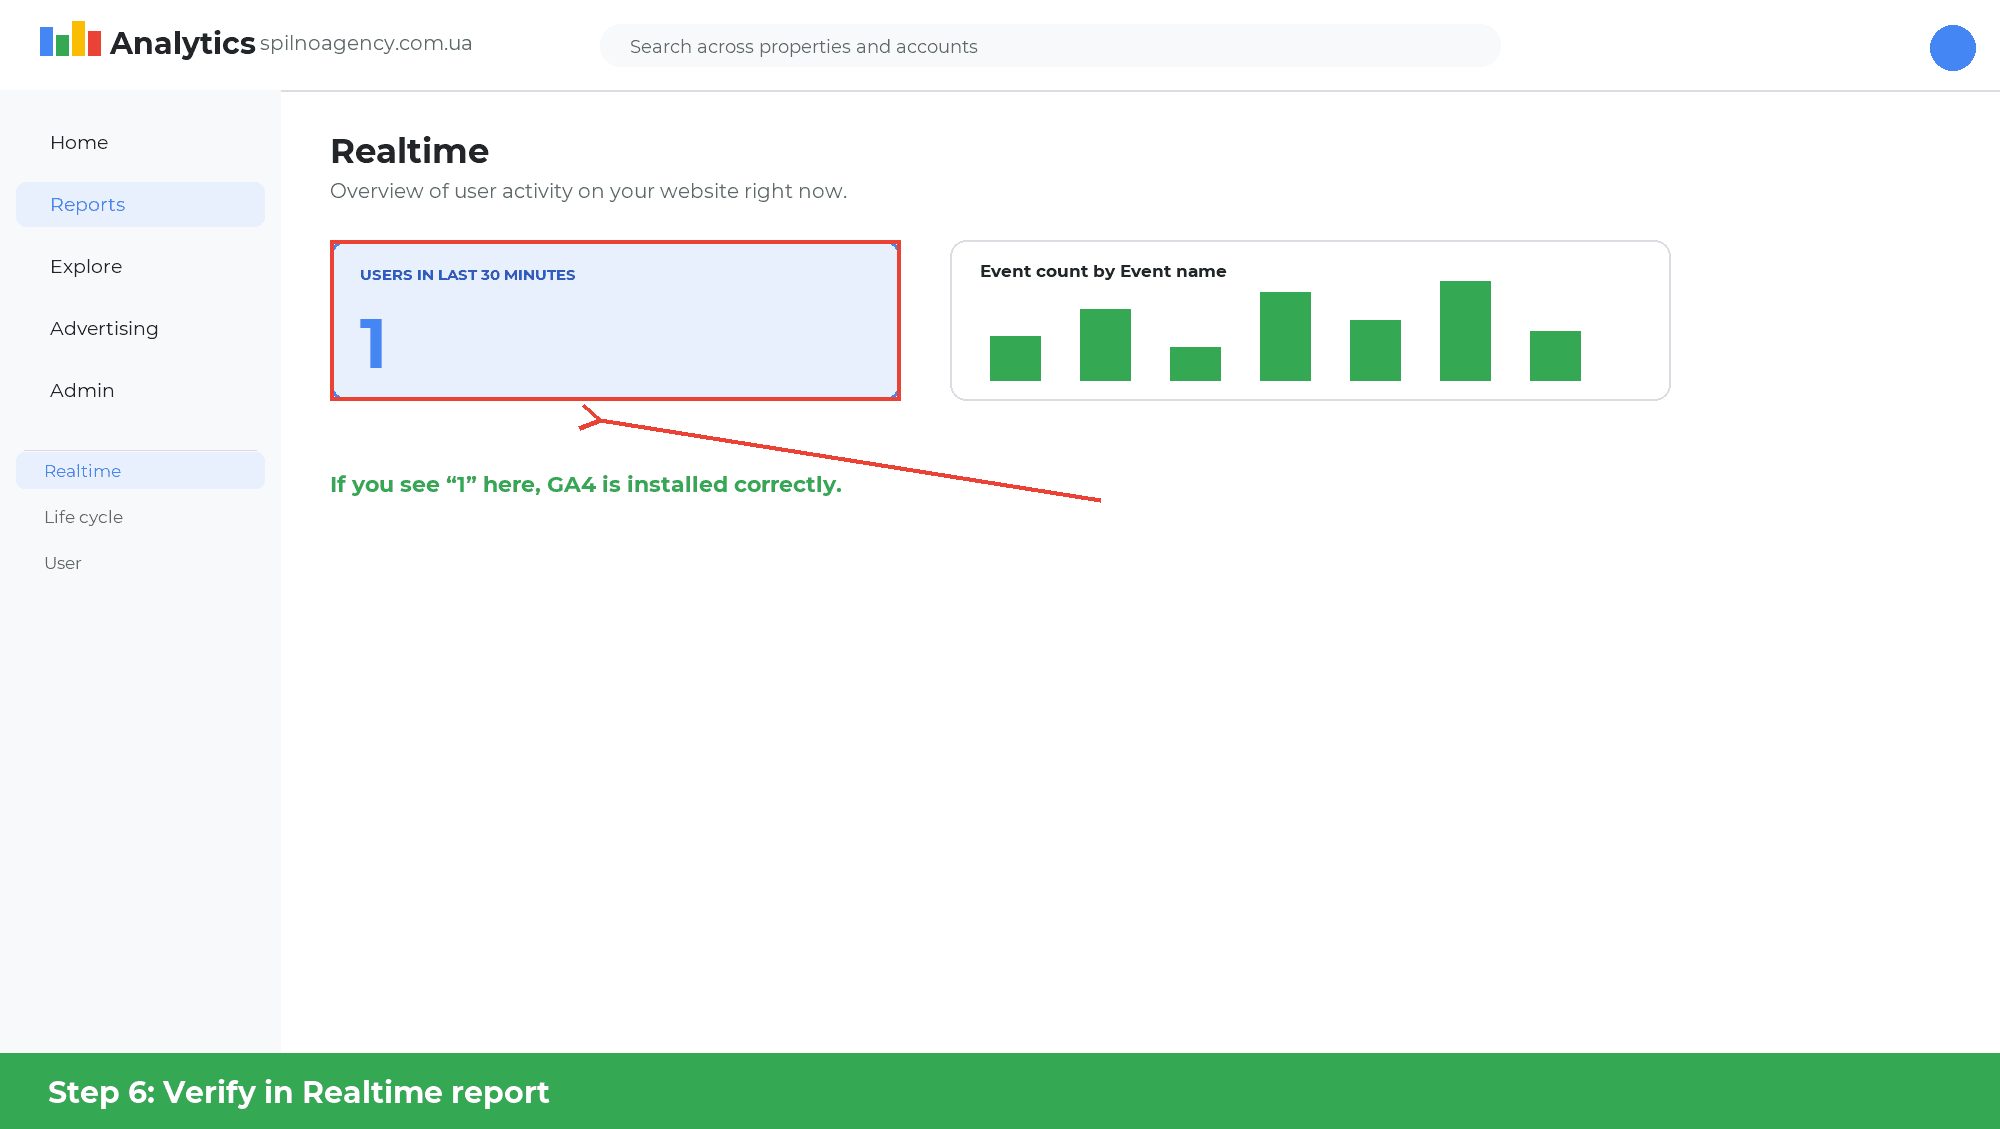
- Open GA4 → Reports → Realtime overview
- In another browser tab, open your website
- Return to GA4 — you should see 1 active user
- If you see it — GA4 is installed correctly
Method 2: GA4 DebugView
For a more detailed check, install the Google Tag Assistant Chrome extension. It automatically activates debug mode, letting you see all GA4 events in real time under Admin → DebugView.
Common Mistakes When Installing Google Analytics 4
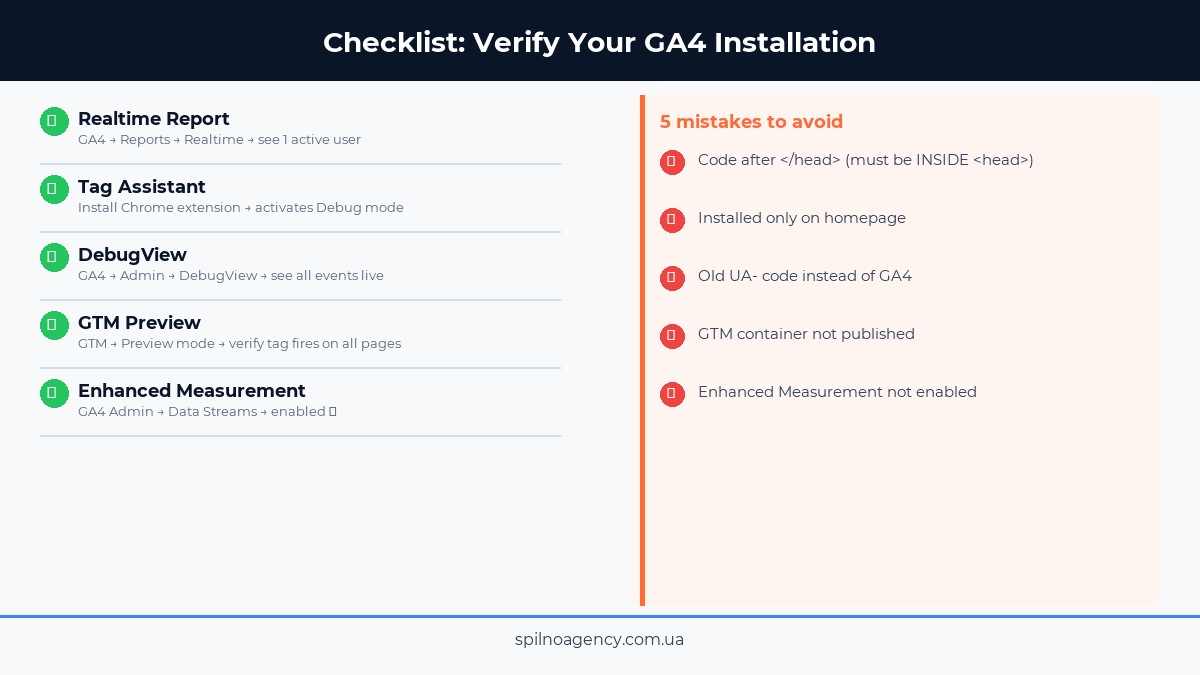
- Code placed after
</head>instead of inside<head>— the most common mistake. GA4 needs to load as early as possible for accurate data collection. - Installed only on the homepage — the code or GTM tag must be on every page of your site, otherwise you only see a fraction of your traffic.
- Using old Universal Analytics (UA) code — UA stopped working in July 2023. If your code starts with
UA-, it is no longer collecting data. - Forgetting to publish the GTM container — after creating or editing tags in GTM, you must click Submit → Publish. Without this step, your changes are not live.
- Not enabling Enhanced Measurement — in your GA4 Data Stream settings, make sure Enhanced Measurement is turned on. It automatically tracks scrolls, outbound link clicks, file downloads, and other important interactions.
Frequently Asked Questions
Is Google Analytics 4 free?
Yes, GA4 is completely free for any traffic volume. Google also offers Google Analytics 360 — a paid enterprise version with advanced SLAs and higher data limits — but the free version covers the needs of the vast majority of websites.
GTM or direct code — which is better?
For most websites, we recommend GTM. It gives greater control, lets you add other tags (advertising, chat, heatmaps) without developer help, and includes version control. Direct code is only suitable for very simple websites with minimal analytics requirements.
How long until data appears in GA4?
The Realtime report shows data instantly. Standard reports (Engagement, Monetisation, etc.) update with a delay of 24–48 hours. Data from Google Ads may display with up to a 72-hour delay.
Can I install both GTM and direct GA4 code?
No. Installing both causes GA4 to count every visit twice, resulting in completely inaccurate data. Choose one method and stick with it.
Does GA4 work with WordPress?
Yes, there are several options: installation via GTM (recommended), direct code in your theme’s header.php, or dedicated plugins (MonsterInsights, Site Kit by Google, WPCode). For most WordPress sites, GTM or Site Kit by Google is the best choice.

Read also

cPanel SEO: How to Optimize Your Hosting for Search in 2026 (Enable & Disable)
cPanel is a hosting control panel that packs dozens of features with a direct impact on SEO: HTTPS…

Cloudflare for SEO: How to Configure It to Improve Search Performance in 2026
Cloudflare works as a proxy and CDN between the visitor and your website, and it can noticeably affect…

How Spilno Agency Does On-Page SEO Optimization with Claude
Spilno Agency runs on-page SEO optimization together with the AI agent Claude — following one document standard that…