How to Grant Access to Google Tag Manager
To grant access to Google Tag Manager, open the container you need, go to Admin → User Management, click «+», enter the user’s email and choose a permission level: Read, Edit, Approve or Publish. The whole process takes about a minute. The key thing is not to confuse account permissions with container permissions — these are two different levels of access.
Handing over access is the step where work with a new contractor most often stalls. The site owner either grants too much (making the agency an administrator of the entire account) or too little (view-only, after which no tag can ever be published). In this guide we break down how to configure Google Tag Manager access properly: which permission levels exist, what each one actually allows, who should get which access, and how to revoke it later.
Why configure access instead of sharing a login and password
The most common practice in small businesses is to hand the contractor the login and password for a Google account. That is a bad idea for several reasons at once:
- No audit trail. In Container Activity every change will be signed with a single name. If a tag breaks, you will not know who actually changed it.
- You cannot revoke selectively. To remove access you have to change the password — and every other service tied to that account loses access along with the contractor.
- Two-factor authentication stops working. Either you switch it off (a risk), or the contractor asks you for a code every single time.
- Google may block the sign-in. A login from a different country or device is often treated as suspicious activity.
The built-in permissions system solves all four problems: everyone works under their own account, actions are logged, and rights are granted precisely and withdrawn in two clicks.
Two levels of access: account and container
This is the key thing to understand before you configure anything. In Google Tag Manager, permissions are granted on two independent levels, and confusing them causes most of the mistakes.

Account permissions
Account permissions govern the GTM account itself: creating new containers and managing the user list. There are only two options here:
- Administrator — can create containers and change other users’ permissions, including removing your own access.
- User — sees basic account data, and nothing more.
An important nuance: the account-level Administrator role does not by itself grant the right to edit tags. It is an administrative permission, not a working one.
Container permissions
Container permissions govern work with tags inside one specific container. This is where a contractor gets their working access. If the account holds several sites, permissions are assigned separately for each container — so an agency running one project will never see the rest.
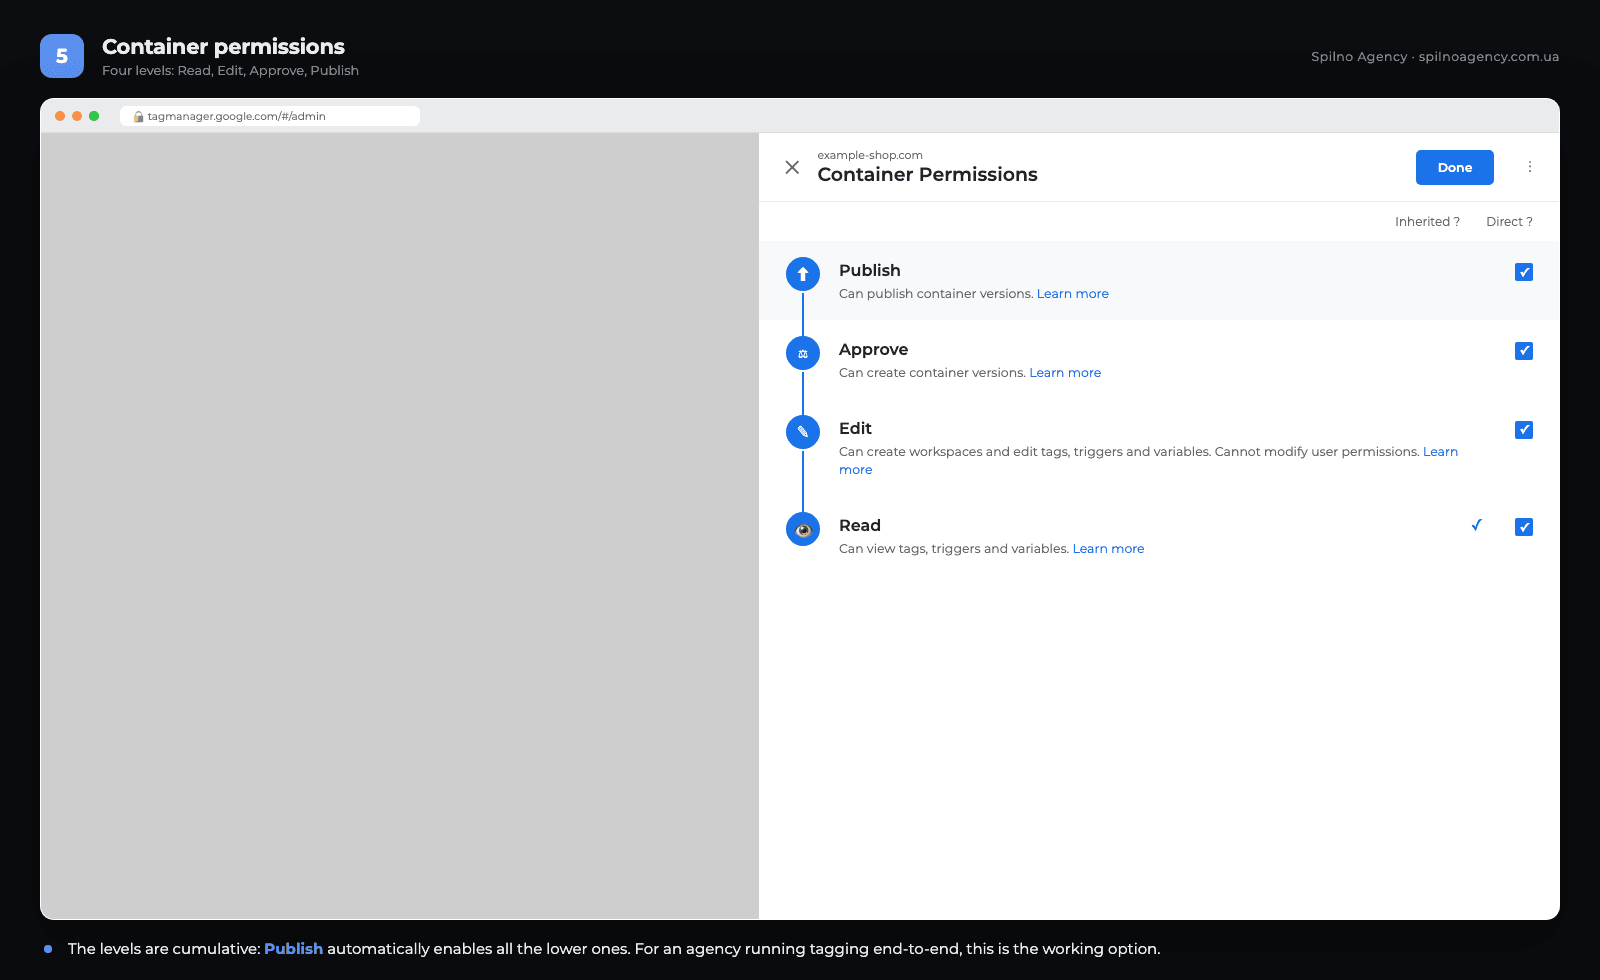
The four container permissions: what each one means
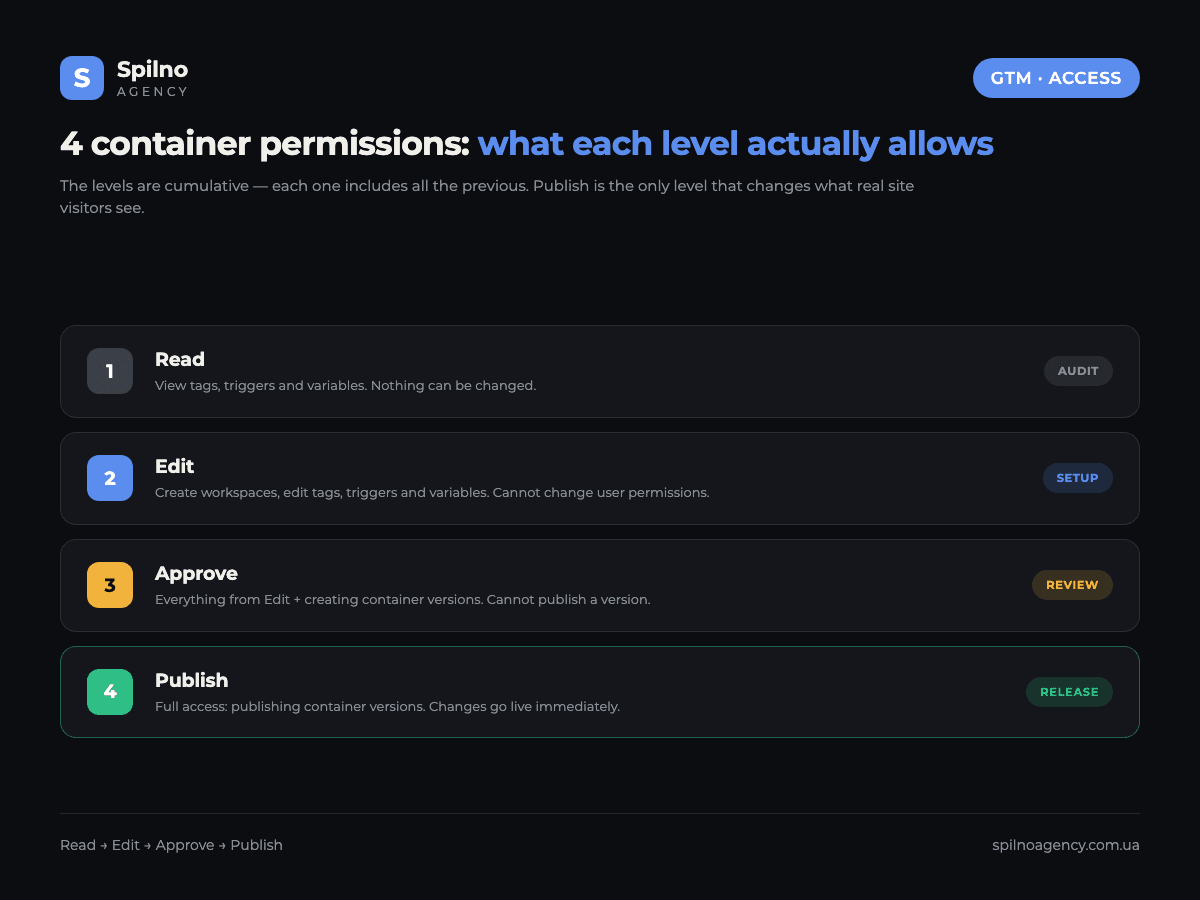
The levels are cumulative: each one includes all the previous. Publish automatically enables Approve, Edit and Read.
| Level | What it allows | What it does not allow |
|---|---|---|
| Read | View tags, triggers and variables, browse version history | Make any changes |
| Edit | Create workspaces, edit tags, triggers and variables | Create versions, publish, change user permissions |
| Approve | Everything from Edit, plus creating container versions | Publish a version to the live site |
| Publish | Full container access, including publishing versions | Change user permissions (that is the account level) |
The practical takeaway: Publish is the only level that actually changes what site visitors see. All the others let someone prepare changes without shipping them. If several specialists work in parallel, it is worth reading how workspaces in Google Tag Manager are structured — they let you run several tasks at once without conflicts.
How to grant access to Google Tag Manager: step by step
Step 1. Open the right container
Go to tagmanager.google.com using an account with administrator rights. Check the account and container name at the top: if you run several sites, access will be granted to exactly the container that is open right now.
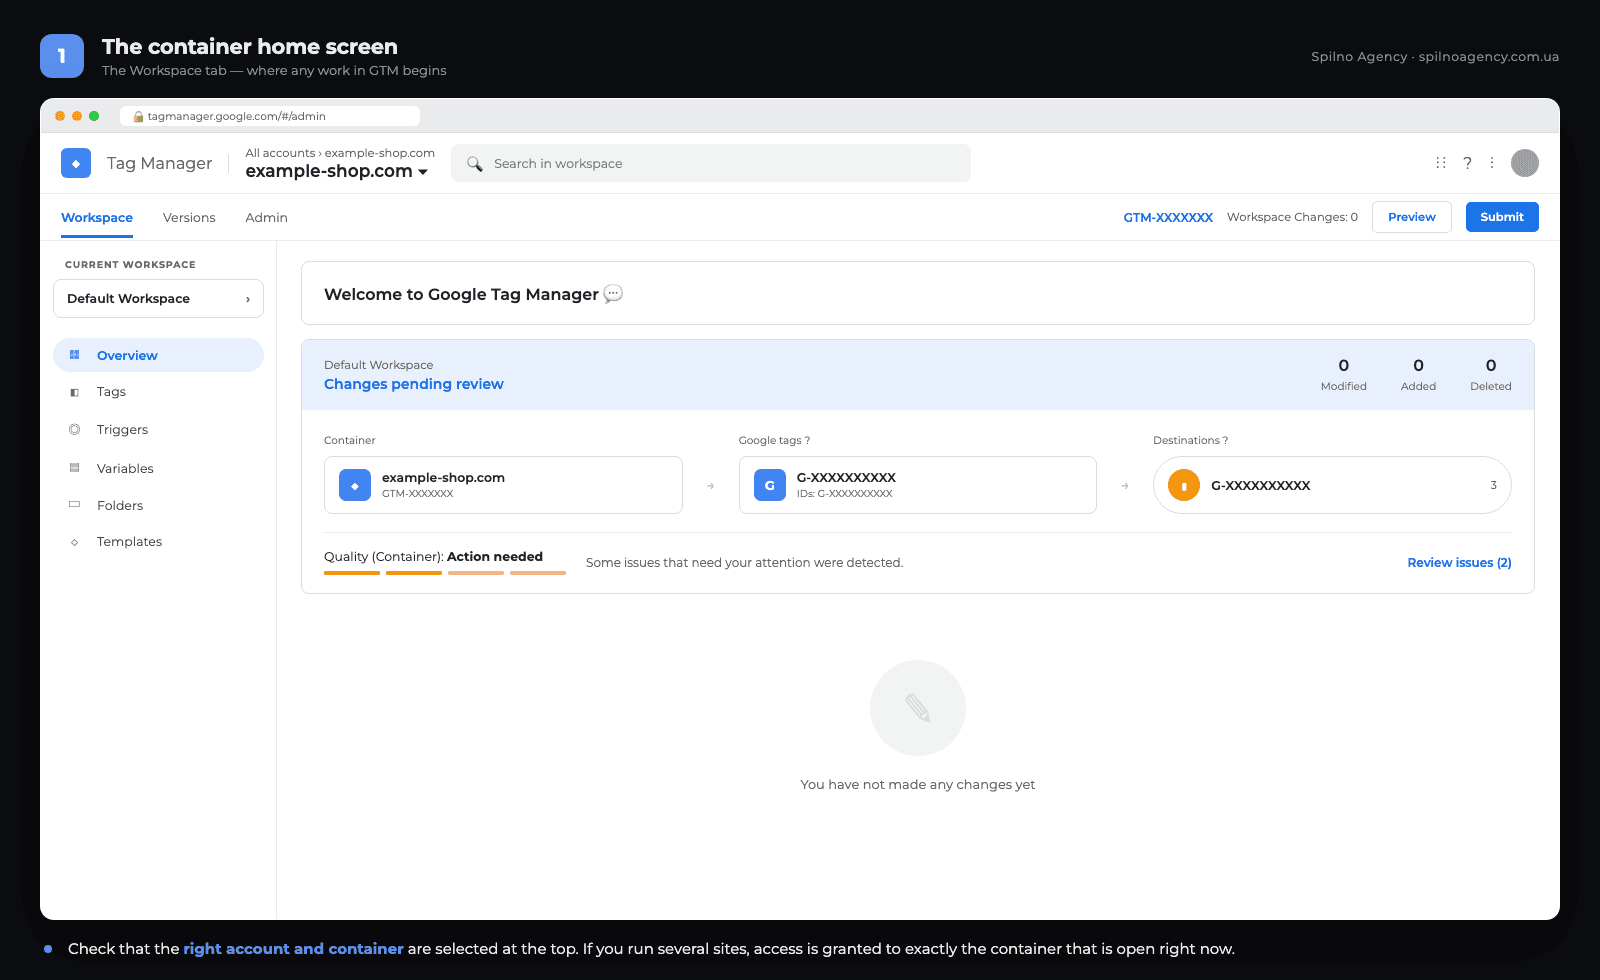
The container ID in the GTM-XXXXXXX format is visible in the top right corner — a convenient way to confirm you are working with the correct site.
Step 2. Go to the Admin section
Select the Admin tab in the top menu. A screen with two columns opens — those are the two permission levels.

Note that User Management appears in both columns. On the left it means access to the whole account and all of its containers. On the right — access to a single container only. For a contractor you almost always want the right-hand column.
Step 3. Open User Management
You will see a list of everyone who already has access: name, email, role and status. Before adding a new person, review that list — it very often still contains contractors you stopped working with a year ago.
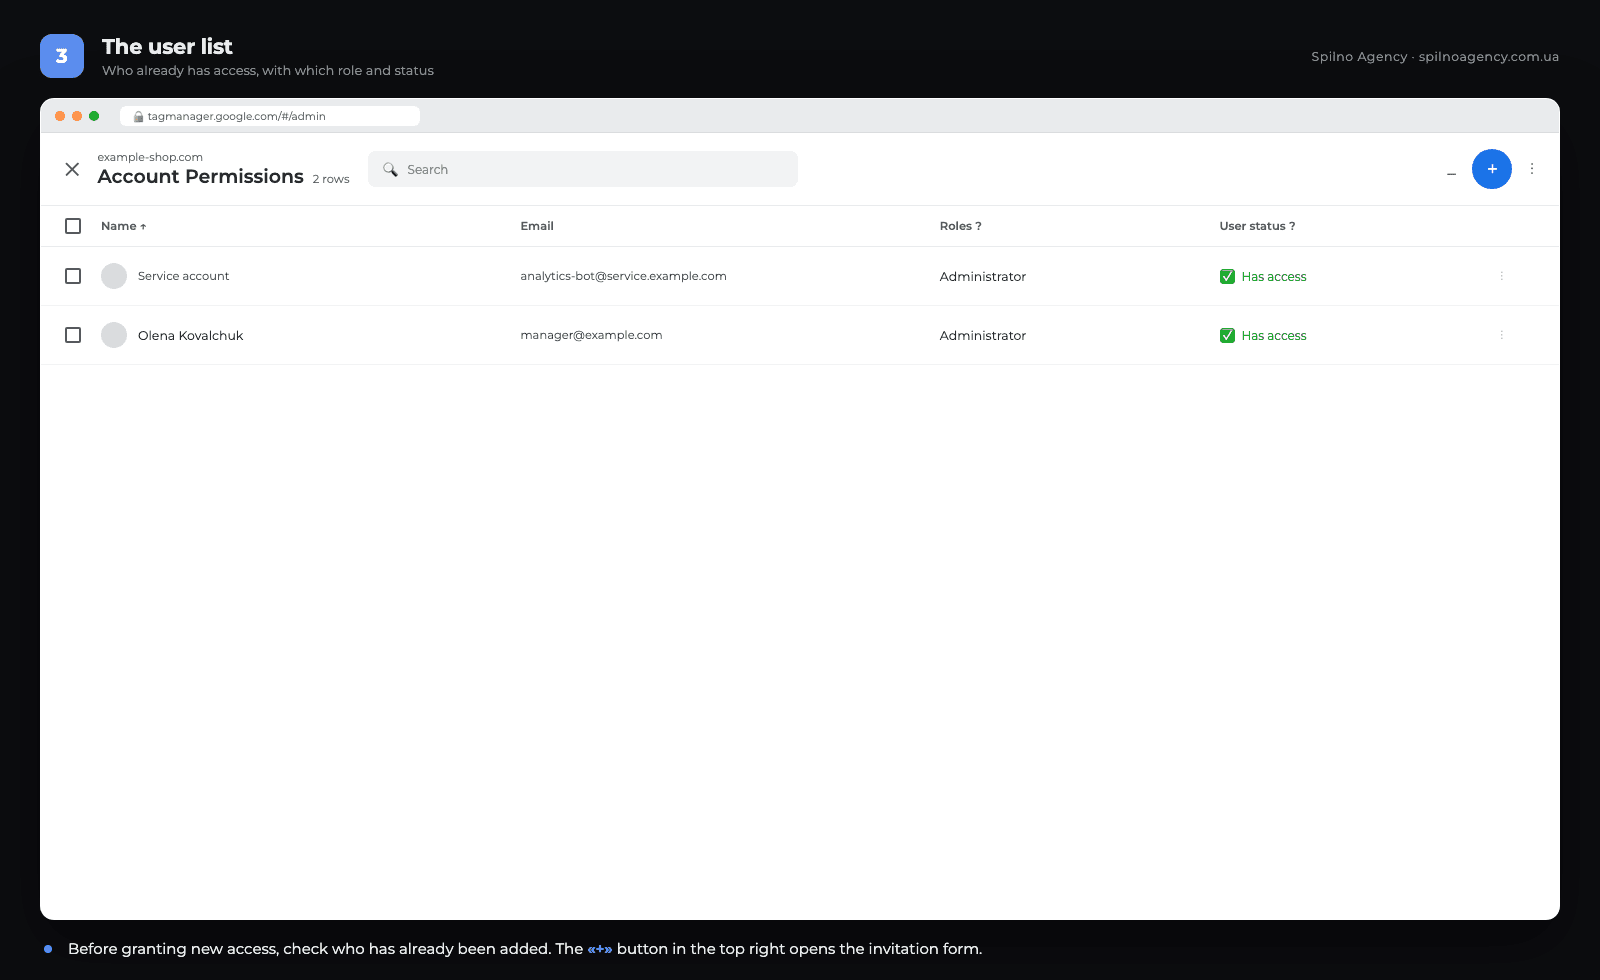
To add a user to Google Tag Manager, click the blue «+» button in the top right corner — it opens the invitation form where every access level is configured.
Step 4. Add the user: enter the email and set account permissions
In the Email addresses field, enter the user’s address. Important: it must be an address linked to a Google account. If you enter a corporate email with no Google account behind it, the invitation will arrive but cannot be accepted.

Below is the Account Permissions block. The Administrator checkbox may be ticked by default. If you do not want the contractor to create containers and manage the user list, untick it and leave only User.
Step 5. Configure container permissions
In the Container Permissions block, click the arrow next to each container. A panel with four levels opens.
Pick the level you need — the lower ones switch on automatically. If there are several containers but access is needed to just one, leave the rest empty: the contractor simply will not see those containers in their interface.
Step 6. Send the invitation
Go back to the invitation screen, check the resulting level next to each container and click Invite.
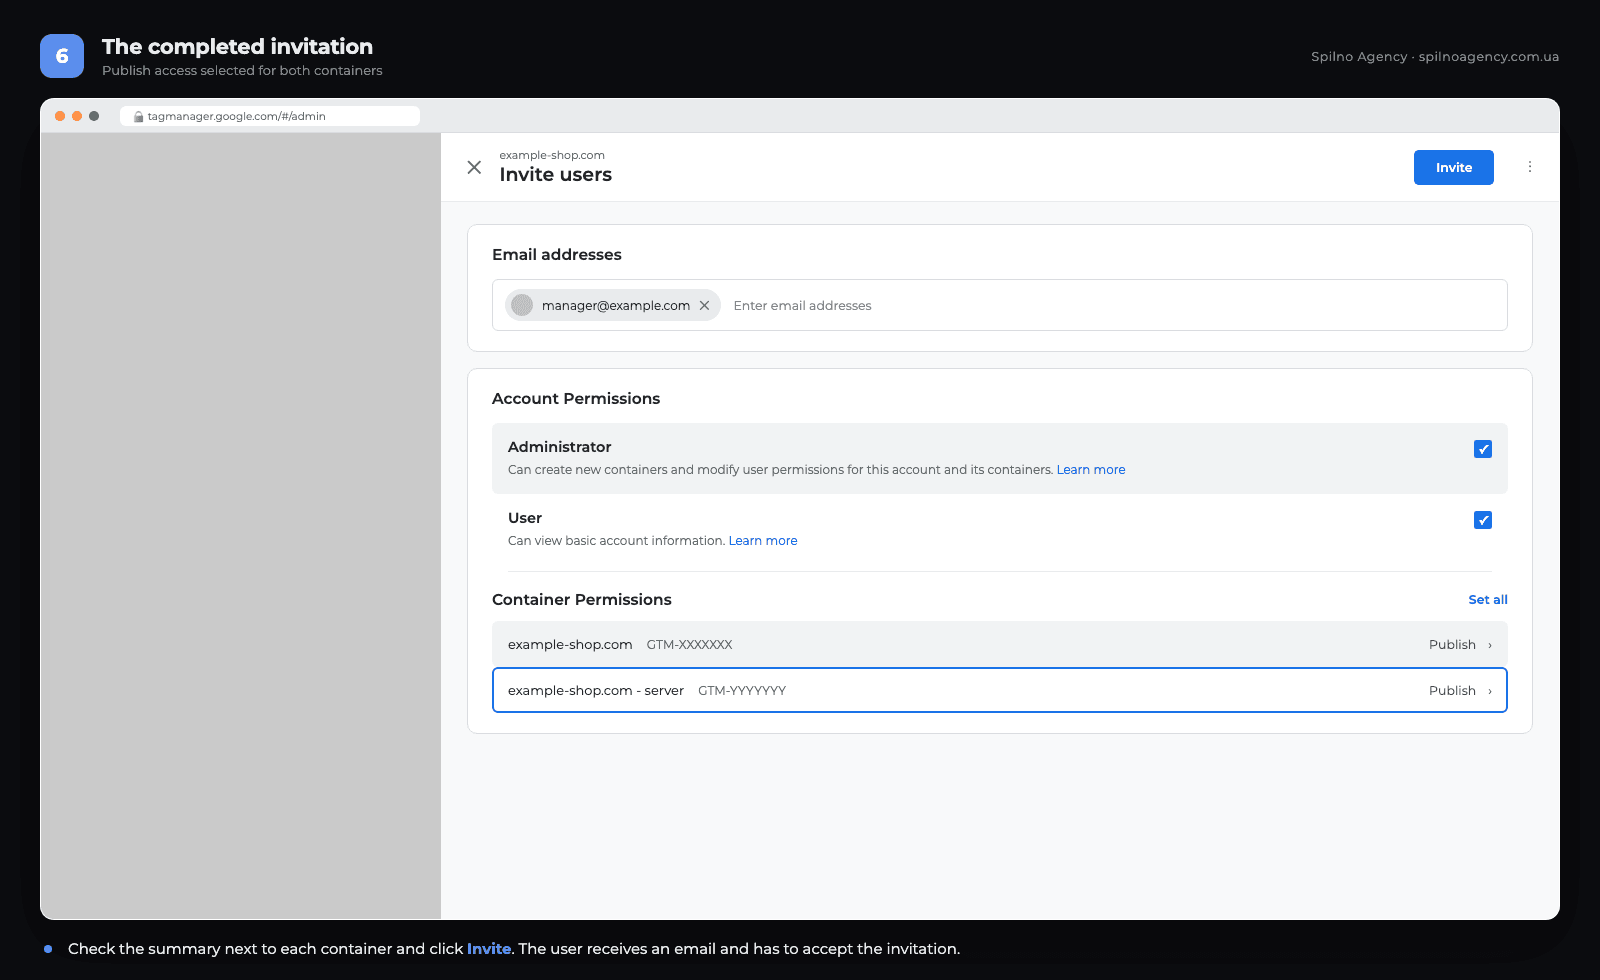
The user receives an invitation email and has to follow the link to accept it. Until then they appear in the user list with a Pending status. Access does not work until the invitation is accepted — this is the most common reason for «I can’t see anything» messages right after permissions are granted.
Who should get which access
The basic security rule is the principle of least privilege: grant the lowest level sufficient for the job. Raising permissions later always takes 30 seconds — undoing the consequences of an accidental publish does not.
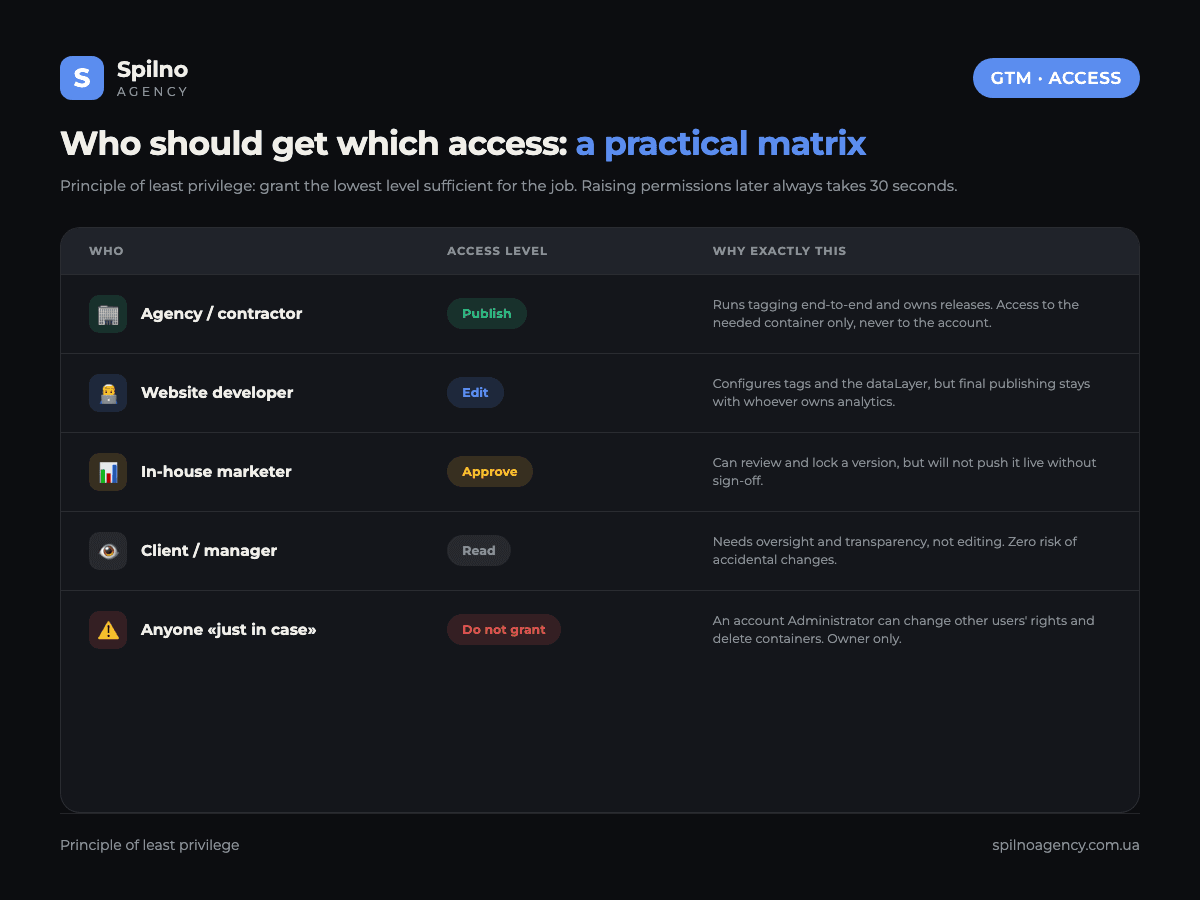
| Who | Account | Container | Why exactly this |
|---|---|---|---|
| Agency running tagging end-to-end | User | Publish | Owns releases and must ship changes without involving you |
| Website developer | User | Edit | Configures tags and the dataLayer, but publishing stays with whoever owns analytics |
| In-house marketer | User | Approve | Can prepare and lock a version, but cannot ship it alone |
| Client, manager, auditor | User | Read | Needs transparency and oversight, not editing |
| Second business owner | Administrator | Publish | The one case where account admin rights are justified |
How to change or remove access
The procedure mirrors granting:
- Open Admin → User Management at the level you need (account or container).
- Find the user in the list and click the three dots on the right of their row.
- Choose Edit permissions to lower or raise the level, or Remove to revoke access entirely.
- To revoke access to just one site out of several, do not delete the user — untick the boxes for that specific container instead.
Changes apply immediately: the user loses access on their next page refresh. Tags they published earlier keep working — removing a user does not roll back their changes.
Access to the server container (server-side GTM)
If you have server-side tracking configured, the account will hold two separate containers: web (GTM-XXXXXXX) and server. In the invitation form they appear as two rows, and permissions are granted for each of them separately.
A typical mistake is granting access to the web container only, then wondering why the contractor cannot see the server-side tags. If the agency owns the whole analytics stack, they need both. If a separate development team runs the server side, split it: the web container for marketers, the server container for developers.
6 mistakes when granting GTM access
- Granting account-level Administrator instead of container access. The contractor gets the right to manage users but may still be unable to publish tags. Too much and too little at the same time.
- Granting Read and expecting results. At that level it is impossible to create a tag or publish a change. Actual work needs Edit at minimum.
- Forgetting the server container. Half the setup turns out to be unreachable, and it surfaces mid-project.
- Not checking that the invitation was accepted. A Pending status means there is effectively no access.
- Entering an email with no Google account. The invitation arrives but cannot be accepted — the address has to be registered with Google.
- Never reviewing the user list. A quarterly access audit is basic hygiene: the list usually still holds former contractors and employees.
Checklist before you hand over access
- You remain the account administrator and are not passing that role to the contractor.
- The correct container is selected — the exact site the contractor is meant to work on.
- The access level matches the job: Publish for whoever owns releases, Edit for whoever only prepares tags.
- If a server container exists, you have decided whether access to it is needed.
- The email is linked to a Google account.
- A day later you checked that the status changed from Pending to Has access.
- There is a calendar reminder to review the user list in 3 months.
If GTM is not installed on the site yet, start with the terms of reference for installing the GTM code — it spells out exactly what to hand your developer.
Frequently asked questions
How do I grant access to Google Tag Manager?
Open the container at tagmanager.google.com, go to the Admin tab, choose User Management in the Container column, click «+», enter the user’s email and set the container permission level: Read, Edit, Approve or Publish. Click Invite — the user receives an email and must accept the invitation.
What access levels exist in Google Tag Manager?
Two levels. At the account level — Administrator (creating containers and managing users) and User (viewing basic data). At the container level — four cumulative permissions: Read, Edit, Approve, Publish.
What access should I give an agency or contractor?
The optimal setup is User at the account level and Publish at the level of the specific container. The agency can work with tags fully and publish changes, but gains no right to manage the user list or create new containers.
Can I grant access to just one container?
Yes, and that is exactly the right way to do it. In the invitation form, permissions are configured separately for each container. If you leave the other containers without permissions, the user will not even see them in their interface.
How do I remove a user from Google Tag Manager?
Admin → User Management → find the user → three dots on the right of the row → Remove. To revoke access to one site only, untick the permissions for that container instead of deleting the user.
What is the difference between Approve and Publish?
Approve allows creating a container version — locking in a set of changes without shipping it. Publish allows pushing that version live, after which the changes start working on the site. This pair works well for a «marketer prepares, owner publishes» workflow.
Why can’t the user see the container after access was granted?
Three typical reasons: the invitation has not been accepted yet (Pending status), access was granted to a different container, or the email is not linked to a Google account. Check the status in the user list — it should read Has access.
How many users can be added to one container?
Google Tag Manager sets no practical cap on the number of users for standard accounts. The real limit is organisational: the more people with publishing rights, the higher the risk of uncoordinated changes. One or two people with Publish is optimal.
Need help setting up analytics and tagging? Spilno Agency runs GTM, GA4 and server-side tracking end-to-end for businesses across Europe — from the technical brief to verified events in your reports.
Read also
Spilno Agency’s Experience: How We Verify Events Before Starting Work
Before launching a campaign in Google Ads or Meta Ads, or starting SEO work, Spilno Agency always checks…
GA4 DebugView: How to Verify Google Analytics Events in Real Time
DebugView is the section of Google Analytics 4 that shows your site’s events in real time, seconds after…

Top Claude Skills for TikTok Ads Specialists (2026)
9 verified Claude skills and MCP servers for TikTok Ads: Pixel/Smart+ audits, Spark Ads hook/hold rate, creator sourcing,…